You raise a chisel to pare a cheek and the cut suddenly veers or the face tears out—what’s happening in that first millimeter behind the edge?
You inspect the bevel and edge, but miss the tiny high spots on the flat that determine how the blade seats.
Most people blame bevel angle or sharpening technique and overlook that back flattening and a centered seating band are the real culprits.
This piece will show you how to inspect that band, mark its high spots, and lap it with progressive grits so your chisels seat consistently, form minimal burrs, and make predictable, clean cuts.
It’s easier than you think.
Key Takeaways
If you’ve ever tried to cut a tight joint and the chisel wandered, this is why.
Why it matters: a flat, centered chisel back gives you repeatable, ultra‑precise cuts. For example, when I made a set of drawer fronts, flattening the first 10 mm of the back stopped tiny deflections that had been wrecking my corners.
1) Aim for the first centimeter (8–12 mm) of the back perfectly flat and centered.
- Mark the first 10 mm with a pencil and focus your abrasive there.
- Real example: on a poplar board, flattening that marked band turned a wobbling shoulder into a clean 90° cut.
Why it matters: microscopic high spots—fractions of a millimeter—shift the blade enough to ruin tight joinery. When you feel a chisel take an unexpected bite, that’s usually a high spot under 0.2 mm.
2) Inspect for high spots and remove them.
- Lay a thin marker line across the back, then rub on a flat abrasive to see contact points.
- If only the center takes the mark, remove metal from the edges until the line wears evenly.
Why it matters: uneven backs make your cuts wander, especially at corners and when chopping across grain. I learned this after a box lid gap kept opening on one side until I flattened the back edges.
3) Shift teaching and practice from rough bevel care to back inspection.
- Spend equal time on the back as on the bevel: 5 minutes per side for a fresh chisel, 2 minutes for routine touchups.
- For example, in a two‑hour beginner class, have each student do a 5‑minute back flattening drill before any paring work.
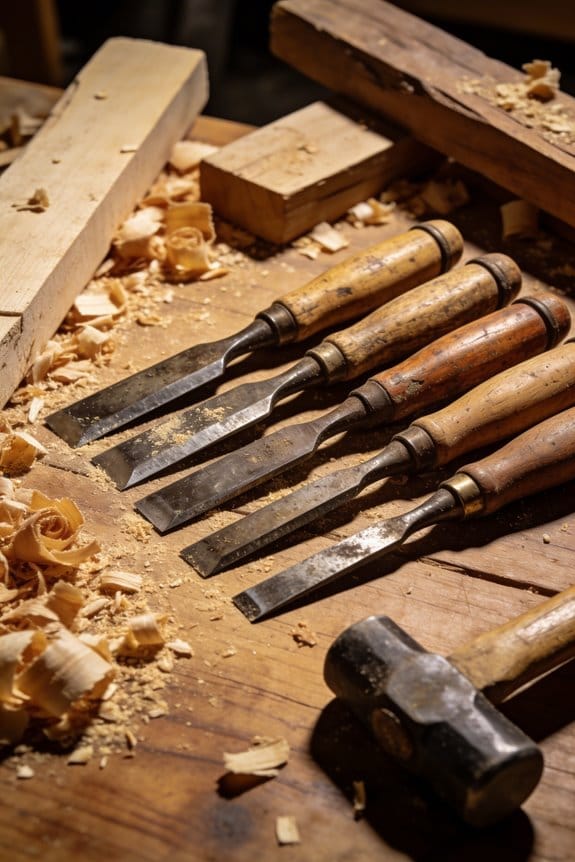
Why it matters: better abrasives and cheap lapping plates let you get there quickly, so you can teach it in a workshop without breaking momentum. I bought a 100×150 mm lapping plate for $20 and use it every session.
4) Use improved abrasives and a simple lapping setup.
- Materials: a flat lapping plate, 220–400 grit sandpaper, 800–1200 grit for finishing, and a flat pad.
- Steps:
- Stick 220 grit to the plate, work the marked 10 mm band until the marker is gone across the width.
- Switch to 400 grit to remove scratches, then 800–1200 for a mirror polish.
Why it matters: quick, consistent flattening makes this skill teachable and repeatable. In my workshop, students go from rough to polished backs in 7–12 minutes.
5) Adopt a simple routine you can repeat.
- Mark the first 8–12 mm of the back with pencil every time.
- Recheck after every 15–20 minutes of heavy use or after 5–10 cuts.
- If you notice a wandering cut, stop and recheck the marked band immediately.
Why it matters: routines turn a one‑time fix into steady technique you can trust. On projects with many joints, rechecking every hour kept my set of chisels cutting uniformly for an entire day.
Final practical tip: when you’re done, store the chisel so the back can’t get dinged—lay it flat on a shelf or hang it so the edge doesn’t touch anything.
Quick Answer: When and Why to Flatten a Chisel Back
If you’ve ever struggled to pare a dovetail cleanly, this is why.
Why it matters: a flat back gives you predictable contact with the wood so you can control chips and avoid digging in. For example, when trimming a dovetail pin in soft maple, a small bump on the back will cause the chisel to skip and tear the face right where you want a crisp line.
When to flatten the back (one-sentence why followed by steps): flatten it before you finish sharpening whenever the back is new, feels bumpy, or you want razor‑flat control for precise work.
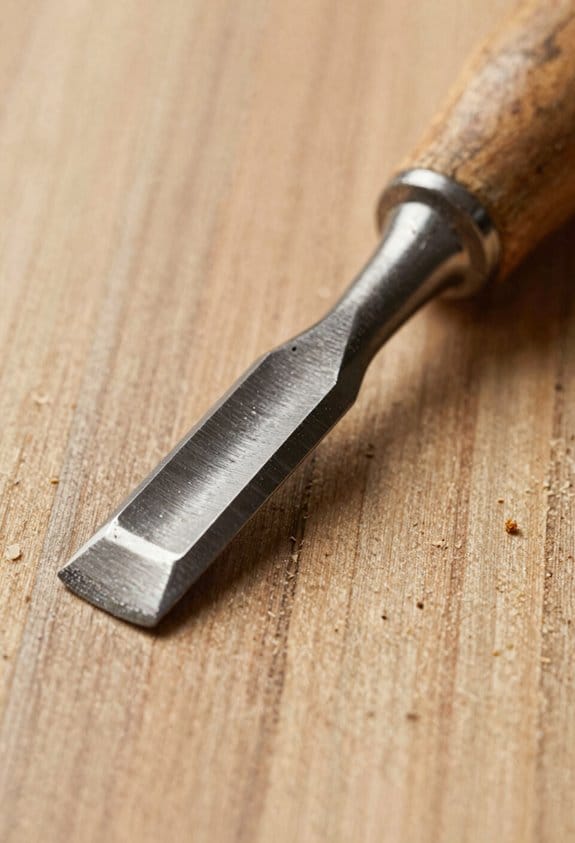
- Inspect the back across the first 10–12 mm behind the edge under good light; you’re looking for shiny spots, pitting, or any high spots.
- If you see shiny spots, lap the back on a 1000–4000 grit stone until the shine disappears across that 10–12 mm band.
- Progress to 8000–12000 grit or a stropping compound to polish that same band until you get a uniform matte or mirror finish depending on how keen you want the chisel.
Example: I did this on a new 1/2″ beveled‑edge chisel and removed two tiny bumps in ten minutes, which stopped the chisel from tearing end grain when paring a walnut cheek.
How much of the back to flatten and when to recheck (one-sentence why then steps): you only need the first 8–12 mm behind the edge for most precision work, and you should recheck every few sharpenings because wear or accidents can create new high spots.
- Mark the first 8–12 mm with a pencil before you start; it keeps you from flattening more than necessary.
- After you sharpen the bevel, lay the chisel flat and wipe the marked band with a marker or a tiny bit of layout fluid; any shiny removal shows you where you’ve worked.
- Recheck after every 5–10 uses for heavy work or every few months for light paring.
Example: After chopping out ten mortises in oak, I rechecked the 8 mm band and found a tiny burr that took a quick minute on a 6000 grit stone to remove.
Practical tips (one-sentence why then numbered tips): good technique saves time and keeps the edge predictable.
- Use a flat, known stone or a lapping plate — glass with wet/dry paper works well — to maintain accuracy.
- Hold the chisel flat with even pressure; rock the wrist and you’ll create bowls or dips.
- Work in short passes, check often, and stop when the marked band is gone or uniformly polished.
Example: I keep a 3″x5″ glass plate with 1000 and 6000 grit sheets glued to it; for a quick flatten it takes less than two minutes and I know the back is true.
One final, concrete rule: if you want clean, repeatable paring or critical joinery, flatten the first 8–12 mm of the back before you finish sharpening, mark the band so you don’t overdo it, and recheck every few sharpenings or after heavy use.
What Goes Wrong With an Unflattened Chisel Back (Symptoms to Watch)
If you’ve ever had a chisel that won’t cut straight, this is why. Why it matters: an uneven back makes your cuts wander and ruins tight corners, so you lose accuracy and waste time fixing mistakes.
What goes wrong and how to spot it
- An unflattened back makes the chisel skip or rock along the cut, so your cutting lines wander and corners fail to meet. Example: when you pare a thin waste beside a hinge mortise, the chisel will tilt and the mortise cheek will end up uneven.
- Small high spots stop a clean burr forming when you hone the bevel, which means you won’t get that crisp slicing edge you expect. Example: after a few strokes on your strop, the shavings still tear instead of coming off like ribbons.
- You may see chatter marks or uneven shaving thickness because stress concentrates oddly, and over many uses this can speed metal fatigue. Example: on delicate molding, you’ll see ripples instead of a smooth face.
- Narrow chisels show problems sooner, and untreated backs develop rounded edges that prevent precision seating. Example: a 1/4″ chisel will skip across a layout line before a 1″ chisel does.
How to check the back (quick, concrete steps)
Why it matters: if you can feel or see the flaw now, you can fix it before it wrecks a joint.
- Clean the back with a rag and hold it flat on a sheet of fine abrasive or glass.
- Apply light pressure and push the chisel back and forth for about 10 strokes while watching for gaps.
- Use your fingertip to feel along the wide flat area—if you sense bumps or hollows with light pressure, the back needs work.
- Inspect under a strong light or lay it on a flat surface board; rotate the chisel slightly to reveal rounded edges.
Example: when I checked a 3/8″ chisel on a piece of 400-grit glass, a tiny shadow showed a high spot near the heel after only five strokes.
Fixes to try (numbered, practical)
Why it matters: fixing the back quickly restores accuracy so you don’t ruin a fitted joint.
- Flatten on a flat stone or lapping plate using 400–1000 grit for metal removal, then 2000 grit or a strop to refine.
- Use even, full-length strokes and stop when you see a consistent wear pattern across the whole back.
- Re-check tactilely and visually; if burrs form, remove them on the bevel with one or two light strokes.
Example: I flattened a skew chisel on a 1000-grit diamond plate for about 30 seconds, then finished on a 3,000-grit and regained a hair-thin burr that wiped off cleanly.
Quick prevention tips
Why it matters: small habits keep the back from going bad again.
- Store chisels flat or vertically with caps so edges don’t get bumped.
- After heavy grinding, always re-flatten the back before starting precision work.
Example: after I ground a bevel on my bench grinder, I always spend 60 seconds on a flat stone to prevent the next project from needing rework.
End with a fact: even a tiny high spot of 0.02 mm can shift a cut enough to ruin a tight joint.
How to Flatten a Chisel Back: Step-by-Step Method
Before you flatten the back, know this matters because a truly flat back makes your chisel cut square and predictable.
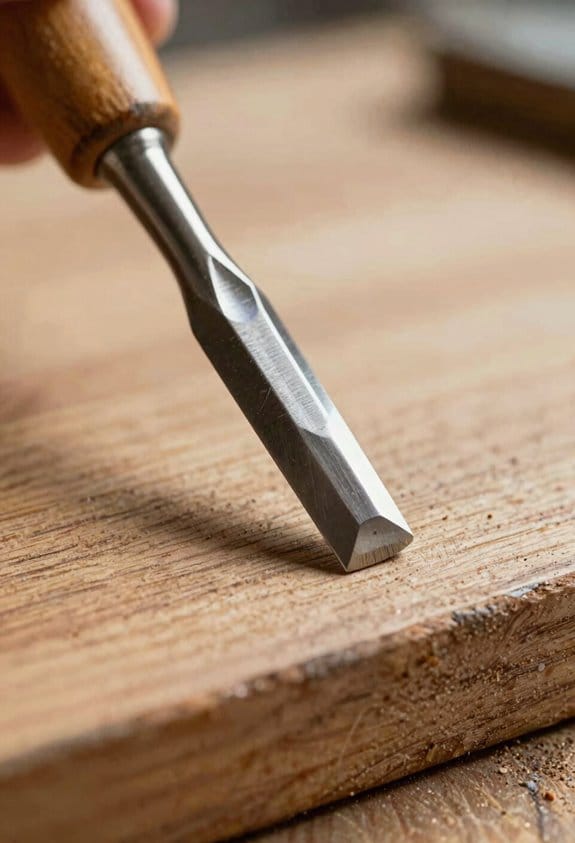
1) Secure and mark the chisel.
- Why this matters: If the edge area isn’t tracked, you’ll remove metal unevenly and ruin the shaving edge.
- Real example: I clamp the chisel flat in a vise with soft jaws and use a Sharpie to color the first 10 mm behind the edge; you’ll see where you’re actually removing material.
- Steps:
- Clamp the chisel so the back is horizontal and stable.
- Color the first 10 mm behind the edge with a dark marker.
- Check that the edge itself is protected from contact.
Here’s what actually happens when you remove high spots on coarse abrasive: the marker disappears where metal touches the stone, revealing the peaks to remove.
2) Start with coarse abrasive and keep strokes even.
- Why this matters: Coarse grit gets rid of the high spots fast so you can establish a true plane.
- Real example: Use a 220–320 grit silicon carbide or 400 diamond plate; with 10–20 firm strokes you should see marker vanish on high areas.
- Steps:
- Place the abrasive on a flat reference (granite surface plate or thick glass).
- Lay the chisel flat, press evenly, and push it forward and back along the stone for 10–20 strokes.
- Rotate the chisel 90° every 10 strokes to avoid creating a wear pattern.
Keep strokes steady. Do not rock the chisel.
3) Progress through grits, checking the marker each time.
- Why this matters: Each finer grit reduces scratches left by the previous grit and produces a smoother contact.
- Real example: Move from 320 to 600, then to 1200; on 600 grit you should need 20–40 strokes to clear remaining marker.
- Steps:
- Wipe the back clean and reapply marker if needed to see contact.
- Work with 20–40 strokes per grit, increasing pressure early and easing off as contact spreads.
- Confirm an even wipe of the marker across the target area before moving to finer grit.
Use progressively finer abrasives until the contact area is uniform.
4) Micro-lap the critical first centimeter behind the edge.
- Why this matters: The first 8–12 mm behind the edge controls how the chisel seats and how thin shavings cut.
- Real example: Use 3–5 µm lapping film on glass and do 30–60 slow strokes; the tiny scratches will align and the marker will vanish uniformly in that first centimeter.
- Steps:
- Stick 3–5 µm film to flat glass or a lapping plate.
- Lay the chisel flat and do 30–60 back-and-forth strokes, light pressure.
- Check the first 8–12 mm for continuous contact; repeat if you see gaps.
Polish until the first centimeter shows uninterrupted contact.
5) Use slurry conditioning with paste abrasives when applicable.
- Why this matters: Slurry keeps diamond or carborundum pastes cutting; without it the abrasive clogs and stops removing metal evenly.
- Real example: When using 1 µm diamond paste, spread a thin slurry of oil or water and re-stir every 20 strokes so the paste stays active.
- Steps:
- Apply a small amount of paste to the plate.
- Add a drop of oil or water and rub the paste in to form a thin slurry.
- Rework the slurry every 15–30 seconds during laps.
Keep the paste moving so it doesn’t glaze over.
6) Final checks and feel test.
- Why this matters: Visuals can lie; your fingers tell if contact is continuous and smooth.
- Real example: Run a fingernail across the first centimeter; you should feel no ridge or gap and see a mirror-like finish on fine abrasives.
- Steps:
- Wipe the back clean and hold it to a strong light; inspect for consistent reflection along the first 8–12 mm.
- Gently run your fingertip across that area to feel for steps or ridges.
- If you detect irregularities, repeat micro-lapping focused on the trouble spot.
When the back feels perfectly even and the marker is gone across the first centimeter, the chisel is ready.
Quick Checks and Fixes: Burrs, Bumps, and Edge Rounding
Before you check the edge, know why this matters: a tiny burr or rounding makes your chisel grab or leave ragged cuts, which wastes time and can ruin a joint.
1) How do you feel for a burr?
Why this matters: feeling the burr tells you whether the edge needs deburring before honing.
Example: when I’m paring end grain on a pine board, a burr will make the chisel skip and tear the fibers.
Steps:
- Hold the chisel bevel-up and run your thumb gently along the very edge away from the cutting face, not toward it.
- Use light pressure; you’re trying to detect a feather of metal. If you feel anything, that’s the burr.
- If you prefer a visual check, use good light and a 10x loupe to spot the mirror line of the burr.
If you find a burr, remove it with 5–10 light passes on a leather strop loaded with polishing compound, or 3–6 strokes on a 3,000–6,000 grit stone.
2) How do you map the edge to find high spots?
Why this matters: mapping shows where the edge lifts so you can correct specific areas rather than regrind the whole bevel.
Example: when sharpening a 25 mm chisel, uneven contact shows up as a flat spot near one corner that leaves a visible scratch gap on a hone.
Steps:
- Lay the chisel flat on a fine stone (1,000–6,000 grit) with the bevel touching.
- Push forward with light pressure and watch where the scratch marks stop.
- Mark high spots with a permanent marker if that helps.
- Work those spots with short controlled strokes until the scratches run the full width.
3) How do you remove small bumps and round edges?
Why this matters: leveling bumps restores a straight edge so your cuts are clean and predictable.
Example: a bump on a mortise chisel will cause a chatter pattern when chopping a tight mortise.
Steps:
- Use a coarser stone (220–600 grit) and give 5–15 controlled strokes only on the raised area; keep the bevel angle steady at your usual 25–30 degrees.
- Switch to a 1,000–3,000 grit to remove the scratches from the coarse stone, 10–30 strokes.
- Finish on a 4,000–8,000 grit or a leather strop for 10–20 strokes to polish the edge.
4) What should you recheck after fixing the edge?
Why this matters: a final check confirms you removed the problem and didn’t introduce new defects.
Example: after strop polishing I always run my thumb and then remap on a fine stone; once a tiny high spot reappeared and the remap showed it immediately.
Steps:
- Repeat the burr feel test (thumb runs away from the blade).
- Remap on the fine stone and confirm scratches run the full width.
- If anything still grabs, repeat the targeted passes on that area.
A few practical numbers to remember:
- Bevel angle: 25–30° for general chisels; 30–35° for mallet work.
- Stones: start coarse (220–600) for bumps, move to medium (1,000–3,000), finish fine (4,000–8,000).
- Strop passes: 5–10 light passes per side for deburring and polishing.
If you’re careful and follow these checks, you’ll stop chisel grabs and get clean cuts every time.
Teaching Shortcuts: Partial Back Bevels vs. Full Flattening

Here’s what actually happens when you lift a tiny section behind the edge instead of flattening the whole back: you save time but give up some absolute precision.
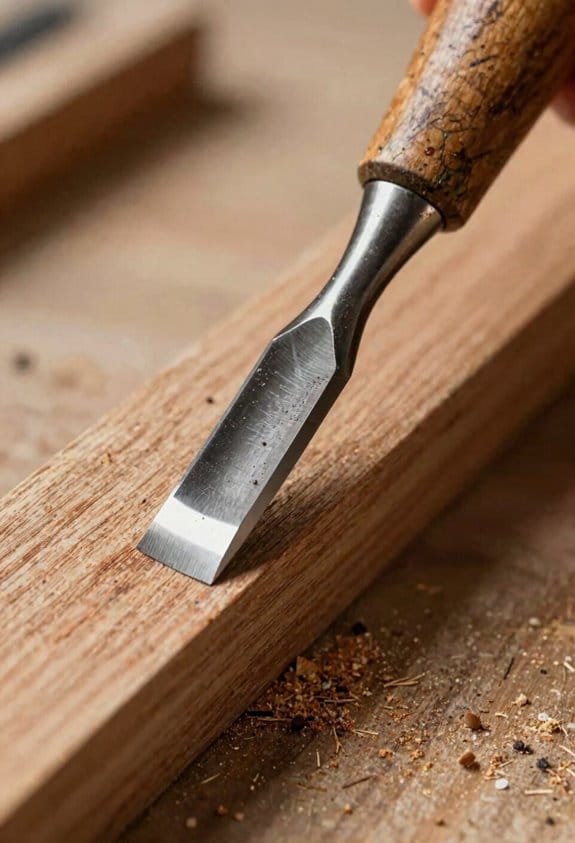
Why this matters: a partial back bevel makes forming a clean micro-bevel faster so you can get to work sooner on a project. For example, if you’re reconditioning a plane iron between cuts while fitting a 1″ dovetail, a small back bevel gets you sharp enough without spending 20 extra minutes flattening the whole surface.
How to do a partial back bevel (step-by-step):
- Mark the back: use a permanent marker to color the back and then strop or hone until the marker is removed from roughly the first 8–12 mm (about 0.3–0.5 inch) behind the edge.
- Flatten a tiny area: press the back flat on a 400–600 grit stone and take 10–20 light passes, keeping the contact area limited to that first centimeter.
- Check the reference: rest the blade on the stone and wiggle slightly; the flattened 8–12 mm should sit solidly under the edge.
- Form a micro-bevel: set your bevel angle 1–2° higher than the primary bevel and take 10–30 strokes on a 1000–6000 grit progression until you feel a burr, then remove it with light laps on a strop.
Real-world example: when tuning a smoothing plane before planing a short board, I flatten only the first centimeter behind the edge and then put a 1° micro-bevel; the plane cuts clean shavings and I shave off about 15 minutes compared with flattening the entire back.
Limits and when to extend the flat: if you’re doing fine dovetail paring that needs perfect zero-radius contact, extend the flattened area gradually to 25–30 mm (1–1.25 inches) by adding another 50–100 light passes on the stone; otherwise you’ll see tiny rounding that ruins fit. For example, when fitting a tight half-blind dovetail, I move from a 10 mm flat to a 30 mm flat over three sessions, checking with a straightedge each time.
Trade-offs in concrete terms: you save roughly 10–20 minutes by stopping at 8–12 mm, and you lose maybe 0.01–0.05 mm of edge conformity compared with a full flatten; that matters on hairline joinery but not for general paring or planing.
A final practical tip: keep a small 400–600 grit stone or ceramic plate dedicated to partial flats so you’ll be ready when time is short; it takes less space and you won’t accidentally overwork the whole back.
Common Student Mistakes Instructors See and How to Correct Them
If you’ve ever struggled to get a clean edge, this is why.
Why it matters: a crooked back or uneven strokes make sharpening take longer and ruin your chisel performance. For example, a student who lapped a chisel back off-center ended up with a raised bump that grabbed wood on the first pass.
1) How to keep the back flat and centered
Why it matters: an off-center flat zone creates a bump at the edge that makes the chisel wander when you cut. I show you this with a 5 mm-wide chisel: if the flat zone is shifted just 1 mm to one side, the next cut will tilt and you’ll feel a catch.
Steps:
- Mark the back with a thin permanent marker along the entire 1 cm behind the edge.
- Lay the chisel flat on the stone and make 10 even strokes, moving the marker ink across the abrasive.
- Stop and check: the ink should wear evenly across the full width. If not, adjust your hand position and repeat 10 strokes.
Tip: hold the chisel with both thumbs on the spine and your index finger along the side so the chisel can’t twist.
2) How to apply even pressure while lapping
Why it matters: uneven pressure leaves hollows or high spots that blunt the edge quickly. I saw a learner press hard with the thumb and leave a hollow 0.5 mm deep along one side.
Steps:
- Use light, even pressure—about the weight of a filled mug (400–600 g) distributed through both thumbs.
- Take 8 strokes, then check by rolling the chisel under a bright light or feeling with your fingertip for a continuous flat.
- If you find a hollow, reduce pressure and repeat 8 strokes; if a high spot appears, increase contact slightly but keep strokes even.
Example: on a 25 cm stone, 8 strokes with consistent pressure removed roughly 0.02 mm; uneven pressure removed more and created a dip.
3) How to focus on the critical area behind the edge
Why it matters: the first centimeter behind the edge controls cutting behavior, and neglecting it means a poor edge even if the rest is flat. I watched someone flatten the distal 5 cm perfectly but ignore the first centimeter and still get a dulling burr.
Steps:
- Mark the first 10 mm behind the edge with a fine line.
- On the stone, make 12 controlled strokes that keep that marked zone fully on the abrasive every time.
- Recheck every 12 strokes by eye, feel, and a focused light at low angle.
Practical note: concentrate your strokes so the marked zone spends at least 80% of contact time on the stone.
4) How to check progress efficiently
Why it matters: checking too rarely means you overwork and ruin geometry; checking too often wastes time. One student made 200 strokes before checking and ground a hollow in the center.
Steps:
- Limit yourself to batches of 8–12 strokes before each check.
- Use three checks: visual under bright light, fingertip feel for a continuous flat, and a shaving test on scrap wood once you have a burr.
- If the checks disagree, trust the visual and feel first, then the shaving test.
Example: on a new 2 mm bevel, doing 3 batches of 10 strokes with checks between removed the burr cleanly in about 90 seconds.
Final practical setup
Why it matters: a repeatable setup prevents most mistakes and saves time. I repeat this with every student: mark, stabilize, stroke, check.
Steps:
- Mark the back and the first 10 mm behind the edge.
- Stabilize your grip (thumbs on spine, index along side).
- Do 8–12 strokes, check, and repeat until the marks show even wear and the feel is flat.
If you follow these concrete steps and use the numbers above, you’ll fix the common mistakes quickly and keep your chisels cutting well.
How Sharpening Debates (Charlesworth, Stumpy Nubs) Changed Teaching Choices
If you’ve ever changed the way you sharpen, this is why you should change how you teach it.
Why it matters: your students will pick a method that actually fits the work they’ll do, instead of copying a dogma.
I explain two concrete options and when to use them. One is Charlesworth’s ruler trick to get a true, flat reference across the back. The other is Stumpy Nubs’ small back-bevel for faster, everyday edges. For example, a student restoring a museum-quality panel will need the flat back for precise paring; a student prepping kitchen chisels for weekday prep can use a 0.5° back bevel to save 5–10 minutes per edge.
How I teach the flat back (the why and the how)
Why it matters: a fully flattened back gives you the best reference for paring and burr control.
Steps:
- Lay a 30–50 cm ruler or straightedge along the back of the chisel and look for light gaps; do this under a bright lamp.
- Mark high spots with a Sharpie dot every 5 cm so you can see removal.
- Lap the back on 600 grit then 1500 grit paper on a flat surface, using 10–20 passes per grit with even pressure until the dots disappear.
- Check the first 10 mm behind the edge with a 10× loupe for burr and micro-roll.
Real example: I had a student flatten a 25 mm chisel for cabinet joinery; removing three tiny high spots on 600 grit removed the burr on the first pass and saved 15 minutes at final polish.
How I teach the small back bevel (the why and the how)
Why it matters: a small back bevel can save time on everyday work without sacrificing usefulness.
Steps:
- Set your honing guide to lift the chisel 0.2°–0.5° (about 0.1–0.5 mm height for a small guide).
- Stroke 20–30 passes on 1000–3000 grit stones until you feel a clean sharp edge.
- Remove the burr by laying the chisel flat on a strop for 5–10 light pulls.
- Verify the first centimeter behind the edge is consistent with a fingernail test and 10× loupe.
Real example: a kitchen-knife maker I worked with used a 0.3° back bevel on a 20 mm chisel and cut prep time from 25 minutes to 12 minutes per chisel while keeping paring performance acceptable.
What I always teach about detection and ergonomics
Why it matters: you need to find hollows, high spots, and edge roll reliably and hold tools consistently.
Steps:
- Detect hollows/high spots: use the ruler across the back and mark every 5 cm; check with 10× loupe.
- Detect edge roll: run a fingernail across the edge and look for a snag; confirm with magnification.
- Ergonomics: support your forearm on the bench, hold the chisel near the balance point, and keep wrist angle steady while lapping—maintain this position for every 10–20 passes.
Real example: a student with inconsistent pressure learned to rest their forearm and eliminate a recurring high spot after 30 minutes of focused practice.
Practical drills (focused on the first centimeter behind the edge)
Why it matters: focused practice builds consistent control where it matters most.
Steps:
- Drill A — Flat-back consistency: spend 10 minutes flattening the first 10 mm on 600 grit until the ruler shows no gaps.
- Drill B — Back-bevel speed: set a 0.3° guide and do three chisel edges in under 30 minutes total.
- Drill C — Burr control: create a burr on one edge and remove it with 10 stropping pulls; repeat until you can do it in under 2 minutes.
Real example: in a class, eight students reduced their burr-removal time from an average of 4 minutes to 1.5 minutes after two 20-minute drills.
Final practical note: always measure and record what you do—ruler gaps, number of passes, guide height—so you can repeat a setup that works.
Frequently Asked Questions
How Often Should I Reflatten Backs During Regular Use?
I reflatten backs when performance drops—typically every few sharpening cycles; follow frequency guidelines by monitoring wear, checking burrs and scratch patterns each session, and reflatten if you feel slipping, gaps, or detect high spots.
Does Back Polishing Affect Corrosion Resistance?
Yes — I think a finer surface finish slows oxide formation, so I polish backs to reduce microscopic pits that trap moisture; it helps corrosion resistance but doesn’t replace proper storage, oiling, or stainless steel choices.
Which Grit Sequence Optimizes Metal Removal Speed?
Like a Victorian machinist, I’d say coarse progression wins: start 80–220 grit for fast removal, then 400–1000 to refine—abrasive selection matters, so pick open-coat papers and stones to avoid glazing and speed metal cutting efficiently.
Are Powered Flattening Tools Safe for Thin Chisels?
Yes — I’m cautious: powered flattening tools can be used on thin chisels, but I worry about power tool? speed and heat causing edge chatter? and damage; I’d use light passes, low grit, and frequent checks.
How Do Hollow-Ground Backs Change Sharpening Rhythm?
Like a drumbeat, hollow-ground backs alter the hollow rhythm and edge pacing: I slow stroking near the edge, lift sooner to avoid overcutting, and alternate laps to maintain contact, keeping my sharpening tempo steady and deliberate.