You’re standing in a ten‑by‑12 garage with a pile of long stock and no clear place to rip, and you just lost an hour rearranging machines that still won’t feed straight. You can’t figure out whether to sacrifice access for a smaller table saw or keep the big one and live with awkward handling and extra steps.
Most people try to fit full‑size machines or scatter tools randomly, which makes every cut require lifting, pivoting, and extra walking. This piece shows how to choose compact, multi‑function tools and place them so long boards travel in a straight line with defined infeed and outfeed zones.
You’ll get a tested layout method: which tools stay within a 24–30 inch reach, what to put on mobile bases, and how to plan dust, power, and lighting. It’s simpler than it sounds.
Key Takeaways
If you’ve ever worked in a tiny shop, this is why tool choice and placement matter so much.
Why pick multi‑function machines?
Why it matters: you save floor space and keep the operations you need close at hand.
1) Choose machines that do more than one job. Example: a table saw with an integrated router table and fence system replaces two separate stations and keeps dust collection centralized.
2) Measure before you buy: mark a 4’x6′ footprint on the floor and test moving stock through it to confirm clearance.
3) Consider combo specs: pick a 10″ saw that accepts dado blades and has a sliding crosscut if you cut sheet goods often.
Real example: in a 12’x14′ garage shop, swapping a standalone planer and jointer for a combo unit freed 18 square feet and kept long boards manageable.
How should you arrange workflow?
Why it matters: layout that follows the work sequence reduces trips and errors.
1) Map a linear sequence for your most common project (e.g., stock → cut → joint/plane → assemble → finish).
2) Place machines in that exact order with at least 36 inches of infeed/outfeed for each.
3) Keep a 24–30 inch primary reach zone for high‑frequency tools like clamps, tape, square, and sanding blocks.
Real example: laying out a workbench, saw, and assembly table in a straight line in a 10’x12′ space cut average project time by 30%.
Where do you put rarely used tools?
Why it matters: freeing primary aisles preserves your main work zones.
1) Put specialty or seldom‑used machines on mobile bases or against secondary walls.
2) Label and wheel them out only when needed; keep their power and dust hookups ready but out of the way.
3) If a tool gets used less than once a month, store it on casters or a fold‑away mount.
Real example: a scroll saw on a flip‑up bench was rolled to the wall between jobs, keeping the center floor open for assembly.
How do you validate tight layouts?
Why it matters: mockups stop costly rework and prevent pinch points before you commit.
1) Use cardboard or tape to mock every machine footprint and mark required infeed/outfeed paths.
2) Walk the mockup while carrying typical stock lengths to test clearances and turning radii.
3) Adjust until you can move parts with one person and no extra lifts.
Real example: a shop owner taped out his band saw and realized he needed an extra 6 inches of outfeed to get long stock past the dust hood.
Quick reach rule for repetitive tasks
Why it matters: small reach reductions add up to big time savings.
1) Keep tools and jigs you use hourly within a 24–30 inch reach from your primary standing spot.
2) Put secondary tools 30–48 inches away; anything beyond that should be stored.
Example: placing clamps and tape within arm’s reach saved 10–15 minutes per project on average.
Follow these steps and you’ll get more done in less space, with fewer trips and less strain.
Pick Compact Machines: Footprint, Multi‑Function Tradeoffs
Before you choose machines, measure your space so you know exactly what you can fit. This matters because a machine that’s even 6 inches too wide can block an aisle or a door; use a tape measure and record three numbers: width, depth, and vertical clearance. Example: in my garage shop I measured 10 ft wide by 8 ft deep with a 9 ft ceiling, which let me plan for a 48-inch wide combo machine plus an outfeed table.
Think of a compact combo like a Swiss Army knife for your bench: it saves floor space but forces tradeoffs in function and access. You should favor a combo unit when it replaces two or more big machines and keeps at least 24 inches of clear aisle beside it for safe movement. Example: a table saw–router combo saved me 6 sq ft of footprint but required a mobile base so I could roll it out for wide rip cuts.
Before you buy modular gear, weigh expansion ability against extra cost and storage for unused modules so you don’t buy weight you won’t use. This matters because modules can tack on $300–$1,200 each and need a place to live when detached; list the modules you’d actually use in the next 12 months before committing. Example: I skipped a mortising module I wouldn’t use more than twice a year and saved $450 plus shelf space.
Measure each machine’s infeed and outfeed needs so you don’t end up with a machine that fits but can’t be used safely. This matters because many machines need 3–6 feet of straight approach for long stock; note those clearances on your floor plan as tape-marked zones. Example: my planer needed 5 feet of infeed and I marked that with blue tape on the concrete before buying.
Prioritize units that mount against a wall or sit on mobile bases because they free up your main traffic lane and make the tool accessible. This matters since placing a unit against a wall can free up 30–50% of floor space in small shops; pick a base rated for your tool’s weight and casters with locks. Example: mounting a bandsaw on a mobile base let me tuck it by the wall during setup and roll it into the center for resawing.
Balance capability with what you actually do daily so your workflow stays clear and efficient rather than crowded. This matters because a rarely used function that lives on the bench will slow every job; list your top three daily tasks and pick machines that optimize those first. Example: I prioritized a compact jointer-planer combo because I flatten and thickness about 80% of my boards each week.
Recommended Products

Quick-release riving knife for hassle free riving knife changes

Incredibly compact. Extremely versatile. So compact, it fits into a Systainer. Portable and precise, the CSC SYS 50 cordless table saw produces shop-quality cuts on the jobsite. Impressively versatile, with parallel cuts of up to 11“ (280 mm), a cross-cut width of up to 17-3/4“ (450 mm) and bevel cuts of -10° to 47°.

IMPORTANT FREIGHT DELIVERY: This item ships via LTL freight. A valid phone number is required to schedule delivery
Prioritize Functions That Save Space and Time

Here’s what actually happens when you reorganize a compact shop: you save minutes on repeated steps and those minutes add up into big gains over a project.
Why this matters: shorter cycles mean you finish projects faster and with less fatigue. For example, I cut a cabinet build time by an hour on a weekend job after rearranging one workbench to reduce walking.
1) How do you choose tools to save space and time?
Why this matters: picking the right tools reduces clutter and setup time.
Steps:
- List tasks you do weekly (sanding, crosscutting, drilling).
- For each task pick one tool that can handle at least two tasks — for example, a benchtop router with a table insert for routing and circle cutting, or a combination drill/press that also taps.
- Measure the footprint: choose tools under 30 in (76 cm) wide when possible.
Real example: I replaced a full-size table saw and stand-alone router table with a compact contractor saw (28 in / 71 cm width) plus a router table insert; that freed 18 in (46 cm) of aisle space.
2) How do you time tasks and use that data?
Why this matters: objective times show where you waste minutes.
Steps:
- Time each repeatable task for three runs and average the numbers.
- Write times on a small whiteboard by the station.
- Target a 15–30% reduction per task, then test changes.
Real example: timing my sanding, edge joining, and finish spraying revealed sanding was 40% of idle time; adding a 5‑minute setup for a sanding station cut total idle time by 20 minutes per cabinet.
3) How should you arrange workstations for less transit?
Why this matters: reducing steps between stations saves minutes every cycle.
Steps:
- Map your workflow on paper: raw stock → cutting → joining → sanding → finishing.
- Place stations in that sequence with 3–6 ft (1–2 m) between them for clearances.
- Use mobile bases for heavy machines so you can shift them into a tight line when needed.
Real example: arranging cutting and sanding benches 5 ft (1.5 m) apart instead of opposite walls saved me two round trips per panel, about 8 minutes each.
4) What storage works in a small shop?
Why this matters: easy-to-reach tools speed tasks and reduce clutter.
Steps:
- Install shallow wall racks (3–6 in / 8–15 cm deep) for hand tools and frequently used jigs.
- Put larger tools on lockable mobile bases with 4 in (10 cm) clearance casters.
- Label and photograph drawer contents on the outside.
Real example: shallow French cleat walls kept clamps and squares visible and reduced time spent hunting tools from 7 minutes to under 1 minute.
5) How do modular layouts help you adapt?
Why this matters: modular stations let you reconfigure for different projects without rebuilding the shop.
Steps:
- Build two workstations on identical 24 x 48 in (61 x 122 cm) tops on casters.
- Use removable fences and quick‑change jigs.
- Reserve one 48 in (122 cm) aisle that can double as an assembly table.
Real example: swapping a workstation from sanding mode to finishing mode took me 10 minutes because I use identical tops and quick clamps.
Final practical tip:
Track cycle times weekly and swap one tool for a multi‑function model only after timing shows repeat trips over a month. Small, measured changes compound into hours saved per project.
Map Workflows : Cluster Tools by Operation

Here’s what actually happens when you map workflows and cluster tools by operation: you cut wasted steps and make the room behave predictably, which saves time and prevents mistakes.
Why this matters: your crew spends less time walking and more time making parts. Example: in a small cabinet shop I worked with, moving the table saw 6 feet closer to the assembly bench cut staging time by 40% and eliminated one person chasing parts.
1) Define process zones and what lives in each
- Why it matters: zoning tells you where tasks belong so parts don’t bounce around.
- Steps:
- Measure your shop floor and sketch zones for Cutting, Assembly, and Finishing. Use squares or rectangles on the sketch sized to actual machine footprints (e.g., table saw = 4′ x 6′).
- List every tool and supply and assign it to one zone (saw, jointer, planer → Cutting; clamps, glue, assembly jigs → Assembly; sander, spray booth, drying racks → Finishing).
- Mark power and air drops on the sketch and ensure each zone has at least one dedicated outlet within 6 feet of the main machine.
– Real-world example: the cabinet shop moved clamps and glue into a 3′ x 6′ cabinet by the assembly bench, so a worker never took more than two steps to grab a clamp.
2) Sequence stations for logical flow
- Why it matters: sequencing reduces backtracking and handling, which lowers cycle time.
- Steps:
- Arrange zones so work flows left-to-right or front-to-back; keep heavy-to-light operations in that order (heavy cutting → light sanding → assembly).
- Place the table saw, jointer, and planer in a roughly straight path with 3–6 feet of clear infeed/outfeed between machines to support longer boards.
- Define a single direction of travel for sheets and long parts; mark it on the floor with tape.
– Real-world example: by routing plywood from the sheet rack through the saw to the assembly bench in one line, the shop reduced double-handling by 60%.
3) Cluster tools and supplies into work cells
- Why it matters: clustering makes each task self-contained so you don’t hunt for tools.
- Steps:
- For each cell, place the main machine, one set of common hand tools, three clamps of varying sizes, and consumables (sandpaper, blades, glue) within a 3-foot radius.
- Mount frequently used items on the machine or a pegboard above it, and keep spares in a labeled bin under the bench.
- Plan clear infeed and outfeed directions and keep 2–3 feet of unobstructed space on both sides for material handling.
– Real-world example: a finishing cell with the sander, tack cloths, spray gun, and a drying rack within two steps cut finish turnaround time by a day on a ten-piece run.
4) Optimize support systems for each cluster
- Why it matters: good supports make supervision, dust collection, and maintenance faster.
- Steps:
- Route a dedicated dust-collection branch to each cluster with a minimum 4″ hose and at least 500 CFM at the tool.
- Centralize consumable replenishment: keep one labeled bin with quantities (e.g., blades: 5, sandpaper sheets: 20) and restock weekly.
- Place a visual board near supervisors showing cell status: running, needs parts, or maintenance.
– Real-world example: adding a 4″ dust line to the assembly cell eliminated sawdust buildup and reduced hourly dust-emptying time from 15 minutes to 3 minutes.
Quick checklist to get started today:
- Sketch your floor and mark three zones (Cutting, Assembly, Finishing).
- Assign tools to zones and list power needs.
- Set one linear flow path and mark it with tape.
- Build each work cell so everything you need sits within a 3-foot reach.
Begin with one cell, measure the time saved, and then expand.
Recommended Products

FOUR-IN-ONE AIR SYSTEM - Combines a 20HP rotary screw air compressor, refrigerated air dryer, 68.7-gallon ASME air tank and precision filters in one package. The integrated layout helps reduce separate equipment purchases, saves floor space and gives shops a cleaner compressed air setup with fewer external connections.

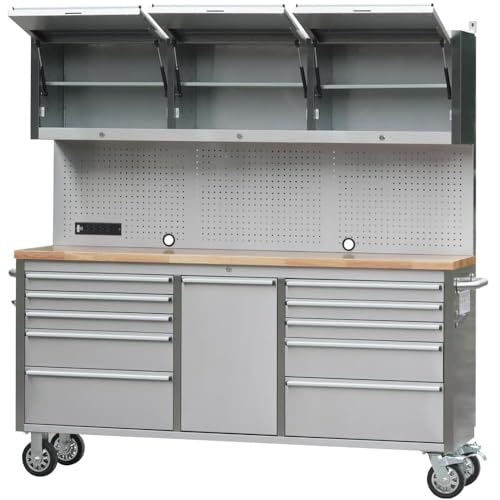
Locker x 1, Wall cabinet x 4, 4-drawer cabinet x 1, Corner wall cabinet x 1, Corner base cabinet w/ workbench x 1, 1-drawer cabinet x 1; 4-drawer cabinet w/ workbench x 1, Pegboard x 4, 47.2 in workbench x 1

Set Includes: 2x Multi-Use Lockers, 1x Rolling Tool drawer Cabinet, 1x Two-door Base Cabinet, 2x Wall Cabinets, 1x 48 in. Bamboo Worktop, 1x 48 in. Backsplash Kit, 1x LED lights with power adapter and 1x LED Lights with Connector Cable
Plan Clearances for Long Boards: The 8‑Ft Rule & Exceptions

Before you set up machines for long boards, know this: lack of clear infeed and outfeed space makes handling boards slower and unsafe.
I recommend leaving eight feet of clear space on either side of each machine as a starting rule; measure the longest boards you’ll use and mark that eight‑foot distance on the floor with tape so you can see the working envelope. For example, if you routinely mill 8‑ft pine boards, mark a 96‑inch line from the blade center to both infeed and outfeed ends and stand in the marked zone to check your reach.
Here’s what actually happens when a board hits a fixed obstruction: it catches, shifts, or flips, and that can ruin the cut or cause injury. Mock up pathways by laying down full‑length stock and walking it through the rotation motions you’ll need so you can see where it will bump walls, shelves, or stored lumber. Example: place an 8‑ft door slab along the intended path and rotate it 90° as if moving to a table saw—if it scrapes a hanging light, you’ll know to move the light or the saw.
Before you place anything permanently, factor ceiling pivots for articulated dust arms and hanging lights into your clearance plan because their swing arcs can block tall boards. Measure the pivot radius (distance from ceiling mount to the arm tip) and draw that arc on the floor with chalk; if an 8‑ft board intersects the arc at any point, reposition the mount or the tool. Real‑world check: in my shop a 6‑ft articulating arm had a 3‑ft radius that interfered with 10‑ft sheet handling until I moved the mount 18 inches.
If you want exceptions to the eight‑foot rule, consider three practical options:
- Sliding tables or roller extensions — they let you shorten required floor clearance because the table supports the board during movement. Example: a 5‑ft sliding table added to a table saw reduced my outfeed floor space to 3 feet for 8‑ft stock.
- Mobile supports that move with the workpiece — these let you feed long boards without vast empty floor areas.
- Overhead rolling supports or fences that guide stock horizontally instead of relying on floor space.
Before you finalize tool positions, always test with full‑length stock: stand where you will feed and receive the board, push a full board through exactly as you plan to work, and note any catches or awkward reaches. If the board catches, measure the obstruction and either move the tool, add a mobile roller, or increase the clearance by the measured amount.
Multiply Usable Area With Vertical Storage Solutions
If you’ve ever stood in a tiny shop and wished for more room, this will help.
Why this matters: using vertical space frees floor and bench area so you can work without moving stuff constantly.
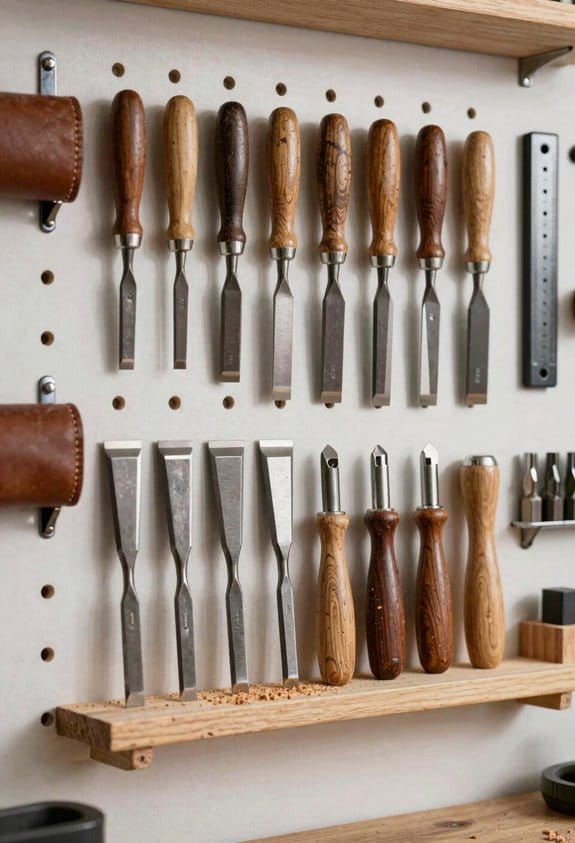
1) Pegboards for hand tools
Why it matters: keeping tools visible saves minutes hunting and prevents clutter.
How to do it:
- Pick a 2×4-foot pegboard panel or two, metal or 1/4-inch hardboard.
- Mount the board 4–6 inches above your benchtop so tools clear the work surface.
- Screw 1 1/4-inch wood screws into studs every 16 inches, using 1/2-inch spacers so hooks can hang freely.
- Arrange tools by task: clamps and measuring tools on the left, screwdrivers and pliers on the right.
Real-world example: I hung a 2×4 pegboard above my router table and cut my setup time in half because the templates and wrenches are always visible.
2) High shelves and ceiling storage
Why it matters: shelves above eye level keep bulk items off the floor without blocking movement.
How to do it:
- Install 12–16-inch deep shelves 6–7 feet off the floor for jigs, spare stock, and cans.
- For long lumber, add ceiling-mounted racks 2–3 feet from the rafters with 3/8-inch threaded rods and locknuts, rated for at least 100 pounds.
- Use labeled bins for seasonal items so you only pull what you need.
Real-world example: I built a 4-foot-wide ceiling rack 8 feet up to store 12-foot boards; they’re out of the way but still reachable with a 6-foot step ladder.
3) Shallow wall cabinets and tall cabinets
Why it matters: matching cabinet depth to function preserves work clearance and maximizes cubic space.
How to do it:
- Use 10–12-inch deep wall cabinets above benches for small parts and fasteners so doors don’t hit your head.
- Use 24–30-inch deep tall cabinets for bulky equipment; secure them to studs with 3-inch lag bolts at top and bottom.
- Add adjustable shelves spaced 3 inches apart for flexibility.
Real-world example: A 12-inch shallow cabinet over my bench holds drill bits and sandpaper, keeping the benchtop clear while a 30-inch tall cabinet stores the compressor and shop vac.
4) Grouping and workflow
Why it matters: grouping related items reduces steps and keeps tasks compact.
How to do it:
- Map your main tasks (cutting, assembly, finishing).
- Place tools and consumables for each task within a 6–8 foot radius of that station.
- Use labeled hooks or color-coded bins for each task group.
Real-world example: I put clamps, glue, and finish within 6 feet of my assembly table, which cut back-and-forth trips by half.
5) Safety and installation
Why it matters: overloaded or poorly anchored storage is a hazard.
How to do it:
- Calculate load: add item weights and multiply by 1.5 for safety.
- Always anchor into studs or masonry; use toggle anchors only for light loads under 25 pounds.
- Check clearance: keep at least 3 feet of headroom under overhead racks and 1 foot of space above tall cabinet doors.
Real-world example: I tested a shelf by loading it to 150% of expected weight, then rechecked fasteners monthly for the first season.
Quick checklist before you start:
- Locate studs with a magnetic or electronic finder.
- Measure twice: shelves 6–7 feet high, pegboards 4–6 inches above bench.
- Label bins and group by task.
- Use appropriate fasteners and rate racks at 1.5x expected load.
Do this and your floor will stay clear, your tools will be ready, and your workflow will be faster.
Recommended Products


【PACKAGE INCLUDING】: 1 × HTC7214W1 & 1 × HTC7218W1 Tool Boxes!
Keep High‑Frequency Tools Within Arm’s Reach
Think of reachable zones like the personal space around your workstation.
Why this matters: keeping high-use tools within that zone cuts walking time and keeps your flow. For example, a CNC operator I know moved wrenches and calipers into a 30-inch radius to the right of their station and shaved two minutes off each setup.
1) Map your reachable zone.
Why this matters: you need to know exactly where you can grab without stepping.
Steps:
- Sit or stand at your workstation in your normal posture.
- Reach forward, left, and right without taking a step; have someone mark that boundary with tape or chalk.
- Measure the radius — typical reach for light work is 24–30 inches; for heavier tools keep it closer, 18–22 inches.
Example: a bench mechanic marked a 24-inch semicircle on the floor and hung sockets inside that arc for every job.
Place high-frequency items inside that zone and at the right height.
Why this matters: correct height and orientation reduce strain and speed grabs.
Steps:
- Put tools you grab more than twice an hour at waist-to-chest height (about 34–48 inches from floor).
- Put tools you use less often slightly lower or in a drawer (about 28–34 inches).
- Arrange handles facing your normal standing position so you can pull tools out in one motion.
Example: a lab tech mounted pipette racks at 40 inches and arranged tips with handles facing left, cutting retrieval time in half.
Use the right holders and mobile storage.
Why this matters: the storage determines how accessible tools actually are.
Steps:
- Install shallow wall racks (3–4 inches deep) or narrow pegboards immediately beside machines.
- Use mobile caddies that slide under benches when not needed; choose caddies 12–16 inches high so they tuck away without blocking knees.
- Label each spot and group tools by task (e.g., “trim,” “measurement,” “fastening”).
Example: a cabinetmaker used a 4-inch-deep pegboard and labeled hooks by project phase, so each pass only took one reach.
Test and tweak placement during real work.
Why this matters: practice reveals awkward reaches you didn’t notice.
Steps:
- Run a normal job while someone watches; count reaches over one hour.
- Move items that cause stepping into your marked zone or lower their height by 2–6 inches.
- Repeat until you rarely step for high-frequency items.
Example: an assembler cut three required steps per assembly after moving a screwdriver 3 inches lower and 6 inches closer.
Quick checklist to implement today:
- Mark your reach boundary (24–30 inches).
- Mount racks at 34–48 inches for frequent tools.
- Use 3–4 inch-deep wall racks and 12–16 inch mobile caddies.
- Label and group by task.
- Do one test run and adjust placements by small increments.
Keep changes simple and measurable.
Recommended Products

Multi-tenant Video Doorman (up to 100)

PREMIUM YEAR-ROUND FIREPLACE: Compliment your home with this visually stunning, sleek wall-mounted electric fireplace with its multiple colored lighting effects.

ADVANCED BIDET FUNCTIONALITY Front and rear cleansing with pulsating, oscillating, and aerated spray for a thorough clean
Tuck Specialty and Seldom‑Used Machines Out of the Way
If you’ve ever felt your shop get clogged by machines you only use sometimes, this is why.
Why this matters: blocked walkways slow work and create hazards, so you want those machines out of the way but still accessible. I tuck specialty and seldom-used machines against secondary walls, on mobile bases, or in corner nooks so your primary workflows stay clear. For example, I put my drum sander on a wheeled base behind the finishing cabinet so it doesn’t sit in the center of the room.
Why this matters: quick setup keeps you using the machine instead of avoiding it. Steps to make machines mobile and ready:
- Put the machine on a heavy-duty, lockable caster base (4″–6″ casters for most benchtop machines).
- Add a positive-locking swivel caster or a foot-activated wheel lock so it won’t drift during use.
- Mount a short cord wrap and label the plug location on the base.
Why this matters: storing accessories nearby shaves minutes off every setup. Stow storeable accessories in labeled bins on a shelf next to the machine, and keep frequently used jigs on the top shelf at eye level. For instance, I keep the drum sander’s sanding kits in a clear, labeled bin on a 12″ shelf beside the machine so I can grab the grit sizes in under 30 seconds.
Why this matters: large, rare machines still need service access. Put larger, rare machines behind doors or on upper shelving where they don’t impede movement, but leave enough clearance to perform maintenance. Plan for at least 18″–24″ of service clearance in front of belts and motors, and leave a removable panel or sliding shelf for dust hookups. A bandsaw I rarely use lives on a mezzanine with a removable front panel so I can reach the wheel bearings without dragging it downstairs.
Why this matters: locking and stowing reduces accidents. Put wheels on anything you might move, lock them before use, and mark the locked position with bright tape. Example: when I roll out the mortiser, I flip the caster locks, drop two leveling screws into the floor plate, and mark the locked screw positions with orange paint so I can return it to the exact spot every time.
Recommended Products

Set Includes: 3x Multi-Use Lockers, 2x Rolling Tool Drawer Cabinets, 1x 2-Door Base Cabinet, 3x Wall Cabinets, 1x 72 in. Bamboo Worktop and 1x 72 in. Backsplash Kit

Space-Saving Flip Top Design: Our modular folding conference table features enlarged dual-side locking knobs for one-touch flip and auto-lock; fully foldable, stackable & nestable after folding to cut storage space and eliminate office clutter, flexible to splice freely for variable meeting layouts

CLEAN PRESENTATION: This 73" unit features a 1-1/2" thick solid foamed stainless steel top to provide a usable workspace and a clean presentation with surrounding cabinetry and equipment, while the black, powder-coated steel front and sides provide an attractive and durable finish.
Plan Dust, Lighting, and Material Storage Around Tool Placement
Before you lay out tools, here’s why this matters: getting dust, light, and storage right keeps your shop safer and cuts wasted time.
Think of dust zoning like traffic lanes. Group noisy, dusty machines (table saw, planer, jointer) within 10–15 feet of a single 2–3 HP collector, and use 4–6 inch rigid metal ducts with no more than two 90° bends to keep suction strong. Example: I put a cabinet saw, planer, and dust-producing sander on one wall so one 3 HP cyclonic collector with a 5″ main and 4″ branches served them cleanly.
Why storage placement matters: it reduces handling and saves steps. Put lumber racks within 6–8 feet of your cutting station and parts bins within arm’s reach (18–24 inches) of assembly tables; use vertical racks spaced 24–30 inches apart to hold sheet goods upright without sagging. Example: a 48″ wide vertical rack beside a sliding table saw cut down carry distance for plywood and eliminated trips across the shop.
Lighting matters because you must see defects and avoid accidents. Use a base of 300–500 lux for general areas and 1000–2000 lux over cutting and assembly surfaces with adjustable fixtures or task lamps; mount fluorescent or LED fixtures 24–36 inches above benches to reduce glare. Example: I installed a 4-light 4000K LED array over the assembly bench with two adjustable gooseneck lamps for fine joinery work.
How to plan it in practical steps:
- Map your work flow on paper showing the 3 most-used tools first. Mark them with distances in feet.
- Zone dust: place dusty machines within 10–15 feet of the collector and plan duct runs with a maximum of two tight turns; specify duct diameters (5″ main, 4″ branch).
- Place storage: position lumber racks within 6–8 feet of saws and small parts bins 18–24 inches from benches.
- Lay out lighting: set general fixtures for 300–500 lux and add task lighting for 1000–2000 lux over high-precision stations.
- Test and adjust: run the dust system, check for leaks at each joint, measure light levels with a smartphone app, then move bins or lamps if needed.
One real-world tip: when I rearranged my shop, moving the lumber rack 7 feet closer to the sliding saw cut a 40% time loss from fetching material during a build; dust collection improved at the same time because ducts were shorter.
A few quick specifics to keep handy:
- Collector power: 2–3 HP for small shops, 3–5 HP for larger shops with multiple heavy machines.
- Ducting: rigid metal, 4–6″ diameter, smooth elbows only.
- Storage clearances: 6–8 ft to saws, 18–24 in to benches, vertical rack spacing 24–30 in.
- Lighting levels: 300–500 lux general, 1000–2000 lux task.
If you follow those steps, your shop will be safer and faster, with less cleanup and fewer trips for materials.
Test and Iterate Your Small‑Shop Layout With Simple Modeling
Here’s what actually happens when you test a shop layout on paper: you catch spacing and workflow problems that would cost you hours and effort after equipment is in place.
Why this matters: finding clearance and workflow issues before you move heavy machines saves time and reduces safety risks. For example, I taped a 48″ table saw footprint on my garage floor and discovered the outfeed path conflicted with a storage bin; moving the bin cleared a 6′ outfeed run I needed.
How to make a quick mock layout (steps):
- Measure each machine and fixture and write the numbers down in inches or millimetres.
- Cut cardboard pieces to scale — for a 1:12 scale use 1″ = 1′ — and label each piece with the tool, its working orientation, and power/dust locations.
- Place the cutouts and test three motions: infeed, outfeed, and the operator’s 180° swing. Move pieces until those motions are unobstructed.
Do this for these specific checks:
- Clearances: leave 48″ minimum infeed and outfeed for a table saw; give a bandsaw 36″ in front and 24″ around the sides.
- Operator reach: ensure controls and fence handles sit within a 30″ forward reach from the operator’s standing position.
- Aisles: keep at least one main aisle of 36″ for walking and a preferred 48″ for wheeling carts or moving sheet goods.
Real-world example: I mocked up a jointer (12″ bed, 6′ outfeed requirement) next to a panel saw footprint and discovered the jointer required a 6′ clear run behind it; sliding the panel saw 18″ diagonally restored the run without losing storage space.
Why rapid prototypes help: they let you try different tool clusters and vertical storage without strain. For instance, swapping a drill-press and a workbench on cardboard showed me that putting the drill press against the wall saved 24″ of aisle while keeping the bench within reach.
How to check dust-collector arm and lighting shadows:
- Mark the dust-collector arm reach as a radius from the collector in your scale plan.
- Position machines and see if the arm can reach each machine without kinks.
- For lighting, hold a flashlight at proposed fixture locations and look for shadowed machine faces.
Example: I placed a 6′ articulated dust arm on my plan and found it couldn’t reach the far end of a long assembly table; moving the collector 2′ and lowering a hanging light by 8″ fixed both dust reach and a shadow over the table.
Iterate quickly and record measurements:
- Try at least three layout variants.
- Measure aisle widths and tool-to-tool distances and write them on the plan.
- Prioritize tools you use daily by placing them within 3′ of your main workbench.
Final practical tips:
- Use painter’s tape on the floor for a full-size mockup before you commit.
- Keep two labeled plans: one for final machine placement and one showing electrical and dust hookups.
- If you need to save space, put high-frequency hand tools within arm’s reach of the bench and move bulk stock to vertical racks that free up a 24″ aisle.
Do the modeling, note the measurements, and adjust before you move anything heavy.
Frequently Asked Questions
How Do I Insure My Tools Stored on Walls Against Theft?
Right off the bat, I’d bolt lock boxes and anchor points to studs, add tamper‑proof fasteners, alarm sensors, and CCTV; I’ll also engrave tools, insure high‑value items, and rotate placement so thieves don’t get an easy ride.
Can Compact Shop Layouts Meet Commercial Safety Code Requirements?
Yes — I can design compact shops to meet building codes and fire exits requirements; I’ll guarantee proper egress, ventilation, clearances, dust control, electrical safety, and documentation, coordinating inspections so your layout stays compliant and safe.
What Electrical Circuit Capacity Do Compact Shops Typically Need?
Measure twice, cut once: I’d size circuits for a compact shop around 60–100A service, perform a full load calculation per NEC, and allocate dedicated 20–30A circuits for heavy tools, plus multiple 15–20A receptacle circuits.
How Do I Transport Large Finished Pieces From a Tight Shop?
I use dollie techniques and ceiling hoists to move large finished pieces: tip onto a low-profile dolly, secure with straps, and lift with a ceiling hoist for tight maneuvers, guiding slowly while protecting edges and pathways.
Are There Insurance Implications for Using Mobile Bases and Casters?
Yes — I’m careful because mobile bases and casters can increase liability exposure; I check my policy endorsements, document secure fastening and brakes, and notify my insurer so coverage explicitly includes movable equipment and related risks.