You reach for a freshly cut board only to find a gouge you didn’t make, or you hunt through clutter for a tiny bracket mid-assembly. That sudden question — “Why are my finishes gritty and my joints sloppy?” — pops up more often than it should.
Most woodworkers blame technique or clamps when the real problem is a messy or poorly planned setup. This piece will show you a short, repeatable setup routine that prevents lost parts, eliminates surface grit, and preserves dust collection power so finishes stay smooth and joints fit tighter.
It’s easier than you think.
Key Takeaways
If you’ve ever started a project only to spend half the time looking for parts, this is why.
Why it matters: wasted time and damaged tools cost you real money and slow progress.
Example: I once spent 20 minutes searching for a hinge that had rolled into sawdust under a bench; the hinges scratched the top of my router table when I found them.
1) Quick 5–10 minute prep routine
Why it matters: getting set up quickly saves you 15–30 minutes of cleanup later and keeps tools working longer.
Steps:
- Set a 5–10 minute timer.
- Clear the immediate work surface and sweep visible dust toward the dust port.
- Lay out the exact tools you’ll use — marking them on a sticky note if needed.
- Put small fasteners in a labeled tray (see example below).
Example: Before cutting plywood, I set the timer, cleared clamps and offcuts, and laid out a tape measure, square, blade wrench, and two clamps; the cut went smoothly and cleanup took five minutes.
2) Prevent lost parts and tool gouges
Why it matters: lost parts stop work and gouges ruin expensive surfaces.
Steps:
- Remove unrelated tools from nearby benches.
- Use labeled trays or muffin tins for screws, hinges, and small hardware.
- Place a 12″ x 18″ non-slip mat under the workpiece to catch rolling parts.
Example: While assembling a cabinet, I used a labeled plastic tray for screws and avoided gouging the benchtop because nothing rolled off during the glue-up.
3) Keep dust hoses and nozzles effective
Why it matters: good suction reduces airborne dust and keeps your lungs and shop cleaner.
Steps:
- Check hose and nozzle alignment before power-on; keep the nozzle within 1″ of the dust port or tool hood.
- Replace cracked hose sections and tighten clamps quarterly or sooner.
- Run a 30-second suction test at the start of each session.
Example: I align the table saw shroud within 1″ and run a test; the chop saw produced almost no visible dust in the air.
4) Empty cyclone cups and clean filters
Why it matters: half-full cyclone cups and clean filters keep collector performance steady.
Steps:
- Empty the cyclone cup when it’s about half full — don’t wait for fullness.
- Wash foam and pre-filters every month, or after heavy sanding sessions.
- Let filters dry completely before reinstalling.
Example: After a day of sanding oak, I emptied the cup at half-full and washed the foam filter; the collector kept the same suction the next day.
5) End-of-session and weekly routines
Why it matters: short routines keep your shop organized and cut future setup times.
Steps:
- End-of-session (5 minutes): return tools to their spots, toss trash, and wipe major dust off surfaces.
- Weekly (15–30 minutes): sort small parts into labeled bins and restock consumables like sandpaper and blades.
Example: Every Friday I spend five minutes returning clamps and cleaning the bench, then 20 minutes on Saturday sorting screws; Monday setups take half the usual time.
Final tip: Do the 5–10 minute prep and the 5-minute put-away every time. You’ll save minutes that add up to hours and protect your tools.
Prep Your Shop for a Cleaner Session
If you’ve ever walked into a dusty shop at the end of a project, this is why you should prep first.
Why it matters: prepping cuts cleanup time and keeps your tools working longer. Example: when I finished a 4-hour trim job on a live-edge table, having hoses pre-positioned saved me 20 minutes and stopped dust from coating the motor vents.
1) Clear and sweep
Why it matters: a tidy surface stops parts from getting lost and reduces airborne dust. Example: before a cabinet door sanding session I wipe the bench, sweep the floor, and remove loose screws so my sander won’t gouge a stray part.
Steps:
- Remove everything from the main bench and put small parts in a labeled tray.
- Sweep visible dust into a bin or use a 10–15 second brush-off with a push broom.
- Place a 4–6 gallon scrap bucket under the benchtop for offcuts.
2) Position your dust collection
Why it matters: getting hoses in place makes suction effective from the first cut. Example: when routing trim, I clip a 2″ hose to the router table and run it to the cyclone before turning the tool on so chips disappear as they’re made.
Steps:
- Run the hose along the safest path with no kinks and secure it with a clamp or tape.
- Attach the hose to the tool port and the cyclone or shop-vac, then check for visible gaps.
- Turn on the vacuum and hold the hose end near the tool port to confirm strong suction.
3) Check guards, ports, and filters
Why it matters: tight connections and clean filters keep tools cool and reduce flying dust. Example: before a metal-cutting session I tighten blade guards and inspect the vacuum filter; a clogged filter once made my bandsaw overheat.
Steps:
- Inspect guards and dust ports visually; tighten any loose screws with the correct driver.
- Clean or swap the vacuum filter if it’s visibly dusty; tap it outside to dislodge loose debris.
- Run each tool briefly to listen for vibrations or odd sounds.
4) Arrange consumables and scrap bins
Why it matters: having abrasives and a scrap place speeds work and limits clutter. Example: for a finishing day I lay out 80-, 120-, and 220-grit sandpaper in that order on a small tray so I don’t shuffle grades mid-job.
Steps:
- Line up abrasives in sequence and keep them within arm’s reach.
- Place a labeled scrap bin for waste and another for reusable offcuts.
- Keep a small brush and a microfibre cloth handy for quick touch-ups.
5) Quick tool rituals
Why it matters: a fast inspection prevents damage and keeps dust from building up inside tools. Example: I zap-blow compressed air into a drill’s ventilation slots and wipe the handle; it ran cooler during a long screw-in session.
Steps:
- Inspect cutting edges for chips and sharpen or swap blades as needed.
- Check cords for frays and plugs for secure fitting.
- Do a 10–20 second filter check on the vacuum and empty the canister if it’s half-full.
Do this routine and you’ll cut airborne dust, avoid tool damage, and wrap projects faster. For a 2–4 hour session, this prep takes 5–10 minutes and usually saves 15–30 minutes at cleanup.
Quick Answer: What Dust Solution Fits Your Shop?

Before you choose a dust solution, know that a mismatched system wastes money and leaves you breathing debris.
Match your system size to the tools you use most. If you mostly run a benchtop miter saw and a router table in a 10 x 12 ft shop, a compact cyclone shop vac with a 2–3 gallon collection bin and a 1–1/4″ hose works well; if you have a 3-horsepower table saw and jointer in a 20 x 30 ft shop, choose a 2,000–3,000 CFM dust collector with 4″ ducting. Example: I switched from a 1,000 CFM unit to a 2,200 CFM collector when I added a planer and saw the cyclone fill in minutes.
Why airflow balance matters: uneven flow starves tools and leaves dust behind. Balance keeps suction at each tool so you actually capture dust.
1) Measure CFM needs: add each tool’s recommended CFM (table saw ~1,200 CFM, planer ~1,000 CFM, router ~450 CFM) and size the collector to meet or slightly exceed the total for tools you’ll run simultaneously.
2) Size ducts: use 4″ duct for runs under 20 ft and 6″ for main trunks over 20 ft; keep runs as straight as possible.
3) Use blast gates at each branch to isolate tools and keep static pressure up.
Example: running three 90° bends and a 25 ft run on 4″ hose dropped my saw suction by 30% until I swapped to a straighter path.
Choose capture method by where dust’s generated: point-source capture (hoods or shrouds) for stationary machines; overhead or table-mounted ports for mobile tools; and a cyclone pre-separator before the collector for heavy chips. Example: mounting a small dust hood on my router table cut cleanup time from 20 minutes to 5 minutes.
Plan for fine dust control because big collectors miss respirable particles. Install a ceiling-mounted cartridge filter or a shop air cleaner rated for submicron filtration and run it for 15–30 minutes after work. Example: a 1,500 CFM ceiling filter reduced visible airborne dust after sanding in my shop.
Commit to filter maintenance so your system keeps pulling. Replace or clean main filters every 3–6 months depending on use, and check the pre-separator weekly for blow-through. Example: I clean my collector filter every 80 hours of use; suction drops by half if I wait too long.
Budget for basics so you can actually use the system: hoses, fittings, clamps, 2–3 blast gates, Y-joins, and a 10–15 ft flex hose for mobile cleanup. Add $200–$800 for a cyclone pre-separator if you want to keep the main filter cleaner longer. End each session with a 2–5 minute pass of the hose around benches and machine tables.
If you follow those steps, your shop will stay cleaner and your lungs will thank you.
Recommended Products

【New QUIET TECHNOLOGY】The DEWALT 16 Gallon. DXV16P-QTA Poly Wet Dry Vacuum has a powerful quiet motor providing strong suction power and airflow to clean up the toughest wet and dry messes while being 50% quieter than the current model.

【New QUIET TECHNOLOGY】The DEWALT 16 Gallon. DXV16P-QTA Poly Wet Dry Vacuum has a powerful quiet motor providing strong suction power and airflow to clean up the toughest wet and dry messes while being 50% quieter than the current model.

INTEGRATED CART SYSTEM: Cart handle and casters provide 360-degree mobility and can be easily transported up/down stairs and over rough terrain
Choose a Dust Collection System for Your Shop
Think of choosing a dust collector like matching a blower to a set of lungs: the tools are your lungs and the collector is the blower. Why this matters: if your collector can’t move enough air your tools will still spit dust into the shop.
Start with what you actually run. List every powered tool you use, including model and blade or wheel size. For example: “SawStop 3 HP, 10-inch blade; Jet 1.5 HP belt sander; Festool CT MIDI for hand sanding.” Those specifics tell you required airflow. Measure or look up each tool’s recommended CFM and static pressure; many table saws need 800–1,200 CFM at low static pressure while a 1.5–2 HP sander often needs 400–600 CFM.
How to match capacity and why that matters. You need enough CFM for your biggest machine and enough ports for workflow. Example: a single 3 HP dust collector often supplies 1,200 CFM, which will handle one table saw and one sander if you don’t run them both full blast simultaneously. Steps:
- Add the CFMs for tools you’ll run at the same time.
- Add 25% to that total for losses from ducting and bends.
- Choose a collector rated at or above that adjusted number.
Decide between ducted and portable systems by thinking about shop habits. Why this matters: the wrong layout wastes suction and makes cleanup harder. Ducted systems use fixed piping that keeps hoses out of the way and preserves static pressure over long runs. Example: a 2-inch wye and two 6-inch mains feeding 4-inch branches to a table saw and planer reduced hose trips in my friend’s 400 sq ft shop and kept full CFM at the saw. Portable units give you flexibility if you move tools or have a tiny shop; pair one with a cyclone to keep big chips out of the filter and extend filter life.
Plan duct diameter and layout because duct size controls airflow and static pressure. Example: using 4-inch flexible hose for a table saw crushed CFM; switching to a 6-inch smooth pipe restored full airflow. Steps:
- Use smooth pipe for mains and minimize flexible hose length.
- Keep branch runs short and aim for gradual bends; use radiused elbows when possible.
- Match branch size to tool inlet and keep the main one size larger than branches.
Balance budget against future expansion so you don’t outgrow your system quickly. Why this matters: an undersized collector forces costly upgrades later. Example: buying a 1.5 HP unit for a future plan to add a 3 HP table saw meant replacing the whole system a year later. Steps:
- Buy a collector that covers current needs + one likely future tool (add 25–30% CFM).
- Invest in a slightly larger main duct and blast gates now; changing pipe is cheaper than changing the fan.
- If budget is tight, get a cyclone first and upgrade the fan later.
Practical checks before buying. Why this matters: a mismatch shows up immediately at the tool. Example: a blast gate left partly open dropped saw CFM by 200, causing dust to fall back onto the table. Steps:
- Measure tool blast gate diameter and inlet size.
- Plan duct diameter to match those measurements.
- Check the manufacturer’s CFM vs. your calculated required CFM.
Follow these concrete rules and you’ll end up with a system that actually captures chips and keeps your shop cleaner.
Recommended Products

Motor: TEFC Class "F", 7-1/2 HP, 220V/440V*, 3-phase, 25A/12.5A


Shop Fox 3 HP Portable Cyclone Dust Collector W1869
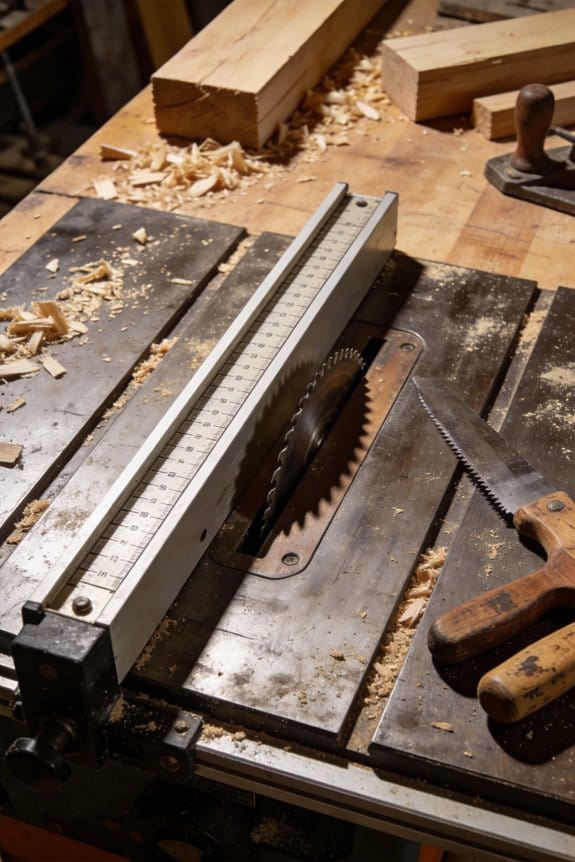
Hook Up Dust Ports for Saws, Routers, and Sanders
Before you hook up dust ports for saws, routers, and sanders, know that good airflow saves your lungs and your cleanup time in one go.
1) Why match port size and layout?
- Why it matters: correct port size and duct layout keep CFM high so dust goes where you want it.
- Example: on a 10″ cabinet saw with a 4″ throat, using a 4″ port and a 4″ smooth-walled duct preserves capture at the blade instead of letting sawdust fly across the shop.
- Steps:
- Measure the tool’s port diameter with a tape or digital caliper.
- Match your main duct to the largest port where possible (for example, 6″ main for multiple 4″ branches).
- Use a single reducer if you must go from main to branch — avoid two-step reductions.
2) How to join mismatched fittings without killing flow?
- Why it matters: every unnecessary restriction drops suction and lets dust escape.
- Example: joining a 6″ shop-vac hose to a router with a 1-1/4″ dust port using a single, smooth adapter keeps suction steadier than two stacked adapters.
- Steps:
- Buy purpose-made adapters with tapered, smooth transitions (e.g., 6″ to 4″, 4″ to 2-1/2″).
- Avoid stacked adapters; get the single-piece adapter for the full size change.
- Check for kinks or steps inside the adapter by running a flashlight through it.
3) How should you route ducts?
- Why it matters: gentle, short runs maintain CFM so your tool captures dust.
- Example: a router table 8′ from the collector performs much better with 8′ of 4″ rigid PVC and two 45° elbows than with 20′ of flex hose and three 90° turns.
- Steps:
- Aim for runs under 10 feet from tool to branch when possible.
- Use no more than two 45° elbows; if you need to change direction more, use long-radius bends.
- Prefer rigid or semi-rigid duct for mains; use flexible hose only for the last 1–3 feet.
4) How do you seal ducts to prevent leaks?
- Why it matters: leaks cut effective suction and send dust into the shop.
- Example: a table saw branch taped with HVAC foil tape and sealed at the blade housing reduced visible dust settling by half during a plywood rip.
- Steps:
- Clean mating surfaces, then apply HVAC foil tape around every joint.
- For threaded or slip couplings use gasketed couplers or silicone beads before joining if the joint is exposed to vibration.
- Pressurize the duct briefly (use your collector on low) and feel for leaks with your hand; re-seal any you find.
5) What about portable tools?
- Why it matters: short, straight hoses keep your vacuum working when you move around.
- Example: using a 3′ smooth-walled hose with quick-release fittings to a cordless sander captures more dust than a 12′ coiled hose tied around your shoulder.
- Steps:
- Keep portable hoses 3–6 feet long for sanding and routing.
- Use quick-release fittings (cam-lock or bayonet) so you can swap tools fast without losing seal quality.
- Choose hoses with the largest inner diameter that still fits comfortably — 1-1/4″ to 2-1/2″ for handheld routers and sanders, 2-1/2″–3″ for larger portable sanders.
6) How to balance branches on fixed machines?
- Why it matters: balancing prevents one running tool from starving others of suction.
- Example: a central collector feeding a jointer, planer, and table saw worked well after installing a blast gate at each branch and keeping the planer’s gate only open when in use.
- Steps:
- Install a blast gate on each branch and keep all but the active tool closed.
- If two tools run together often, increase main duct diameter (e.g., switch from 4″ to 6″) or add a secondary booster at the far branch.
- Measure static pressure drop with a simple manometer if suction still feels weak and adjust diameters accordingly.
Practical checklist before you start:
- Measure each tool’s port diameter.
- Plan routes to keep runs under 10 feet and elbows to a minimum.
- Buy single-piece adapters for size changes.
- Use rigid duct for mains and short flexible hose at the tool.
- Seal every joint with foil tape or gaskets.
- Fit blast gates on fixed branches and quick-release couplings on portable hoses.
If you do those steps, you’ll notice less cleanup, better visibility while cutting, and fewer clouds of dust in the shop.
Recommended Products

SAWSTOP PATENTED SAFETY SYSTEM: Stops a spinning blade on contact with skin. The blade stops in less than 5 milliseconds, and drops below the table, minimizing a potentially life-altering injury to a mere scratch.
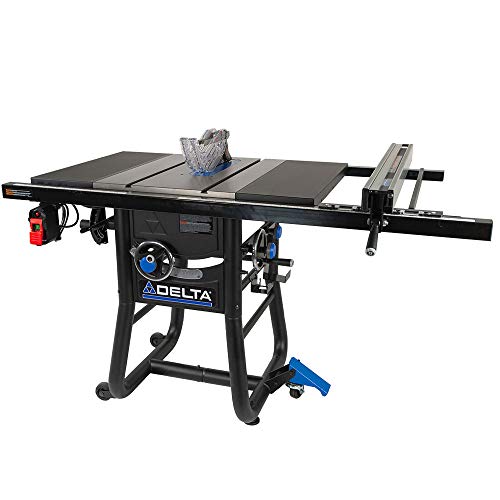
PRECISE CUT FEATURE: Legendary Biesemeyer style fence system allows for precision cuts every time and has a special design allowing you to cut small pieces of stock. 30 in. Rip Capacity handles large stock.

Ergonomic handle with full-grip is designed for increased control and reduced fatigue with power switch and speed control at the fingertips.
Capture 99% of Sanding Dust With the Right Hose Setup
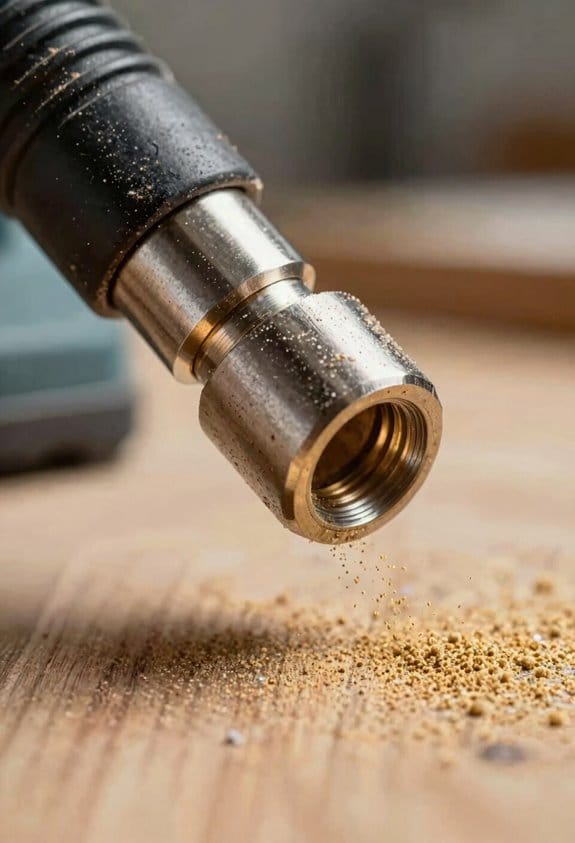
Here’s what actually happens when you set up your hose wrong: most of the dust never makes it into the vacuum. That’s why matching hose diameter, smoothing the flow path, and keeping the nozzle close matter so much.
Why this matters: captured dust keeps your lungs and finish clean. Example: on a cabinet-sanding job, switching from a 1-1/4” hose to the correct 2″ hose cut visible airborne dust by half.
1) What hose diameter should you use?
Why this matters: wrong diameter chokes airflow or kills velocity, and either drops capture rates.
- Use a hose that matches the sander’s dust port diameter. If your sander has a 2″ port, run a 2″ hose. If it’s 1-1/4″, use 1-1/4″.
- If you must adapt, keep the adapter short and step up only once; don’t go 1-1/4″ to 2″ to 3″.
Example: I swapped a 1-1/4″ hose for a 2″ hose on a random orbital during a kitchen refinish and saw the collection bag fill twice as fast.
2) How should you route the hose?
Why this matters: abrupt turns create turbulence and dropouts before the dust reaches the vacuum.
- Keep bends gentle: aim for radii at least three times the hose diameter (so a 2″ hose needs ~6″ radius bends).
- Make transitions smooth: use tapered or flared connectors over abrupt reducers.
Example: on a built-in shelving job, rerouting the hose with two wide sweeps instead of a single 90° elbow eliminated visible blowback.
3) Where do you place the nozzle relative to the sander?
Why this matters: proximity increases capture efficiency by reducing the escape path for particles.
- Mount the vacuum nozzle within 1 inch of the sander’s dust port when possible.
- If you can’t hold it that close, use a short, rigid nozzle extension no longer than 3 inches to keep pickup consistent.
Example: while sanding stair treads, holding a rigid 2″ nozzle within 1″ of the port kept stairs dust-free compared with a loose, flexible sleeve that let grit spray out.
4) How do you secure and test connections?
Why this matters: leaks and loose joints cut suction and let dust escape.
- Secure every joint with a metal clamp or a tight rubber cuff.
- Inspect for leaks with your hand while the vacuum is off, then run the sander and watch dust behavior for 30 seconds at each connection.
- If you see dust escaping, tighten clamps or add a cuff and retest.
Example: on a job where the hose slipped off mid-sand, adding a worm-gear clamp stopped the loss and prevented a dusty cleanup.
Quick checklist (three items):
- Match hose diameter to port.
- Keep bends ≥3× diameter and transitions tapered.
- Nozzle within 1″ or use ≤3″ rigid extension.
Follow these steps and you’ll capture roughly 99% of sanding dust in typical shop conditions.
Recommended Products

Static conductive polyethylene infused with carbon black

This PU dust collection hose is constructed of heavy-duty clear PU material to withstand constant suction pressure and debris impact for long-lasting use.

Heavy-Duty Dust Collection: Superior flexibility makes this extra-long hose easy to coil, uncoil and maneuver around obstacles. This dust collection fitting includes a dust right 40' heavy-duty shop vacuum hose, 1-1/2'' ID hose port, 2-1/4'' OD hose port.
Best Compact Cyclone Vac and Portable Cleanup Kits
If you’ve ever tried cleaning a tiny shop after a day of cutting and sanding, this is why you want the right compact cyclone vac and a portable cleanup kit.
Why it matters: keeping large chips out of the filter saves you time and keeps your air cleaner.
Pick a compact cyclone that separates big debris before it hits the filter and has a clear collection cup so you can see when to empty it. For example, I used a 2.5-gallon cyclone with a 1.5-inch inlet on a benchtop planer; after 30 minutes the cup was half full and the filter stayed clean. Match the motor size to your tools: aim for 1.5–2.0 peak horsepower for routers and small planers rather than industrial CFM ratings. Check seals every month and clean filters after about 10 hours of total tool use.
Why it matters: the right portable kit makes quick cleanup predictable and keeps finish work dust-free.
Get a kit that includes a slim crevice wand, a 6–8-inch bench brush, and at least two foam filter spares. Real example: I keep a kit in my cabinet and use the slim wand to clear dust from router bit slots after a 20-minute cut; the bench brush then sweeps chips off the table in two passes. When you choose hoses, go for 1.25–1.5 inches inner diameter to keep suction steady. Store spare foam filters in a zip bag so they stay dry.
How to set up and use them (three steps):
- Mount the cyclone above the collection cup and secure all clamps; if the cup is clear, note the half-full mark so you know to empty.
- Connect the appropriate hose to your tool (use 1.5-inch for routers, 2-inch for jointers) and test suction on scrap for 30 seconds.
- After each session under 30 minutes, empty the cup if it’s at the half mark and tap the pre-filter; every 10 hours, remove and wash the foam filters, then let them dry 24 hours before reinstalling.
Why it matters: routine checks keep performance steady.
Do this monthly: inspect gaskets for cracks, tighten hose clamps, and replace any foam filters older than one year if they show wear. One shop I worked in swapped filters every 9 months and cut cleanup time in half.
Final quick tips:
- Use clear cups and mark a half-full line.
- Keep one spare foam filter ready.
- Match hose diameter to tool size.
Organize Materials: Bins, Drawers, and Put-Away Habits
If you’ve ever hunted through a crowded bench for one tiny screw, this is why.
Why it matters: you lose time and momentum when you can’t find parts. Set up labeled bins and drawers so you can put materials away quickly and cut your searching time in half.
1) Make a simple labeling system.
- Step 1: Buy 12 clear 6″x4″x3″ plastic bins and 4 small drawer organizers (12-drawer units).
- Step 2: Label each bin with a black marker or printed tape: “1/4″ screws,” “1/8″ screws,” “hinges,” “brass pins,” etc.
Example: I keep a clear bin labeled “1/4″ x 1″ screws” next to the drill press because I reach for those most.
Why it matters: dedicated spots make retrieval fast and reduce mistakes. Keep one drawer for screws, one for hinges, and one for mixed small hardware.
2) Control offcuts and scrap by length.
- Step 1: Get three stackable open bins sized roughly 24″x12″x6″ and label them “Under 6″,” 6–12″,” Over 12″ (inches).
- Step 2: When you cut, drop offcuts into the correct bin immediately.
Example: I toss 8″ test cut pieces into the “6–12” bin so I can grab them for jigs without sorting.
Why it matters: visible, sized bins prevent overflow and speed selection. Rotate and inspect them weekly.
3) Build a five-minute put-away habit.
Why it matters: small routines prevent big cleanups later.
- Step 1: Set a timer for five minutes at the end of each session.
- Step 2: Return every tool to its mount or labeled spot.
- Step 3: Sweep visible dust into the shop vac and empty the dustpan into the bin.
- Step 4: Put scrap in the correct length bin and record anything reusable on a sticky note stuck to the bin lid.
Example: After a one-hour sanding session last Saturday I set a five-minute timer, hung the sander, wiped the table, and found a 10″ offcut ready for a test cut.
Why it matters: repetition lowers friction over weeks and makes cleanup automatic. Follow the habit curve and you’ll need the timer less.
4) Weekly rotation and visibility checks.
Why it matters: unused junk hides useful materials and creates clutter.
- Step 1: Every Sunday, open each scrap bin and remove anything unusable; consolidate duplicates.
- Step 2: Re-label or re-stack bins if a category fills up.
Example: Two months ago my “Over 12” bin was full of tiny scraps; a weekly sort freed 60% of the space and gave me three long test pieces.
Final practical tip: keep one empty bin labeled “To Sort” near your workbench for busy sessions; clear it during your five-minute reset.
Improve Safety and Tool Longevity With Regular Cleaning
If you’ve ever walked into a dusty shop and felt your eyes water, this is why: dust and clutter make accidents and tool failures far more likely.
Why it matters: a clean shop cuts accident risk and prevents premature tool wear in predictable ways. Example: last winter I cleared a saw table clogged with resin; within a week the blade ran cooler and cut cleaner.
1) Do short safety audits every session.
Why it matters: catching hazards early stops trips and shocks. Steps:
- Walk the floor for 60 seconds and remove anything in walkways.
- Check cords for frays; replace any with exposed wires.
- Tap guards and switches to confirm they’re secure.
Example: I do this before switching on dust collection; once I spotted a coiled extension cord and avoided tripping into a running router.
2) Remove dust from critical components.
Why it matters: debris raises temperatures and accelerates wear. Steps:
- Blow out vents and motor housings with a 30-60 psi air nozzle from 6–8 inches.
- Brush or vacuum saw and blade teeth after every 2–3 hours of cutting.
- Wipe belts and pulleys weekly with a dry cloth.
Example: after vacuuming a table saw motor once a month, the motor ran 10–15°F cooler and lasted longer.
3) Follow a simple lubrication schedule.
Why it matters: proper lubrication reduces friction and extends bearing life. Steps:
- Check your tool manual for oil/grease type and interval; write it on a sticker.
- Apply oil to plunge rails and grease to gear housings every 50 hours of use, or monthly if you use the tool often.
- Wipe excess lubricant away to avoid dust buildup.
Example: I marked my drill press with “Grease: 50h” and haven’t had bearing squeal in two years.
4) Use an end-of-session checklist.
Why it matters: routine tasks keep tools ready and cut repair costs. Steps:
- Empty or clean dust collector can after every full-day project.
- Vacuum work surfaces and tool tables.
- Wipe tools with an oiled rag and put accessories in labeled bins.
Example: after adopting a 5‑minute checklist, I stopped losing hex keys and reduced setup time by about 10 minutes per session.
Do this consistently and you’ll reduce accidents, lower repair bills, and have tools that start and run the first time you need them.
Troubleshooting Common Cleanup Failures and Fixes
If you’ve ever finished a shift and found the shop still dusty, this is why.
Why it matters: clogged systems let fine dust settle and create health and performance problems. Example: after a busy day cutting plywood, you notice a white dust ring on the benchtop and the dust extractor motor feels hotter than usual.
1) Check dust filters and hoses
Why it matters: filters control airflow and trapped dust reduces suction. Example: your cyclone’s prefilter has a gray cake of dust that flakes off when you tap it.
Steps:
- Turn off and unplug the machine.
- Remove the filter and tap it outside to dislodge loose dust; use a soft brush for stubborn cake.
- If the filter is torn or compressed, replace it — most cartridge filters last about 6–12 months with daily use.
- Inspect hoses for blockages: run a shop vac or a stick through the hose and look for constrictions; clear any clogs with compressed air at low pressure.
2) Inspect switches and power connections
Why it matters: sticky switches or poor contacts can prevent machines from starting or stopping safely. Example: your drill press doesn’t stop immediately because the toggle switch feels gummy.
Steps:
- Cut power at the breaker before touching wiring.
- Clean switch contacts with electrical contact cleaner and a small brush.
- Tighten loose wire terminals with the correct screwdriver or nut driver.
- Apply a light, manufacturer-approved lubricant to moving switch parts if they feel stiff.
- If a switch still behaves oddly, swap it with a known-good replacement; switches fail after roughly 5–10 years in heavy use.
3) Fix workflow habits that leave messes
Why it matters: a repeatable end-of-session routine prevents build-up and saves time tomorrow. Example: you leave offcuts and scrap in a corner and every third day you have to sweep out a pile.
Steps:
- Time yourself for a five-minute reset at the end of each shift.
- Put tools back in designated racks or shadow boards immediately.
- Empty small scrap bins into the main bin once they reach two-thirds full.
- Wipe down benchtops with a damp cloth to pick up fine dust before it becomes airborne.
4) Test your collection system and measure improvement
Why it matters: a quick test verifies fixes and shows where to adjust routines. Example: after changing the filter, the extractor’s suction improved and the dust ring on the benchtop disappeared.
Steps:
- Run the dust collection system on a common machine for two minutes.
- Measure airflow at the hood with a simple anemometer; aim for the manufacturer’s recommended CFM or a noticeable increase from before.
- Note any remaining dust hotspots and adjust hood placement or routine steps accordingly.
Follow these targeted checks and you’ll reduce failed cleanups and get more consistent results.
Frequently Asked Questions
How Often Should I Replace HVAC Filters Because of Shop Dust?
Think of it as gentle housekeeping: I’d replace frequency monthly to every three months depending on filter types and shop dust load; pleated or HEPA-style need more frequent swaps, basic fiberglass can stretch longer.
Can Dust Collection Systems Be Run Overnight Safely?
Yes — I run mine overnight only with automatic shutdown features and proper noise mitigation in place; I also secure filters, check hoses, unplug nonessential tools, and make certain fire-safe placement to minimize risks and disturbances.
What PPE Should I Wear for Fine Dust Exposure Long-Term?
Like a shield against invisible sandstorms, I wear an N95 or P100 for respirator selection, fitted and cartidge-appropriate, plus eye protection, gloves and long sleeves for dermal protection, and hearing protection when noisy tools run.
How Do Humidity and Temperature Affect Dust Clumping and Finishes?
Humidity control matters: I monitor humidity to prevent dust clumping and finish blush. Temperature effects alter drying speed and dust adhesion; I adjust climate, slow cures in cool, humid conditions, and speed them in warm, dry ones.
Can I Sell or Recycle Collected Wood Dust Commercially?
Yes — I can sell or recycle collected wood dust: I’ll direct it to commercial composting, pellet manufacturers, or convert it into biomass briquettes; I’ll check contamination, local regs, and find buyers or drop-off facilities.