You shove a workpiece against the fence, raise the bit, and still end up fighting tearout and inconsistent cuts. You wonder why the same setup makes one part perfect and the next one slightly off. Most people blame the bit or feed speed instead of checking precise bit height and repeatable fence positioning.
This piece shows exactly how to use a locked lift, micro‑adjuster, solid fence with repeat stops, and simple jigs so you can dial in bit height, lock fence‑to‑bit distances, and batch identical parts with less scrap. It also explains quick dust extraction and basic safety steps. It’s easier than it looks.
Key Takeaways
If you’ve ever set up a router bit and then had to redo the whole run, this is why.
A stationary router table keeps your fence, lift, and dust port locked in place so profiles match every time; set the fence once to 1/4″ offset and you’ll cut identical tenons across a batch. Example: when making 12 identical drawer fronts, clamp a scrap stop, set the fence to 0.500″ from the bit shoulder, and run each piece—no guesswork.
You need clean air to see and finish well; here’s why it matters. Integrated dust collection with a short, sealed hose pulls chips at the cut so you can watch the profile and get a smoother surface. Example: running a 3/8″ roundover at 2000 RPM with a 2″ dust hose attached keeps dust off the fence and prevents burn marks.
Before you start a batch, write down exact settings so you can repeat them later. Steps: 1) Record bit model and RPM. 2) Measure bit-to-fence distance with calipers to 0.005″. 3) Note lift clicks or spindle height in millimeters. 4) Tape the fence at the stop and label it. Example: for a tongue cut, note “3/16″ bit, 0.375″ fence, lift = 7.2 mm” on a setup card.
Micro-adjusters and quality lifts stop tiny drift; here’s why that matters. Use a lift with 0.1 mm increments and a micrometer fence adjuster so you can change bit height by small amounts without losing alignment. Example: if your first part is 0.2 mm over, dial the lift down two clicks (0.2 mm) and rerun the scrap.
You should always test at production speed because adjustments can shift under load. Steps: 1) Run a scrap piece at the same feed rate you plan to use (for example, 30 inches per minute). 2) Lock the fence and spindle lock while the cutter is running. 3) Recheck measurements after one full pass. Example: when trimming a rail at 30 ipm, lock controls and confirm the profile before cutting the tenth part.
Why Router Tables Matter for Clean, Repeatable Routing (Quick Start)
If you’ve ever fought to keep a board flat while routing, this is why.
A router table turns routing from a handheld, variable chore into a controlled, repeatable process, and that change matters because you get cleaner edges and fewer mistakes. When you move the work to a fixed table, pieces are guided instead of wrestled; for example, using a fence and a featherboard on a 3/4″ oak panel will stop it from twisting and give a straight profile every time. Set the fence 1/8″ off the bit for a first pass, then finish with a 1/16″ cleanup pass.
Before you set up the table, know why dust and offcuts happen: inconsistent feeds and random bit heights. A proper station simplifies material handling and reduces stray dust because you run the stock along a fixed path every time. In one small shop I saw, routing at a dedicated table with a 2″ dust port dropped floor scrap by half within a week.
Why your shop layout matters: routing stations should sit between stock prep and assembly to make cleanup routine. If your prep bench feeds directly into the router table and the table feeds a small assembly bench, you only move pieces once; that reduces handling and prevents tiny offcuts from getting lost in nooks. Route on a shop-built table with the extractor connected and you’ll see less airborne dust and better visibility at the bit.
How to get consistent, tidy runs:
- Set repeatable stops: use a stop block clamped to the fence and note the distance on the block with a Sharpie.
- Test on scrap: run one sacrificial piece at the exact feed speed you plan to use, then measure the profile.
- Document distances: write down fence-to-bit and table height in a notebook or on a taped label.
Example: for a 1/2″ roundover on pine, clamp a 3″ wide scrap, set the fence so the bearing rides on the edge, run at a steady pace roughly 1 foot every 3 seconds, and mark the fence position as “RO 1/2” on the tape.
A stationary setup also lets integrated extraction work effectively because the dust port stays aligned. Plug a 2″ hose to the table port, seal gaps with foam tape, and you’ll see a clear difference in airborne particles when you route for 10 minutes.
Do this before you make parts:
- Install fence, featherboard, and dust hose.
- Set bit height and fence distance; write them down.
- Run two scrap pieces at your target feed rate and adjust.
The payoff is consistent parts, less cleanup, and safer air.
Set Up Router Table Dust Collection for a Cleaner Shop

Before you set up dust collection, know that clean airflow prevents clogs and keeps your lungs safer.
Plan your duct routing to make runs short and smooth so suction stays strong and clogs are less likely. Example: route a 4-inch PVC or metal duct no more than 12 feet from the router table to the collector, using at most two 45° bends; this kept my shop from losing suction when I added a table saw and router. 1) Measure the straight-line distance from the table port to the collector. 2) Draw the duct path on paper and mark every bend. 3) Choose 4-inch duct for single-station use and 6-inch if you’ll add a table saw later. Use silicone caulk on joints and clamp every connection to seal leaks.
You want focused suction at the table so chips don’t wander across the shop.
Install a blast gate at the table to concentrate airflow when you work; a simple metal gate on the branch line reduced my router dust by half when cutting full-length trim. 1) Mount the blast gate within 2 feet of the table branch. 2) Use a gate sized to your duct (4-inch gate on 4-inch duct). 3) Keep the gate closed when other machines are running to preserve suction.
You’ll preserve filter life and suction by removing big chips before they hit the filter.
Consider a cyclone separator ahead of the main unit because it dumps larger chips into a trash barrel and keeps the filter cleaner. Example: adding a 5-inch DIY cyclone between my router branch and collector let me empty a 30-gallon bucket weekly instead of cleaning the filter every two days. 1) Position the cyclone before the collector inlet. 2) Use a collection bucket with a gasketed lid and a quick-release clamp. 3) Ensure the cyclone inlet matches your duct size or use a smooth adapter.
You need to seal gaps and capture side blow so dust doesn’t stay airborne around your face.
Seal gaps around the fence and use a shroud or hood to catch side blow; a simple plexiglass hood clamped to the fence cut airborne dust during edge routing. 1) Apply foam weatherstripping along fence joints where dust sneaks through. 2) Build a 6-inch-high shroud that covers the router bit sides and ties into your 4-inch port. 3) Position the hood so the bit is centered in its throat opening for best capture.
Quick checklist to get you started:
- Use 4-inch duct for a single station; 6-inch if adding more tools.
- Keep runs under 12–15 feet and use smooth 45° bends where possible.
- Mount a blast gate within 2 feet of the table branch.
- Add a cyclone before the collector if you want less filter cleaning.
- Seal fence gaps and fit a hood that ties into the port.
Follow these steps and you’ll see better suction, fewer filter clogs, and less dust on your shop floor.
Recommended Products

Dust Box’s port covers can be removed, allowing for your motor to pull in fresh, cool air.

Convert Your System: Convert your single-stage dust collector into an efficient two-stage system and reduce the need for frequent bag emptying with our Wall-Mount Cyclone Dust Collector; this separator filters out large dust particles before they reach the main bag

INCLUDES: (5) dust collection blast gates, (1) splice, (4) 3ft dust collection pipes, (4) y-fittings, (1) 90-degree elbow, (10) U bracket clamp hangers, (20) screw, (20) wall plugs
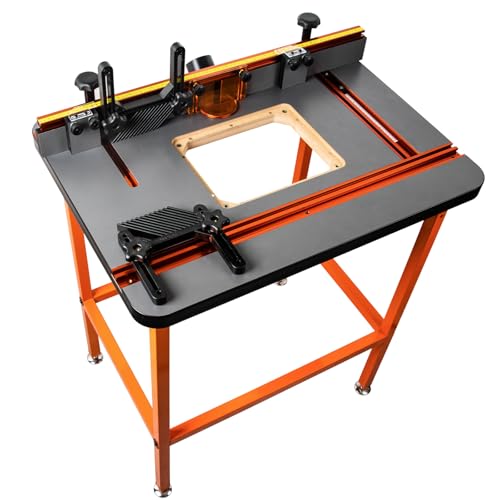
Choose a Fence and Lift Combo for Repeatable Cuts

If you’ve ever struggled to get the same cut twice, this is why.
Why this matters: repeatable settings save you time and scrap. Pick a fence with a clear ruler, two flat faces, and a dust port that lines up with your shop vacuum so you don’t have to clean between runs.
How to choose the fence:
1) Read the scale and set it. Look for a fence with etched or printed measurements every 1/16″ (0.0625″) and a zero mark you can align to the bit. For example, set the scale to 3/8″ (0.375″) when you need that offset and lock the fence.
2) Check the faces. The faces should be at least 3/4″ tall and perfectly flat; lean a 12″ steel straightedge across them to confirm. If there’s a gap under the straightedge, swap fences or shim until the faces sit flush.
3) Match the dust port. Ensure the fence’s dust chute lines up with your 2″ hose; if it doesn’t, use a short flexible adapter to keep chips from building up behind the fence.
Real-world example: I set a fence to 5/16″ using its etched scale, clamped a plywood stop at 12″ for repeat crosscuts, and ran ten parts with no drift while my vacuum removed the chips.
Why the lift matters: fine height control keeps your profile consistent across multiple pieces. If you change bit height by even 1/32″ (0.03125″), the joint fit or profile can shift visibly.
How to choose and use the lift:
1) Pick a lift with at least 1/64″ (0.0156″) micro-adjust increments or better and a smooth worm-gear crank. Set the bit height using the lift, not by turning the motor shaft.
2) Lock the lift after setting height. Crank to the exact height, read the gauge, then tighten the lock so a bump won’t move it.
3) Confirm with a test pass. Run a scrap piece and measure the profile with calipers; adjust by one micro-click if needed.
Real-world example: I used a lift with 1/64″ steps to raise a raised-panel bit 0.0625″ between passes, keeping the panel shoulder consistent on eight doors.
Use material stops to index quickly:
1) Install a T-track stop or a clamping stop on the fence.
2) Set the stop against a reference face and lock it.
3) Run each workpiece against the stop before feeding.
Real-world example: I milled ten identical tenons by locking a stop at 2″ from the bit and feeding each blank until the stop hit — every tenon ended up within 0.02″ of each other.
Extra tips that save time:
- Use the fence’s micro-adjuster to make 0.005″ changes instead of nudging the whole fence.
- Keep a scrap reference piece: after any adjustment, place that scrap in and compare profiles.
- Mark repeat settings on the fence with a small piece of tape for quick visual return.
If you set the fence to a measured value, lock the lift after a micro-adjusted height, and use stops for indexing, you’ll cut consistent parts every run.
Recommended Products

Assembly includes: rt-c27 27" cast iron table, rt-f27 27" fence, rt-psw power switch, and rt-st2 support legs

Fence consists of three 6000 series aluminum extrusions machined square and anodized black.

SPECS - You will receive a fully-equipped router table fence including three-way micro-adjustment, universal fence base with adapter track nuts, dust port, aluminum and sacrificial fences, and featherboard track.
Dial in Repeatable Cuts With a Router Lift

If you’ve ever set a router bit by hand under the table, this is why.
Why it matters: setting the bit height with a lift gives you repeatable cuts so your parts fit together without reworking them.
1) Set and lock the lift
- Step 1: Raise the lift until the bit is about 1/8″ (3 mm) above the workpiece, then lower it in 0.010″ (0.25 mm) increments until the cut is right.
- Step 2: Tighten the lift lock with the torque spec on your lift (usually 15–20 ft·lb for cast aluminum lifts; check your manual).
- Example: I set a 1/2″ rabbeting bit to cut a 1/4″ deep lip on a door stile by bringing the bit to 3 mm above the stile, lowering 0.25 mm at a time, then locking at 6 mm total depth.
Why it matters: using a router lift keeps you from crawling under the table and guessing heights.
2) Use the micro-adjuster
- Step 1: After locking, use the micro-adjuster screw to dial in final depth in 0.05–0.25 mm (0.002–0.010″) increments.
- Step 2: Make a test cut on scrap and measure with calipers; adjust as needed.
- Example: For a hinge recess I needed exactly 6.35 mm (1/4″), so I locked the lift, then backed the micro-adjuster 0.15 mm until the caliper read 6.35 mm on the test piece.
Why it matters: checking the lift under load prevents the bit from drifting mid-run.
3) Check torque and locking under load
- Step 1: With the bit installed and the motor running at the planned feed speed, put a light downward pressure on the bit and watch for movement.
- Step 2: If the lift slips more than 0.1 mm, re-torque the locking mechanism or tighten motor-mount screws; repeat the test.
- Example: On a long routed panel I once saw 0.3 mm drift; retorquing the drive collar and reinspecting the lock reduced drift to 0.02 mm.
Why it matters: marking settings saves you time and reduces errors on repeat jobs.
4) Mark and record settings
- Step 1: Mark the fence and table with a permanent marker or scribe at the bit centerline.
- Step 2: Record lift positions: write the lift dial reading, micro-adjuster turns, and bit type on a recipe card for that cut.
- Example: For a batch of cabinet doors I noted “3/8″ roundover, lift dial 12.6, micro +3 turns” on each job sheet so I could reproduce results the next day.
Final checklist before a run:
- Bit seated and tightened to recommended torque.
- Lift locked at coarse position.
- Micro-adjuster set and test-cut verified with calipers.
- Lock tested under running load (drift ≤ 0.1 mm).
- Fence and lift positions marked and recorded.
Do those five things and you’ll get consistent, repeatable cuts every time.
Recommended Products

Applicable Models : Aluminum Router Plate Dimensions are 11-3/4" X 9-1/4" X 3/8"thick, 19.1(3/4”) Radius. Designed for routers with 3-1⁄2-in.-dia of body.(Please check the size of our Router Lift to make sure if it matches your router motor and router table .(Multiple patents have already been applied for)

Includes Mast-R-LIft II, 3 Insert Rings (1-3/8", 2", & 2-1/2"), 1 Insert Wrench, 1 Crank Handle, 10 Stainless Steel Set Screws with Blue Nylok Patch, 4 Mounting Screws

Router Table & Fence: Use your table saw as a base for this cast iron router table top! Saves lots of space, and uses one of the sturdiest anchors in your shop to cut down vibration and noise.
Batch‑Processing Techniques for Small Parts and Dowels
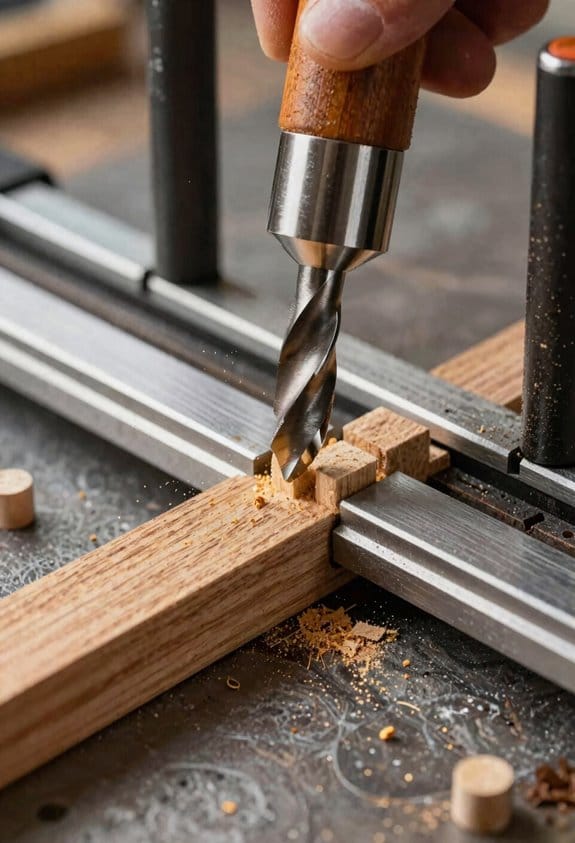
Here’s what actually happens when you set up a router table to batch-process small parts or make dowels: if your setup isn’t consistent, every piece drifts and you waste time fixing mistakes. You want each blank to pass the same way every time so cuts stay uniform and you don’t remeasure.
Why this matters: consistent jigs and mandrels save time and reduce scrap.
1) Build a simple multi-blank jig.
- Step 1: cut a block of 3/4″ plywood or MDF to the length of the run, for example 12″ for four 3″ blanks.
- Step 2: lay out hole centers on 3″ spacing and drill stop holes with a Forstner bit sized to the blank diameter; clamp the block to the fence.
- Step 3: add two 1/4″ dowel locators at the ends to keep the blanks from sliding; screw them in place.
This jig holds four blanks square to the cutter so you can feed them one after another.
Real-world example: I used a 12″ jig with 3″ centers to mill four guitar bridge pins in one pass and kept every diameter within 0.005″.
Why this matters: a concentric hold keeps dowel diameters consistent.
2) Use a mandrel or a dedicated dowel jig for dowels.
- Step 1: mount the blank on a 1/4″ or 3/8″ mandrel that matches your chuck; tighten the locknut to avoid wobble.
- Step 2: set the cutter height so the final diameter takes two light passes of 0.010″ each rather than one heavy pass.
- Step 3: spin the mandrel at 2,000–3,000 RPM for hardwoods; slow to 1,200–1,800 RPM for softwoods.
The mandrel keeps the blank centered and reduces taper.
Real-world example: turning 1/2″ oak dowels on a 3/8″ mandrel at 2,200 RPM and taking two 0.010″ passes produced perfectly round dowels that fit jig holes snugly.
Why this matters: indexing and sampling prevent drift over many cycles.
3) Index parts, mark sequence, and sample.
- Step 1: mark each blank position on the jig with a permanent marker (1, 2, 3…).
- Step 2: perform an index pass: rotate or move the jig to position 1, cut; position 2, cut; continue in the same order.
- Step 3: after every 8–12 pieces, remove one sample and measure with calipers; if diameter or length varies more than 0.010″, stop and check clamping and spindle runout.
Indexing keeps repeatability; sampling catches drift early.
Real-world example: on a batch of 48 wooden pegs I checked a sample every 10 pieces and caught a loose clamp before 6 bad pegs were made.
Final practical tips:
- Use featherboards and a push stick for small parts to keep your hands safe.
- Replace bits after about 200–300 linear inches of cut, or when you see tearout.
- Keep a written setup sheet: cutter height, mandrel size, RPM, and pass depth so you can recreate the run later.
A single bold action to take now: clamp a test blank and run two light passes, then measure. This confirms your jig and mandrel before you commit to the full batch.
Safety Habits, Fences, and Guards to Reduce Kickback
If you’ve ever had a bit grab your work, this is why.
Why it matters: a grab can hurl wood at 40+ mph and badly injure you. I always set a solid fence to control the workpiece edge because a straight, fixed fence guides wood past the bit and prevents sudden grabs. Example: when I routed a 3/4″ oak panel, the panel tracked cleanly past the 1/2″ straight bit at 1/8″ depth per pass with no flips. Use a fence clamped and bolted to the table, aligned parallel to the bit, and check with a square before each run.
Before explaining how, know this: holding stock down and away reduces lift, chatter, and kickback. I use featherboards and guards to keep pressure against the fence and hold the board to the table. Example: for a 6″ wide pine board and a 1/4″ roundover bit, I set one featherboard 2″ before the bit and another 2″ after — that kept the edge tight and eliminated chatter. Steps:
- Mount a featherboard with the fingers angled to push stock toward the fence.
- Position it so the outermost finger is 1/8″ to 1/4″ from the workpiece.
- Tighten the clamp so it won’t slip under pressure.
Why you’ll want push sticks: your hands shouldn’t be near the cutter when feeding small pieces. For pieces under 3″ wide, reach for a push stick. Example: when trimming a 2-1/2″ long tenon, I used a 12″ push stick and kept both hands behind the fence while feeding the stock. Steps:
- Keep one hand on the push stick and the other on the workpiece behind your featherboard.
- Feed at a steady pace — about 1/8″ to 1/4″ per pass for hardwoods.
- If you need two hands, use a push block and a second push stick.
When to wear eye and face protection: flying debris can cut your face and eyes even from a short distance. I wear a face shield when clearing jams or adjusting cutters because chips can ricochet unpredictably. Example: while clearing a pinched 1/2″ MDF off a 3/4″ rabbeting bit, a small chip spat out and would have hit my cheek if I hadn’t been wearing the shield. Steps:
- Turn the motor off and wait for the cutter to stop before reaching in.
- Use a wooden wedge or stick to clear jams — never your fingers.
- Put the shield on any time you change bits or remove guards.
Final practical checks you should do every session: check fence alignment with a square, verify featherboards are 1/8″–1/4″ from the stock, and confirm push device availability. Example: before a 90-minute routing session on poplar, I spent three minutes checking those items and cut my work without a single feed problem. Do these three quick checks before you start.
Use Your Router Table for Jointing, Dowels, and Box Miters
If you’ve ever thought a router table only trims edges, this is why.
Why use your router table for jointing?
Why it matters: using a router table keeps your edge straight and square without buying a jointer.
Example: when you need to square the edge of a 1″ pine board for a cabinet side before glue-up, the router table saves shop space and gives repeatable results.
How to joint an edge on the router table
Why it matters: a straight fence and controlled passes produce an edge that meets another board cleanly.
Steps:
- Fit a 3/8″ straight bit (or larger, 1/2″ for heavier cuts) and set the fence so the bit removes about 0.010–0.020″ per pass.
- With the board face down on the table and one reference face against the fence, start with the out-feed side of the board to the bit and make a single, steady pass along the fence.
- Flip the board, keep the same face against the fence, and repeat until the edge is square; check with a combination square every 2–3 passes.
- If you need a long edge joint, use a sacrificial backer board clamped to the fence to avoid tear-out.
Real-world visual: jointing a 48″ cabinet side, you’ll make 10–12 light passes at 100–150 ft/min feed speed until the edge measures square.
Why use your router table for dowels?
Why it matters: the table gives you identical dowel rods quickly so joints line up easily during assembly.
Example: making ten 1/2″ dowels for a bookshelf back yields consistent length and diameter so shelves register perfectly.
How to make dowels on the router table
Why it matters: a repeatable jig + bit = uniform dowels and less sanding.
Steps:
- Install a dowel-making bit sized to your target diameter (for 1/2″ dowels, use a 1/2″ dowel cutter).
- Build or clamp a simple jig: a 1/2″ hole in a scrap block with a fence to hold the stock vertically against the bit.
- Feed straight, steady pressure and make identical passes until the rod is fully formed; measure diameter with calipers after the first piece and again after every 5 pieces.
- Cut to length with a stop block and trim square on the table or a miter saw.
Real-world visual: producing 20 maple dowels, you’ll rotate the stock and make 3–4 light passes per piece, then cut to 1-1/4″ lengths against a stop.
Why use your router table for box miters?
Why it matters: the table delivers matching 45° edges so corners fit tight without trial-and-error.
Example: making a 12″ x 16″ picture frame, precise box-mitered corners give a seamless outside corner without sanding.
How to cut box miters on the router table
Why it matters: correct fence setup and test cuts prevent wasted material.
Steps:
- Fit a 45° molding bit or set your bit height so the bearing creates a 45° profile at the edge.
- Align the fence so the mating faces meet exactly—start with the fence flush and move it 0.005–0.010″ if you need a tighter fit.
- Make a test cut on scrap of the same thickness and check the joint; adjust fence increments by 0.010″ until the test fits snugly.
- Once set, run each piece with the reference face against the fence and use a featherboard to keep consistent pressure.
Real-world visual: for an 8/4 walnut box, you’ll make 2 test cuts, then cut four sides using a push block to keep fingers clear.
Final tips
Why it matters: small adjustments and safety stop mistakes before they cost material.
- Use a push stick or featherboard every time.
- Take light passes (0.010–0.020″) for final surfacing.
- Always test on scrap and recheck measurements with a square or calipers.
If you want, tell me the lumber dimensions you’re using and I’ll give exact bit sizes, fence offsets, and number of passes.
Recommended Products

Versatile Slab Flattening Jig features 3.5 inch diameter carriage; designed for standard 3-1/2 inch routers such as 690/890, 610/618, 1617/1618, 1754X/28190/28084, HE041(57368), and RT1322-00 models

24" x 32" router table top includes a router insert plate with three molded Level-Loc reducing rings

SAVE TIME AND MONEY ON WOODWORKING – Use a Slab Jig to level your woodworking projects without the high cost of a CNC machine! Cut your wood slabs down to size while saving time and money!
Accessories and Upgrades to Keep Your Table Accurate and Tidy
If you’ve ever set up a router table only to get slightly different results each time, this is why.
Why it matters: small shifts cost you material and time when you’re making multiple parts. Use fitted micro-adjusters on your fence and featherboards so you can move them by tiny, repeatable increments without taking the whole setup apart. For example, install a micro-adjuster that moves the fence 0.01″ per click so you can fine-tune a jointed edge after your first test cut.
Why it matters: chips and dust change alignment and clog jigs. Add a dust-collection shroud around the bit and route a 1-1/4″ hose to the fence extraction port to pull chips away from the work area. I routed a 1″ channel behind my fence and hooked a 1-1/4″ dust hose to it; after that, I stopped getting dust buildup that pushed featherboards out of position. It’s simple and keeps surfaces clean.
Why it matters: accidental tugging wrecks setups and can throw lifts out of calibration. Run a cable-management tray under the table and secure cords with Velcro straps so nothing snags when you move the lift. I stapled a 12″ plastic tray under my table and looped the power cord through two Velcro straps; lifts stay calibrated now.
Why it matters: jigs need consistent placement every time. Fit T-slots into your table top so you can add repeatable stops and jigs, and use a quality router lift that clicks or indexes in precise positions to set bit height. Step 1: cut or buy an MFT-style T-track and install it 3/4″ from the table edge. Step 2: mount a cam-lock fence stop that repeats to ±0.005″. Step 3: install a lift with a steel worm gear—those hold depth steady.
Why it matters: a tidy workspace is a safer workspace. Combine micro-adjusters, dust extraction, cable management, T-slots, and a solid lift to keep your cuts accurate and your table organized. For a quick checklist: 1) micro-adjusters (0.01″ per click), 2) 1-1/4″ dust hose to the fence, 3) under-table cable tray with Velcro, 4) T-slots 3/4″ from edge, 5) steel-gear router lift.
Recommended Products

Woodworking Router Lift: Two patent-pending features raise the Rockler router table insert plate with lift into a class of its own: ultra-fast ''Quick-Gear'' height adjustments and ''Snap-Lock'' tool-free insert ring changes.
Sturdy steel-tube stand with leveling feet – The stand is made from rectangular steel tubing and includes adjustable levelers at each leg to ensure stability on uneven floors. The height is 36", with minor adjustment range for leveling purposes. Footprint: 28-1/8" × 20-1/8"

Crafted from Heavy Weight CNC Machined aluminum components - Assembled with 34 Swiss-turned stainless-steel parts - Guide Bar meticulously made of custom rolled steel
Frequently Asked Questions
Can Router Tables Be Used With Handheld Routers Safely and Effectively?
Yes — I use handheld compatibility on my router table with proper safety adaptations: secure the router in a table mount, fit guards and dust extraction, and keep both hands clear while guiding stock for safe, effective routing.
How Do I Reduce Noise From Router Table Operations?
I’d reduce router table noise by using proper bit selection (sharp, balanced bits), tightening mounts, adding isolation pads or combo enclosure, improving dust collection to cut air turbulence, and wearing hearing protection for safe, quieter sessions.
What Maintenance Schedule Maximizes Lift and Fence Longevity?
I recommend routine inspections weekly and seasonal lubrication at least twice yearly; I’ll clean chips, check fasteners, align the fence, test lift travel, replace worn parts promptly, and document service to maximize lift and fence longevity.
Can Router Tables Handle Non-Wood Materials Like Plastics or Aluminum?
Absolutely — I’ll say they’re superheroes: I’ve used router tables for plastic machining and light metal routing, but I stick to proper bits, slower feeds, lubrication and safety gear to avoid melting, chipping, or tool damage.
Are There Reliable Portable Router Table Options for Small Shops?
Yes — I recommend a Compact benchtop model with a Foldaway fence; I’ve used one in a tiny shop, it’s stable, portable, and the foldaway fence saves space while still delivering repeatable setups and decent dust control.