You lift the chisel to pare a tight joint and hesitate—should you angle the bevel more, grip harder, or stop before your thumb gets too close? That split second of uncertainty is the exact question: how do I control the chisel so I don’t nick my hand or send metal fragments flying?
Most people assume stronger strikes and a looser grip make work faster, but that’s what causes slips, mushroomed heads, and ejected shards. This piece shows step-by-step techniques—steady grip positions, correct bevel angles for common cuts, how to spot and dress small head defects, and exactly when to stop—that cut down on cuts, eye injuries, and flying fragments.
You’ll also get clear PPE and workspace checks to practice immediately. It’s simpler than it looks.
Key Takeaways
Before you start using a chisel, know that good control keeps you safe: it prevents flying chips that can hit your eyes and face.
1) How does controlling chips protect you?
Why it matters: flying fragments cause most chisel-related eye injuries.
Example: when you pare a hardwood block to fit a joint, a 1/8″ chip can shoot off and hit your cheek.
How to do it:
- Hold the workpiece firmly against a bench with a clamp or vise so it can’t move.
- Position your body so the cutting edge points away from your face and off your legs.
- Wear a snug pair of safety glasses rated Z87.1.
Takeaway: clamp the wood, aim the blade away, and wear Z87.1 glasses.
If you want to avoid punctures and deep cuts, you must control the blade direction.
2) How does blade direction lower puncture risk?
Why it matters: uncontrolled force sends the chisel where you don’t want it.
Example: when trimming a glued joint, a misplaced strike can drive the chisel into your thigh.
How to do it:
- Stand to the side of the cut line, not directly behind the chisel.
- Use small, controlled taps (10–20 joules of impact; think light hammering rather than full swings).
- Keep your hands behind the cutting edge and use a push-stick or scrap wood to hold small pieces.
Takeaway: stand to the side, tap lightly, and keep hands behind the blade.
Controlling your grip and strikes keeps the tool from slipping and hitting you or others.
3) How does a stable grip prevent slips?
Why it matters: slips cause most accidental hand contact with the blade.
Example: while chiseling dovetail sockets, a loose grip sent the chisel across a coworker’s toolbag.
How to do it:
- Grip the handle with your dominant hand near the ferrule for control and your other hand on the shaft for guidance.
- When striking, let the hammer do the work—use consistent strikes of one handed swing or two-handed for heavier bits.
- Replace leather or smooth handles with a textured grip or wrap tape if the handle is slippery.
Takeaway: hold near the ferrule, use consistent strikes, and fix slippery handles.
Matching chisel size to hammer weight improves accuracy and reduces tool stress.
4) Why match chisel and hammer?
Why it matters: mismatched tools make you overstrike and break blades.
Example: trying to drive a 1/4″ paring chisel with a 16 oz club hammer bent the blade after several hard blows.
How to do it:
- Use light hammers (8–12 oz) for paring chisels and medium hammers (12–16 oz) for bench chisels.
- For cold chisels or heavy demolition, use 20–32 oz club hammers and full-length handles.
- Test on scrap wood: if you need more than 8–10 strikes to move 1/8″ depth, use a heavier setup or a different chisel.
Takeaway: pick hammer weight by chisel type and test on scrap.
Regular inspection and removing damaged chisels prevents sudden failures that injure you.
5) How does inspection keep you safe?
Why it matters: cracks or mushroomed heads change how the tool behaves under impact.
Example: a chisel with a 1/4″ split at the ferrule shattered during a strike and sent a shard into a workshop light.
How to do it:
- Inspect before each use: look for head mushrooming, handle splits, blade chips, and temper discoloration.
- Remove or tag any chisel with a cracked handle, a mushroomed head you can’t grind smooth, or a blade with hairline fractures.
- Recondition heads by grinding off mushrooming and reface them, and replace handles with hardwood or fiberglass replacements when needed.
Takeaway: inspect every time and remove or repair any compromised chisel.
Quick Stop-and-Do: When to Stop Using a Chisel and What to Do Now
If you’ve ever grabbed a chisel and felt something wrong, this is why.
Why it matters: a failing chisel can fling metal, wood, or pieces of handle toward your face or feet. Example: on a shop floor last year a coworker’s mushroomed cold chisel threw a shard that nicked a safety boot; he walked away because the shoe absorbed the hit.
1) When to stop using it
Why it matters: stopping immediately prevents sudden failure that can cause injury. Example: you strike a chisel and hear a ringing crack—this is a warning.
Steps:
- Remove the chisel from use right away. Put it down on a bench or in a tool bin away from walkways.
- Mark it out of service with tape or a bright tag that says “DO NOT USE.” Use red duct tape or a preprinted tag.
- Tell your supervisor or lead before anyone touches it.
2) What to look for during inspection
Why it matters: specific visible defects predict how the tool will fail. Example: under a LED work light, you can see a mushroomed head or a hairline crack along the handle where a strike will split it.
Steps:
- Inspect the head for mushrooming—if the steel at the striking face flares beyond the original diameter (for example, a 3/4″ chisel head bulging to 1″ or more), stop using it.
- Check for nicks or broken tips—if the cutting edge has chips larger than 1 mm, it needs attention.
- Look for handle problems—hairline cracks, splits, or a loose fit where the tang meets the handle mean don’t use it.
3) Immediate alternatives you can use right away
Why it matters: using the right replacement prevents damage and keeps the job moving. Example: you need to remove a wood wedge but your cold chisel is tagged out; a wood-sizing screwdriver and a brass drift saved time without damaging the material.
Steps:
- Use a properly sized screwdriver for prying or levering—match blade width to slot or gap.
- Use a punch for driving pins—pick a steel or brass punch that fits the pin diameter exactly.
- Replace with a matching chisel—choose one with the correct blade width and a hardness rating suitable for the material (e.g., hardened tool steel for metal, softer carbon steel for wood).
- Always wear appropriate PPE: safety glasses with side shields, leather gloves, and steel-toe shoes.
4) If the chisel needs reconditioning
Why it matters: improper repairs create hazards later. Example: someone ground down a mushroomed head on the bench without heat treatment and the tool fractured later during a heavy strike.
Steps:
- Do not try to reshape or reheat the head yourself on the job. That’s a job for trained personnel with the right equipment.
- Have a trained person dress the head with a bench grinder using a grinding rest and a soft-touch finish, or replace the entire head if hardness has been compromised.
- Replace cracked or split handles—use a manufacturer handle or a certified replacement and secure it with the correct wedge and epoxy if required.
Final practical tip: tag the tool, tell your lead, and swap it for a known-good replacement before you strike again.
Recommended Products

SimpliFiber Pro optical power meter with multimode light source
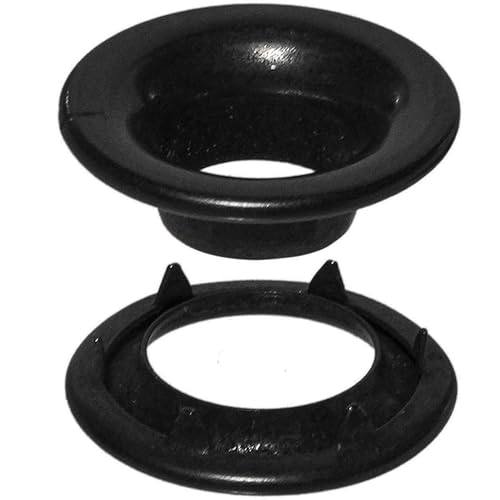
DIMENSIONS IN INCHES: Hole Size: 1-3/32 Flange Diameter: 1.865 Length Under Flange: .465 Metal Thickness: .025 Inside Diameter: 1.195 Outside Diameter: 1.910 Metal Thickness: .020
DIMENSIONS IN INCHES: Hole Size: 29/32 Flange Diameter: 1.725 Length Under Flange: .446 Metal Thickness: .020 Inside Diameter: 1.062 Outside Diameter: 1.725 Metal Thickness: .020
How Chisel Misuse Causes Lacerations, Eye, and Projectile Injuries

If you’ve ever watched someone jab at a chisel and flinch, this is why.
Why it matters: a single slip can cut your hand, shoot metal at your eye, or send a fragment across the shop.
Lacerations — how they happen and what to do
Why it matters: bleeding and tendon damage can stop you from working for weeks.
1) Causes
- Poor blade alignment: holding the chisel at a shallow angle lets the edge glance and slice your hand.
- Using the chisel to pry or turn screws: the blade twists and the edge moves where you didn’t expect.
- Slipping cuts when your support hand is in line with the edge.
Real-world example: I once saw a friend try to lever up a nail with a 1-inch cold chisel; the chisel slipped and sliced the pad of his thumb open to the tendon.
2) How to avoid it — steps
- Always position your non-striking hand at least 2–3 inches to the side of the cut line.
- Keep the chisel bevel aligned to the cut — hold it at 25–45 degrees for wood and 60–80 degrees for metal.
- Never use a chisel as a pry bar or screwdriver; use a pry bar or screwdriver instead.
- Use a stationary clamp or vice to hold small workpieces; clamp at the edge with 2–3 turns of force.
Eye injuries — how they happen and what to do
Why it matters: a single chip at 100+ ft/s can blind you instantly.
1) Causes
- Chips or broken tips eject toward your face when you strike hard.
- Lack of eye protection when working with hardened steel or brittle material.
- Striking a mushroomed chisel head that flakes tiny metal inward.
Real-world example: a coworker hit a hardened chisel on a steel pin; a 1/8-inch chip flew about 6 feet and left a gouge in the safety glasses lens.
2) How to avoid it — steps
- Wear ANSI Z87.1-rated safety glasses every time you strike; add a full face shield when grinding or heavy striking.
- Inspect the chisel tip before each use; if you see hairline cracks or chips, replace or regrind it.
- Use controlled strikes: tap with a 12–16 oz hammer for small work, and reserve 24–32 oz hammers for heavy cuts.
Projectile injuries — how they happen and what to do
Why it matters: flying handles or studs can fracture bones or knock you off balance.
1) Causes
- Fractured tips from repeated hard impacts.
- Mushroomed hammer heads or chisel strikes that split the striking face.
- Loose or rotten wooden handles that eject from the ferrule.
Real-world example: a hammer head that had a mushroomed face sheared off a chunk; the fragment flew 10 feet and embedded in a toolbox.
2) How to avoid it — steps
- Check the striking face and replace any mushroomed or fractured heads immediately.
- Replace wooden handles with properly fitted, wedged handles if you feel looseness; torque the wedge until it seats firmly.
- Use a tool with a factory-forged one-piece steel handle when you expect heavy impacts.
Final quick checklist you can use before work
- Inspect the chisel edge for chips or cracks.
- Check the handle and ferrule for looseness or rot.
- Choose the right chisel type and size for the job.
- Put on ANSI-rated eye protection and optionally a face shield.
- Plan each strike: hand position, hammer weight, and angle.
If you follow those steps — inspect, choose, protect, and strike with control — you’ll cut the odds of lacerations, eye injuries, and projectiles by a large margin.
Recommended Products

LIGHTWEIGHT: Unisex protective eyewear combines versatility and value with a comfortable, contoured fit

ANSI Z87.1 COMPLIED. Made of Premium Raw Polycarbonate Material from Japan, Amoolo protective glasses offer all-around eye protection from flying debris and particles. Anti-Scratch and Ballistic Impact Resistant. 99% UV400 blocking.

168 PACK PASSION VALUE SET - Ptcol Safety Glasses Have 7 Colors Frame, Provide More Color, More Number of Goggles at a Fraction of the Price. The Package Contains 6 Boxes (with 28 Pairs of Glasses in Each Box) and Every Pairs of Glasses are Individually Packaged in the Bag
Inspect, Dress, and Replace Chisels: Step-by-Step to Prevent Mushrooming

Before you inspect a chisel, know why it matters: a mushroomed head can send metal fragments into your hand or eye. Think about the time you hit a hardened nail and bits flew off—you’re fixing that risk.
1) How do you inspect the head and shaft?
Why it matters: spotting mushrooming or cracks early keeps you safe.
Steps:
- Hold the chisel by the handle with a glove on and a cloth over the struck end.
- Look for a lip or bulge around the head; use a straightedge or ruler held against the face to see any gap — if the bulge is more than 0.5 mm, it needs attention.
- Tap the shaft gently with a hammer while the chisel is supported on a block and listen: a clear ringing tone means the temper is OK; a dull thud suggests possible heat damage or cracks.
Real-world example: I once caught a hairline crack by tapping a chisel that had been overheated on a forge; hearing a dull sound saved my thumb.
2) How do you dress a small mushroomed head?
Why it matters: removing the bulge restores safe striking and prevents future cracking.
Steps:
- Secure the chisel in a vise with soft jaws so the struck face is horizontal.
- Put on eye protection and a dust mask.
- Use a bench grinder at low speed or a bastard file to remove the bulge; grind only the raised metal, keeping the struck face flat. Aim to remove no more than 1–2 mm per dressing so you don’t shorten the head too much.
- Blend the edges with a 180–220 grit flap wheel or file to remove sharp shoulders that create stress risers.
Real-world example: A neighbor had a chisel with a 1 mm mushroom; I dressed it on a slow grinder in two quick passes and the tool was safe again.
3) How do you refinish the cutting edge?
Why it matters: a correct bevel holds up to hits and gives cleaner cuts.
Steps:
- Check the bevel angle — most bench chisels use 25°–30°. Measure with a bevel gauge or angle guide.
- Start with a coarse abrasive if the edge is nicked: 220 grit belt or 400–800 grit waterstone for reprofiling, then progress to 1,000–6,000 grit stones or a 1,000–3,000 grit belt for polishing.
- Use a consistent number of strokes per side (try 20–30) and maintain the chosen angle with a guide unless you can hold it freehand.
- Test the edge on a scrap of pine; a clean shaving cut means you’re done.
Real-world example: I repaired a nicked chisel by regrinding at 30° on a 220 belt, then stropping; it sliced softwood like new.
4) When must you replace the chisel?
Why it matters: some damage can’t be made safe again.
Steps:
- Replace if you see longitudinal cracks from the head into the blade, if the struck face has lost temper (blueing or scaling), or if dressing would remove more than 5 mm of metal.
- Dispose of a failed chisel by cutting the handle off and recycling the metal, or mark it and keep it as a non-striking tool for light paring only.
Real-world example: I tossed a chisel with a 10 mm heat-affected zone after a forge slip; dressing would’ve ruined its geometry and risked a fracture.
Final safety checklist (do these every time):
- Wear eye protection and gloves.
- Keep a slow grinder or file for dressing — never use an overheated, high-speed pass that bluish the steel.
- Test the strike tone after dressing; it should return to a clear ring.
Follow those steps and you’ll stop small defects from turning into flying hazards.
Recommended Products
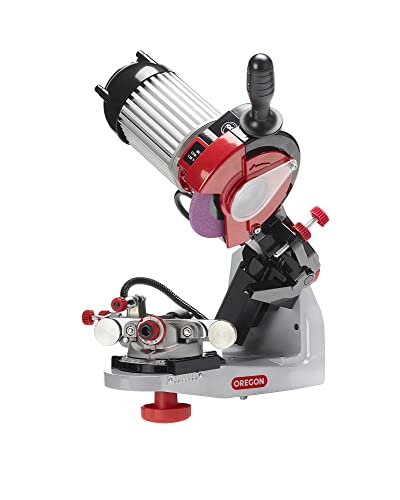
Bench or wall mounted professional grinder: Powerful performance with hydraulic clamping assistance unique to the 620-120. Perfect for pro users. Ideal for frequent, high volume chain sharpening

Fine (60-grit) and coarse (36-grit) vitrified grinding wheels

Includes a 36-grit vitrified aluminum oxide wheel, and a crimped wire wheel
Safe Striking, Secure Handles, and Work Positioning for Chisels

Before you strike with a chisel, know this: a stray blow can send metal or wood flying into you or someone nearby. For example, a friend of mine nicked his thumb when a loose chisel head popped off while he was leaning over a bench.
1) Pointing and strike control — Why it matters: pointing the chisel away keeps flying fragments and the tool’s path out of people’s bodies.
How to do it:
- Always orient the cutting edge so it moves away from your torso and other people; turn the workpiece if needed.
- Stand with your feet shoulder-width apart (about 18–24 inches) and knees slightly bent so recoil goes into your legs not your arms.
- Tap first with light strikes (5–10 gentle taps) to start the groove, then increase force gradually to full strikes once the chisel is guided.
Example: When paring a mortise on a bench, I start with 5 light taps to set the line, then use firmer blows once the chisel sits in the groove.
Keep your strikes deliberate. Use controlled hits aimed squarely on the chisel’s peen so energy goes into the cut instead of into unpredictable motion. Short pause.
2) Handle condition — Why it matters: a cracked or loose handle can let the head fly off under impact.
How to check and fix:
- Inspect before each shift: press the head with your thumb and rotate the handle; look for wiggle or gaps.
- If you see mushrooming, split grain, or a loose head, re-wedge or replace the handle immediately; don’t keep using it.
- For wooden handles, drive a new wedge or epoxy a cracked portion only if the head is tight afterward and the wood has no splits running the length of the handle.
Example: On a weekend project, I tossed a chisel whose head moved more than 1–2 millimeters under thumb pressure and used a different, solid-handled chisel instead.
3) Work positioning and shop layout — Why it matters: placing cuts to move away from people reduces chances of injury.
How to position things:
- Clamp the work so the chisel cut path goes away from your body and toward empty space or a waste block.
- Keep at least a 3-foot clear zone behind you and to either side when swinging a mallet.
- Avoid crowded aisles; move your bench or the piece if the shop is tight.
Example: While trimming dovetails at a community shop, I rotated the board so chips and the swing path went toward the empty end of the bench and not down the aisle.
Final practical reminders — Why it matters: small checks prevent big accidents.
How to finish:
- Replace any handle with visible damage rather than risk failure.
- Wear safety glasses and keep coworkers outside your 3-foot swing zone.
- Keep a short, consistent striking rhythm to avoid glancing blows and preserve control.
Example: I always wear safety glasses and mark my 3-foot zone with tape when teaching a class; nobody’s been hit in three years.
Follow these steps and you’ll reduce the chance of a flying head, a glancing blow, or a cut that heads toward someone.
Recommended Products

POWER: outstanding power, providing 43 ft.-lbs. of impact energy for a tool weighing just 63 pounds, perfect for the toughest applications including foundation work and pipe laying

The BOSCH BH2770VCD Breaker Hammer provides outstanding 43 ft.-lbs. of impact energy with Active Vibration Control and Service Minder Brush System for convenience.
The breaker hammer provides outstanding 35 ft-lbs impact energy and 1,000 BPM for the toughest concrete removal applications including foundation work and pipe laying.
Chisel Safety: PPE, Storage, and Workplace Controls

Before you pick up a chisel, you need to know why PPE and controls matter: they cut your risk of chipped eyes and crushed fingers in half.
1) What PPE should you wear and why?
Why it matters: a single chip can blind you and a slipped chisel can crush a fingertip.
Steps:
- Put on safety glasses that meet ANSI Z87.1 (wraparound lenses are best).
- Add a face shield when striking heavy blows or working with brittle materials.
- Wear cut-resistant gloves rated at least ANSI A3 for general chisel work; choose sizes that let you still feel the handle.
- Replace gloves if the weave shows holes, cuts, or oil saturation — every damaged glove raises your risk.
Example: at a metal shop, a bench worker switched to ANSI Z87.1 glasses and A3 gloves; after that, they had zero eye or glove failures in a year.
Storage and handling: why it matters — poor storage causes punctures and workplace trips.
Steps:
- Store chisels in a labeled rack or leather sheath; never carry a loose chisel in your pocket.
- Hang chisels by handles or lay them point-down in a covered bin so tips don’t poke someone.
- Tag any chisel with a cracked or bent shaft and remove it until repaired.
Example: a carpenter who started using a wall rack stopped getting puncture incidents during site moves.
Maintenance and striking tools: why it matters — a mushroomed head can shatter and send metal flying.
Steps:
- Inspect striking-tool heads before each shift for mushrooming; measure heads against a new tool if unsure.
- Dress mushroomed heads with a grinder or file until the face is round and smooth; then deburr and cool before use.
- Replace a striking tool if cracks appear or if you can’t restore the face to a smooth, even surface.
Example: a maintenance crew found a 20% drop in head-fragment incidents after instituting weekly head dressing.
Workplace controls and training: why it matters — clear rules keep bystanders safe and reduce mistakes.
Steps:
- Mark cutting zones with bright tape and post a two-person exclusion buffer of at least 3 feet.
- Require a one-hour hands-on refresher every six months covering correct grips, substitution risks (don’t use nails as chisels), and maintenance checks.
- Keep a log of training dates, tool inspections, and any incidents for trend review.
Example: a small fabrication shop posted zones and scheduled six-month refreshers; near-miss reports dropped by half within three months.
Quick checklist before you start:
- Safety glasses: ANSI Z87.1? Yes or no.
- Gloves: A3 and intact? Yes or no.
- Chisel stored properly? Rack or sheath.
- Striking tool: no mushrooming or cracks? Yes or no.
- Zone marked and bystanders clear? Yes or no.
Final concrete tip: if you strike more than 50 blows a day, swap gloves mid-shift and inspect heads weekly.
Recommended Products

ANSI Z87+ HIGH IMPACT CERTIFIED: Independently tested to meet the ANSI Z87+ high impact standard for dependable outdoor eye protection

ANSI Z87+ HIGH IMPACT CERTIFIED – Independently tested and rated to meet ANSI Z87+ standards, providing reliable impact resistance for industrial environments including construction, oil & gas, and assembly work.

Polycarbonate Lenses: Lightweight polycarbonate lenses deliver superior protection against spills, splashes, impact, and debris; Lenses are clear and won't obstruct vision
Frequently Asked Questions
Can Chisels Be Used Safely on Non-Metal Materials Like Masonry or Ceramics?
Yes — I can, but cautiously: use masonry precautions and proper ceramic techniques, wear eye and hand PPE, choose chisels designed for those materials, keep edges sharp, strike with appropriate hammers, and replace mushroomed or damaged tools promptly.
How Often Should Chisels Be Heat-Treated or Tempered for Heavy Use?
Measure twice, strike once: I’d recommend heat treatment annually for heavy-use chisels, with a strict maintenance schedule checking hardness, dressing mushroomed heads, and re-tempering as needed after substantial wear or any fracture to prevent failure.
Are There Recommended Torque Limits for Powered Chisel Attachments?
No universal recommended limits exist; I follow manufacturer torque specs and attachment standards for each powered chisel, and I won’t exceed those ratings—checking manuals, tool plates, and certified adapters to guarantee safe operation.
Can Vibration-Reducing Handles Decrease Long-Term Hand Injuries?
Yes — I believe vibration dampening and ergonomic grips can reduce long-term hand injuries by lowering transmitted vibration and improving posture; they don’t eliminate risk, so training, PPE, and maintenance remain essential alongside them.
What Legal Liabilities Exist if a Chisel-Related Injury Occurs on Site?
If someone’s hurt, I’ll say you’ll face liability insurance claims and possible lawsuits; employer negligence can mean fines, workers’ comp disputes, and criminal charges—so don’t be reckless or untrained, or expect costly legal consequences.