
You’re staring at a pile of rough boards and a cramped shop, asking whether a benchtop planer can really handle your furniture and trim work. You want to know if a smaller machine will save space without forcing you to buy a heavy floor model. Most people assume benchtop planers are underpowered or rough-finished compared with full-size machines.
This article shows you how modern benchtop planers — with 10–15 amp motors and spiral cutterheads — deliver quieter, smoother cuts that reduce sanding and fit on a bench or rolling stand. You’ll learn which features matter, how to set one up, and what projects it can handle reliably. It’s easier than you think.
Key Takeaways
If you’ve ever tried to thickness a board in a small garage, this is why benchtop planers matter. They give you professional thicknessing without needing a full-size floor machine, and they fit on a bench or mobile base in a tight shop. Example: you can plane a 1×8 fence board flat beside your workbench without clearing floor space.
Before I tell you how to use one, know why the newer motors change things: upgraded 10–15 amp motors with 12–13″ capacity let you handle wider boards and heavier cuts than older benchtops. That means you can take a rough 12″ wide maple panel down to finished thickness in a few passes, instead of flipping to a floor model.
Why quieter cutterheads matter: helical or spiral cutterheads give smoother cuts and less tearout, so you spend less time sanding. I once surfaced a figured walnut tabletop with a spiral-head benchtop and needed only light sanding to get a clean finish.
How to position the machine so it flows with your other tools: mount the benchtop planer on a mobile base and place it next to your jointer so you can run boards through the jointer for one face and through the planer for the opposite face without walking across the shop. Example: set the jointer and planer end-to-end with infeed and outfeed supports aligned for 4–6 ft boards.
If you care about cost vs. usage, here’s a simple rule: benchtop planers are the better buy if you use them under about 100 hours per year; full-size floor models make sense if you plane daily for a business. For a hobbyist who does weekend projects, the lower purchase price and lower maintenance justify a benchtop.
How to get the best results with a benchtop planer:
- Why this matters: consistent board thickness prevents glue-line gaps.
- Steps:
- Flatten one face on a jointer or hand plane first.
- Set the planer to remove 1/16″ (about 1.5 mm) per pass.
- Use the spiral/helical cutterhead setting if available.
- Support long boards with rollers or an outfeed table.
- Check thickness every 2–3 passes with calipers.
Example: to plane a 1″ rough oak board to 3/4″, take two passes of 1/16″ to remove twist, then finish with one pass of 1/32″ for a smooth surface.
Final practical tip: if you need to plane wide, heavy boards occasionally, look for a benchtop with a 13″ throat and a beefy 15A motor — you’ll get fewer passes and less motor strain.
Is a Benchtop Planer Right for Your Shop?
Before you set up a small shop, you need to know whether a benchtop planer will actually help your workflow. It matters because a benchtop planer gives you power-planing in a compact footprint, letting you surface boards flat and to thickness without a floor model.
If you plan to dimension lumber more than a few times a month, get one. For example, if you build a dining table from rough-sawn oak every couple months, a benchtop planer will save hours compared with hand planes and sanding.
1) Where it fits in your shop and workflow
Why this matters: putting machines near each other cuts handling time and frustration.
- Place the planer next to your jointer or workbench so you can move a board only a few feet between operations.
- Example: I set mine on a 30-inch-high bench beside the jointer; short 2x8s take two people and 10 seconds to transfer.
- Measure the machine footprint: common benchtop planers are 20–30 inches long, 12–16 inches wide; leave 3–4 feet in front for infeed/outfeed.
End with: leave 36 inches of clear space in front.
2) What to check on the machine before buying
Why this matters: specs predict how well the planer will cut and what projects you can handle.
- Motor power: choose 10–15 amp for hardwoods; 8–10 amp is fine for softwoods and light use.
- Maximum width: get a planer that handles at least 12 inches wider than your largest common board; for a 10-inch tabletop you’d want a 12–13 inch capacity.
- Cutterhead quality: spiral or helical heads stay quieter and give smoother cuts than straight knife heads; expect higher-cost replacement cutters but better surface finish.
Example: I swapped a 7.5‑amp, 12-inch unit for a 15‑amp, 13‑inch helical head model and dropped sanding time by half.
End with: check that replacement cutters are available locally.
3) How to operate one safely and effectively
Why this matters: planers can kick back and throw chips, so safe habits reduce injury and cleanup.
Steps:
- Wear eye protection and hearing protection.
- Use a push stick or push pad on short or narrow boards.
- Stand to the side of the infeed, not directly behind the board.
- Run dust collection into a 2–3 inch hose connection or at least use a shop vacuum.
Example: I run a 2.5-inch hose to my cyclone; it captures 80% of shavings and keeps the bench clean.
End with: never feed warped boards without jointing first.
4) When a benchtop planer makes practical sense
Why this matters: matching machine capability to your project load saves money and space.
- Choose a benchtop planer if you need moderate throughput, like a few furniture pieces per month, and you have limited floor space.
- If you routinely plane wide slabs, or you need high daily output, upgrade to a floor model.
Example: for weekend projects and occasional cabinet doors, a benchtop unit handled twelve boards a weekend for me without overheating.
End with: expect to replace knives or cutters after roughly 100–300 board-feet depending on wood species.
If you need one, prioritize a 10–15 amp motor, a 12–13 inch cutting width for most home projects, and a helical cutterhead if you value quieter, smoother cuts.
Recommended Products
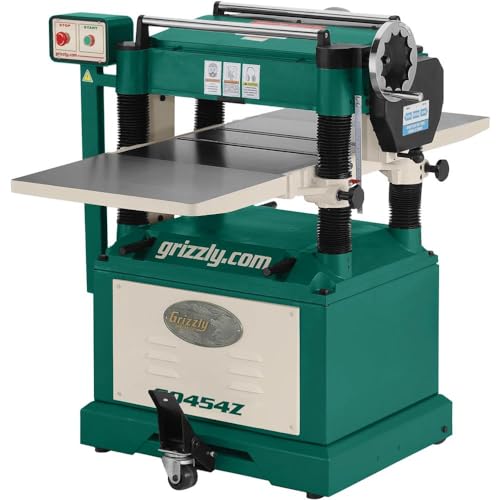
Motor: 2 HP, 220V, single-phase, TEFC capacitor start induction, 60 Hz, prewired to 220V; Amps: 10; RPM: 1725

Item may ship in more than one box and may arrive separately

Large 9" x 12" infeed table assembly extends the support area, and can be used in either horizontal or vertical positions
How Benchtop Planers Save Shop Space
Think of saving shop space like packing a weekend bag — you want the most useful stuff in the smallest space.
Why this matters: you can keep a full woodworking setup in a garage without losing floor room for a workbench. A benchtop planer sits on a shelf or compact stand so you free up floor area for a 6′ workbench or storage cabinets. Example: I put a 13″ planer on a 24″ deep shelving unit above my miter saw, which freed a 4′ × 2′ floor patch for clamps and standing work.
Before explaining how to place one, here’s how the planer saves space: compact dimensions and lighter weight let you store it vertically, mount it on a foldable stand, or tuck it on a high shelf. A typical 12–13″ benchtop planer is about 24–30″ long, 12–15″ wide, and weighs 40–65 lbs, so you can lift it to a 6′ shelf or move it onto a 24″ fold-down table. Example: my 13″ unit (28″ long, 14″ wide, 55 lbs) fits upright between two studs and clears a 6″ gap for hanging storage.
How to set yours up (steps):
- Measure the unit and your space. Measure the planer’s length, width, and weight, then measure shelf depth and wall stud spacing.
- Choose mounting: shelf, foldable stand, or vertical wall bracket. For shelving, pick a shelf ≥ 30″ deep for planers up to 28″ long; for foldable stands use a stand rated for ≥ 100 lbs; for vertical storage use a bracket that supports the weight and holds the unit securely.
- Prepare clearance: leave 24″ of infeed and outfeed room when planning temporary setup, or reduce to 12–18″ for short boards and space-limited shops. Shorter infeed tables mean less clearance needed when you only plane stock under 24″.
- Install dust collection: route a 4″ hose or 2½” hose adapter to a shop vac or cyclone; clamp it to the planer’s port so chips don’t fill your shelves.
- Test mobility: mount the planer on casters or a folding stand and move it through a work sequence to confirm it repositions in under 30 seconds.
Why vertical storage works: you use height instead of floor area, and the *planer’s* flat base and modest weight make upright storage safe when braced to studs. Example: I secured mine upright with two heavy-duty L-brackets at 36″ and 60″ high and it holds the planer steady while leaving the floor clear.
How to size your clearance precisely: measure the longest board you’ll plane and add the planer’s infeed/outfeed overhang. If you plane 8′ boards, keep at least 8′ + 24″ total length available; if you only plane 24″ scraps, 36″ total is fine. Example: for 8′ decking, I left a 9′ path—8′ board plus a 12″ safety buffer.
Quick checklist before buying:
- Check planer’s dimensions and weight.
- Confirm shelf depth ≥ planer’s length + 2″ lip.
- Choose a stand rated at 2× the planer’s weight.
- Plan dust collection with a 4″ port or adapter.
If you follow these steps, you’ll keep your shop compact without losing staging room for projects.
Benchtop Planer Cost vs. Floor Models
If you’ve ever stood in a tool aisle wondering whether to spend $300 or $3,000, this is why.
Why the price gap matters for your workshop
You need to match cost to how you’ll use the machine because your money buys capacity and time savings. A benchtop planer typically costs $200–$600; a used floor model runs $800–$2,500 and new professional machines can top $5,000. Example: if you’re flattening occasional 8/4 hardwood for a few weekend projects, a $400 benchtop handles 1–2 boards at a time and fits on a folding stand.
How the initial outlay affects your budget
You care about what else you can buy with the same money because a cheaper machine leaves funds for lumber and accessories. Step 1: Set a total workshop budget. Step 2: Allocate 40% to the planer if you plan heavy milling, 15–20% if it’s hobby use. Example: with $1,000 total, choose a $350 benchtop and spend $650 on good lumber and joinery tools.
How maintenance and repairs change the long-term cost
You should plan for service because larger machines have heavier-duty parts that also cost more to fix. Benchtops need occasional blade changes ($20–$80 per set) and bearings every few years; floor models may need motor servicing or belt replacements ($150–$500). Example: estimate yearly maintenance by hours — if you run the tool 200+ hours a year, budget $200–$600 annually for a floor model, versus $50–$150 for a benchtop.
How workspace needs influence your choice
You want a machine that fits comfortably in your shop so you actually use it. Benchtops require a bench or 2′ x 4′ clear area and fold down for storage; floor models need 6–10 sq ft plus infeed/outfeed space—plan for at least 10–12 ft of straight approach for ripping long boards. Example: in a 2-car garage with a workbench along one wall, a benchtop on a rolling stand will save space and keep the door usable.
When a floor model is the right investment
You should buy a floor model only if you’ll get the extra capacity and uptime. Specific signs: you plane thicker stock frequently, do long runs of boards, or charge for your work. Example: if you plan 10+ hours a week of milling, a $2,000 floor model will pay back through time saved and fewer passes.
When a benchtop is the smarter buy
You should pick a benchtop if your projects are occasional and your shop space is tight. Specific signs: hobby projects, under 5 hours a week of milling, or tight startup budgets. Example: a $450 planer on a mobile base lets you plane face-jointing and thicknessing for most small furniture and trim projects.
How to estimate long-term value in practical terms
You want a simple calculation to compare real cost over time because sticker price lies without hours and repair costs. Step 1: Estimate annual hours (H). Step 2: Add estimated annual maintenance (M). Step 3: Divide purchase price (P) plus 3-year total maintenance by 3, then divide by H to get cost per hour. Example: P=$2,000, M=$300/year, H=200 hours → ((2,000+900)/3)/200 ≈ $4.83/hour.
Practical shopping checklist before you buy
You should test and measure so you don’t regret the purchase. 1) Try a test board to check feed smoothness. 2) Measure the machine plus 6–8 ft of throughput room. 3) Ask about blade cost and availability. 4) Check motor horsepower: 1–1.5 HP suits benchtops, 3+ HP for heavy floor models. Example: if the dealer lets you plane a 8/4 oak offcut, you’ll see if the motor bogs or the finish is acceptable.
Final matching rule
You should match machine to your project volume and space because that gives the best return on dollars spent. If you plane less than 100 hours a year and have limited space, go benchtop; if you plane several hundred hours or run a small shop business, choose a robust floor model.
Recommended Products

Sanding motor speed: 1,725 RPM

MAXIMUM SUPPORT - Large, precision-ground cast iron table and extensions provide maximum workpiece support

POWERFUL 1HP MOTOR - 1HP motor and 0 degrees to 45 degrees mitering head provides flexibilty for workshop or industrial use. This saw is ready to handle tough materials with reliable performance
Benchtop Planer Performance for Hobbyists
Here’s what actually happens when you put a benchtop planer to work in your shop: it removes material evenly to a set thickness so your boards match one another.
Why that matters: matching thickness prevents gaps and wobble in projects. Example: when you plane five pine boards for a 24″ wide tabletop, getting them all within 0.005″ of each other keeps glue joints tight.
1) What a benchtop planer will do for you
- It flattens and sizes stock to a controlled thickness so pieces glue and fit.
- Real-world example: you can take a 1″ rough-sawn board and turn it into a uniform 3/4″ piece by removing 1/4″ in multiple passes.
How to use it (steps):
- Measure the board thickness with calipers or a tape; record the starting thickness.
- Set the planer to remove no more than 1/16″ per pass for hardwoods and 1/8″ for softwoods.
- Support the infeed and outfeed ends so the board doesn’t dip; use a pair of roller stands or 2x4s at table height.
- Feed the board with the grain and keep firm, even pressure on the feed handles.
- Check thickness after each pass until you hit your target.
Ergonomics and safety matter because setup time and mishaps cost you time and lumber. Example: on a 3-board project, a loose infeed can tilt a board and ruin 6″ of edge.
- Pay attention to feed handles, infeed/outfeed support, and adjustment knobs — they determine how quickly you can change settings.
- Use hearing protection and consider a simple acoustic panel or a small muffler on the motor to reduce noise to under 85 dB at three feet.
What results to expect
- After light passes (1/32″–1/16″), the surface is usually smooth and ready for sanding.
- For deep stock removal (more than 1/8″), plan on several passes; each pass should leave about 90–95% of the surface with clean cuts, with the remaining tearout removed by a final light pass.
Practical tip: to avoid snipe, support the trailing end with a sacrificial board the same thickness as your workpiece; clamp it to the outfeed. Example: when planing a 48″ oak board, that sacrificial board prevents a 1/4″ deep gouge at the end.
Bottom line: a benchtop planer gives you consistent thickness, manageable noise, and decent surface quality if you take measured passes, support the work, and use basic hearing protection.
Recommended Products

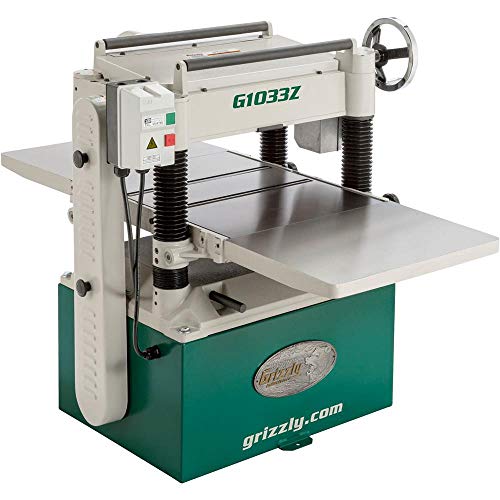
Serrated Infeed Roller - The serrated infeed roller and pressure bar are mounted close to the cutterhead to virtually eliminate snipe

JET BLACK PERFORMANCE COATING: Coated cast iron tables resists corrosion, reduces friction, and eliminates the need for waxing/polishing

Heavy-duty, ball bearing board return rollers
Cutterheads and Features That Improve Cut Quality

Before you pick a planer, know why the cutterhead matters: it controls how cleanly your wood is cut and how much sanding you’ll have to do afterward.
Think of the cutterhead like the engine of a car: if it’s designed well, everything runs smoother. Spiral cutterheads use many small, indexed knives that slice fibers instead of tearing them; you’ll get a quieter machine and a finish that often needs only light sanding—about 120–180 grit—after a single pass. Example: when you plane a knotty pine board with a spiral head, the grain gets cut cleanly and you avoid the tear-out that would show up on the next face.
Why spiral heads save money: they use small replaceable knives, so when one dulls you replace a single blade instead of resurfacing or replacing a whole blade set; that usually costs $10–25 per insert rather than $50–150 for full knives. If you plan a lot of hardwood, that means one bad spot doesn’t shut down a job.
Before you change feeds or cutters, here’s why variable speed matters in one sentence: it lets you match cut aggressiveness to the wood so you reduce tear-out. Practical steps:
- Start at a slower cutter speed (for example, 1,000–2,000 RPM equivalent) when you plane figured or cross-grain stock.
- Increase speed in 500 RPM increments until you hear chatter or see tear-out.
- If you need faster stock removal, raise feed rate while watching the surface.
Example: on curly maple, use the slowest cutter setting and a light pass (0.5–0.8 mm) to keep the flame pattern clean.
Look for these specific features and what they do:
- Helical knife geometry: provides uniform chip removal, so you get consistent shavings instead of long ribbons; on oak, that means fewer clogged cutters.
- Hardened bearings: keep the cutterhead stable; expect less runout, usually under 0.01 mm if bearings are good.
- Easy-access knife clamps: let you change a blade in 5–10 minutes with simple tools, so maintenance stays quick and safe.
Short practical checklist before you start a job:
- Choose a spiral or helical cutterhead for fine finishes.
- Carry spare indexed knives (buy a pack of 10–20 if you plane weekly).
- Set variable speed low for figured woods and test on a scrap.
- Tighten or check bearings and clamps; aim for <0.01 mm runout.
If you follow those steps, you’ll save time sanding and you won’t need to replace whole knife sets as often.
Recommended Products
Board return rollers
Motor: 5 HP, 230V, single-phase, 23A

Digital readout for infeed table height
Avoiding Snipe, Tear-Out, and Other Problems
If you’ve ever had a perfectly planed board ruined by a nick at the end, this is why.
Why it matters: a snipe or tear-out can make a board unusable for a visible surface or a tight joint. I’ll show you practical fixes you can use right away.
Snipe: what causes it and how to stop it
Why it matters: snipe leaves short depressions at the board ends that you can feel and see after finishing.
Real-world example: on a 6-foot pine tabletop I planed, both ends developed 1/8″ deep snipes after a push-pull pass.
Steps to prevent snipe:
- Support both infeed and outfeed. Place a 36″ auxiliary board aligned with the bed so the board never drops at either end.
- Lock the workpiece. Use 1–2 clamps at the outfeed to prevent lift when the cutterhead reaches the end.
- Take a light final pass. Reduce depth-of-cut to 1/64″–1/32″ for the last pass; that single light pass often eliminates snipe.
- Feed with consistent pressure. Push straight and steady; avoid tilting the board.
- If snipe persists, shorten your pass so the damaged ends are cut off later. Cut 1/2″–1″ from each end after planing.
Tear-out: why it happens and exact fixes
Why it matters: tear-out ruins the grain surface and requires more sanding or replacement of the board.
Real-world example: when planing walnut with mixed grain, a 12″ section tore out ahead of the cutterhead leaving 3/32″ high torn fibers.
Steps to reduce tear-out:
- Sharpen or replace blades. Aim for a blade edge angle recommended by the manufacturer, usually 25°–30°.
- Consider a spiral or helical cutterhead. Swapping to a helical head cut that walnut with near-zero tear-out on the next pass.
- Align blades carefully. Set each blade so cutting edges sit exactly on the same radius—use feeler gauges or the maker’s shim kit.
- Adjust depth of cut. Limit to 1/32″–1/16″ per pass on figured or cross-grain boards.
- Feed the board with the grain running into the cutter as much as possible; if grain goes uphill, flip the board so you cut downhill.
Feeding technique and handling
Why it matters: how you feed affects both snipe and tear-out on every pass.
Real-world example: I stopped mid-pass on a 4-foot oak, which caused a 2″ torn patch that needed filling.
Steps to better feed:
- Maintain steady pace—about 2–3 feet per second for most hardwoods.
- Don’t stop mid-pass; if you must, finish the board, then refeed from the other end.
- Orient the board so the cutter meets the grain in a downhill direction when possible.
- Use hold-downs or featherboards for long, narrow pieces to keep them flat against the table.
Routine checks and small adjustments
Why it matters: small, regular checks catch problems before they cost a board.
Real-world example: a quick blade-height check before a batch run saved me from ruining six cabinet doors.
Steps to check:
- Inspect blade sharpness and nick-free edges before each session.
- Verify blade alignment every 10–20 board passes.
- Check bed and table for debris and remove it with a brush or compressed air.
- Re-test depth-of-cut on scrap before running your good stock.
Quick reference (keep this near the machine)
- Support both ends with an auxiliary board.
- Final pass: 1/64″–1/32″.
- Tear-out safe cut: 1/32″–1/16″ per pass on figured wood.
- Feed speed: ~2–3 ft/s.
- Check blade alignment every 10–20 passes.
Follow those concrete steps and you’ll avoid most snipe and tear-out problems without guessing.
Recommended Products

Fits: POWERTEC, Delta, Porter Cable 12-1/2-inch planers; replacement for Porter Cable 1342143 Planer lock bar

Planer Blade Holders Replacement for 3-1/4" Wood Planers Which Use 82x5.5x1.2mm Reversible Blades
Setup, Maintenance, and Best Projects for Small Shops
If you’ve ever set up a tiny workshop, this is why location and upkeep matter.
Why it matters: proper placement and routine care keep you safe and save time. I put my benchtop planer within 6 feet of a grounded outlet so the cord doesn’t cross walkways, and I leave infeed and outfeed support equal to the longest board I’ll plane — in my case 8 feet each. For example, when I flattened an 8-foot live-edge maple slab, having that full-length infeed and outfeed saved me from juggling the ends and gouging the face.
How to position and mount your planer
Why it matters: a stable, level machine gives consistent passes.
- Place the planer on a bench or stand 34–36 inches high for comfortable feeding.
- Leave at least the full length of the longest stock free in front and behind the knives (so for 8-foot stock give 8 feet in each direction).
- Bolt the planer to the stand with four 3/8-inch bolts and lock washers; use metal-to-metal mounting points if the stand is metal.
- Level the stand with shims under each leg until a 2-foot level reads true across the table.
Real-world example: I bolted my planer to a plywood-topped steel stand and shimmed one leg 1/8 inch to stop a subtle roll that was causing taper.
If you’ve ever fed a board and lost control, this is why sightlines and dust collection matter.
Why it matters: clear visibility and dust capture keep feed consistent and reduce fires. I run a 2-1/2 inch hose into the planer port with a hood adapter and keep the drop below 6 feet to maintain suction. For example, when I planed rough oak, hooking up the dust hood cut airborne chips so I could see the edge and avoid kickback.
Dust collection and feeding tips
Why it matters: consistent suction keeps the cut surface visible and the knives clean.
- Connect a 2–3 inch diameter hose directly to the planer port; use a 45-degree sweep or a hood to reduce clogs.
- Keep the hose fall angle under 30 degrees from horizontal and total drop under 6 feet.
- Feed boards at a steady pace — for a 12-inch-wide board, aim for 12–20 feet per minute of surface travel (push at a steady, medium rate rather than thrusting).
Real-world example: switching from a flexible ribbed hose to a smooth 2-1/2 inch PVC adapter improved suction and stopped a backlog of chips that had been jamming my infeed.
Before you plan on maintenance, you need to know the simple schedule that prevents problems.
Why it matters: small, regular tasks stop big repairs and maintain surface quality. I clean chips after every session, check knives every 5 hours of cutting, oil moving parts monthly, and verify belt tension every three months. Once, cleaning chips after a long cypress run prevented a clogged feed roller that would have needed disassembly.
Routine maintenance steps
Why it matters: following these numbered steps keeps the planer reliable.
- After each use: clear chips from the bed and throat with a brush and vacuum; remove any stuck pieces with a wooden stick to avoid nicking knives.
- Every 5 hours of cut time: inspect knife edges; replace or sharpen when you see burn marks or need more than two passes to remove 0.010 inch.
- Monthly: apply 3–4 drops of light machine oil to bearings and the blade-change mechanism; wipe excess with a rag.
- Quarterly: check drive belt tension — a properly tensioned belt deflects about 1/2 inch at center with moderate thumb pressure; adjust per the manual.
Real-world example: I skipped monthly oiling once and a pivot seized; a quick monthly drip would have kept it moving smoothly.
The fastest way to get value from a small planer isn’t mystery projects — pick tasks that match the tool.
Why it matters: using the planer for the right jobs saves time and produces better results. I use mine for dimensioning rough lumber to final thickness, flattening tabletops in stages, and preparing cabinet stock at final thickness, because those tasks benefit most from a benchtop planer. When I needed cabinet sides, planing the boards to final thickness before jointing cut my glue-up time in half.
Projects you should do first
Why it matters: these three project types give the biggest payoff.
- Dimension lumber: plane to within 0.010–0.020 inch of your target thickness before jointing faces.
- Make flat tabletops: use jointing and then light planing passes of 0.005–0.010 inch to remove snipe and get a uniform surface.
- Prepare cabinet stock: plane all pieces to the same thickness (±0.005 inch) before cutting joinery.
Real-world example: I milled rough poplar to 3/4 inch for cabinet doors, then matched all faces to within 0.003 inch so the doors hung without shim adjustments.
Final quick checklist
Why it matters: one glance saves setup time and prevents mistakes.
- Power within 6 feet, repeatable infeed/outfeed lengths, and secure mounting.
- Dust hose 2–3 inches, drop under 6 feet, smooth sweep.
- Clean after use, knives checked every 5 hours, oil monthly, belt tension quarterly.
Do the checklist and you’ll get predictable, safe results every time.
Frequently Asked Questions
Can Benchtop Planers Handle Exotic Hardwoods Like Ebony or Teak?
Yes — I can plane exotic hardwoods like ebony or teak, but I’ll watch stability concerns closely and prioritize proper blade selection, take light passes, use sharp cutters, and stabilize stock to avoid tear-out or motor strain.
Do Benchtop Planers Require a Dedicated Dust Collection System?
Short answer: no—it’s not mandatory, but I’d strongly recommend one. To keep dust management effective and reduce cleanup, I use a shop vac and muffler/silencer for noise reduction; it keeps my shop cleaner and safer.
Can I Use My Benchtop Planer Outdoors in Humid Climates?
Yes — I can use a benchtop planer outdoors in humid climates briefly, but I won’t leave it exposed; outdoor storage and regular rust prevention (oil, covers, desiccants) are essential to protect cutterheads and cast parts.
Are There Safety Accessories Specifically for Benchtop Planers?
Absolutely — I use push blocks and featherboards forends, plus a dust port, blade guard, and hearing protection; they’re lifesavers! I also recommend riving knives, push sticks, and anti-kickback pawls for safer planing.
How Do Warranty and Customer Support Compare Between Brands?
I find warranty transparency varies widely: premium brands list clear terms and longer coverage, while budget makers hide limits. Support responsiveness matters—some respond fast with parts and guidance, others leave you waiting, phone calls ignored.


