
You clamp a glue‑up, tighten, then find a gap where the joint should be solid — why won’t the faces sit flush? You plane a board to “roughly” the same thickness and wonder why clamps pull one edge tight while the opposite side lifts. Most people assume approximate thickness and visual alignment are good enough, and miss that inconsistent faces and reference surfaces cause the failure.
This introduction will show exactly how repeatable thickness gives true parallel faces, predictable joints, and full‑face glue contact so your clamps draw faces together evenly. You’ll get specific setup steps, quick measurement checks, and simple jig ideas. It’s easier than it seems.
Key Takeaways
If you’ve ever clamped boards with gaps, this is why.
Why it matters: matching face-to-face thickness keeps glue lines tight so your assemblies don’t rock. Example: when you glue an eight-foot table top from six boards, boards with the same thickness sit flush and the top stays flat.
1) Make both faces parallel and repeatable so mating boards sit flush when clamped. Use a jointer plus a planing setup or a sled on the planer to get parallel faces. Aim for ±0.005–0.010″ thickness tolerance across all boards.
Why it matters: consistent thickness makes joinery fit predictably and reduces hand-fitting. Example: when cutting tenons for a chair rail, equal-thickness rails drop into mortises without shimming or trimming.
2) Cut parts to the same target thickness before fitting joinery. Steps:
- Pick a final thickness, for example 3/4″ (0.750″).
- Surface one face flat on a jointer or reference table.
- Thickness-planer the opposite face until you hit 0.750″ within ±0.005″.
- Measure at three points (near each end and the middle) and use shims or a sled to remove any high spots.
Why it matters: holding tight tolerances produces even glue squeeze-out and uniform clamp pressure for stronger bonds. Example: edge-gluing boards for a cutting board, consistent thickness prevents gaps and gives a single continuous surface after sanding.
3) When you glue up, clamp for even pressure by matching part thickness. Steps:
- Lay boards face down on a flat reference surface.
- Check thickness at three points per board with calipers.
- Use cauls and evenly spaced clamps; adjust clamp force until you see consistent squeeze-out along the seam.
Why it matters: preventing twists and high spots avoids misaligned joints that weaken assemblies. Example: a bookshelf side with a high shoulder will misalign multiple shelf dados, making the shelves sit out of level.
4) Prevent twist and high spots by measuring and correcting before final assembly. Steps:
- Set a stop or fence on your planer or use sleds for short boards.
- Recheck three-point thickness after each pass.
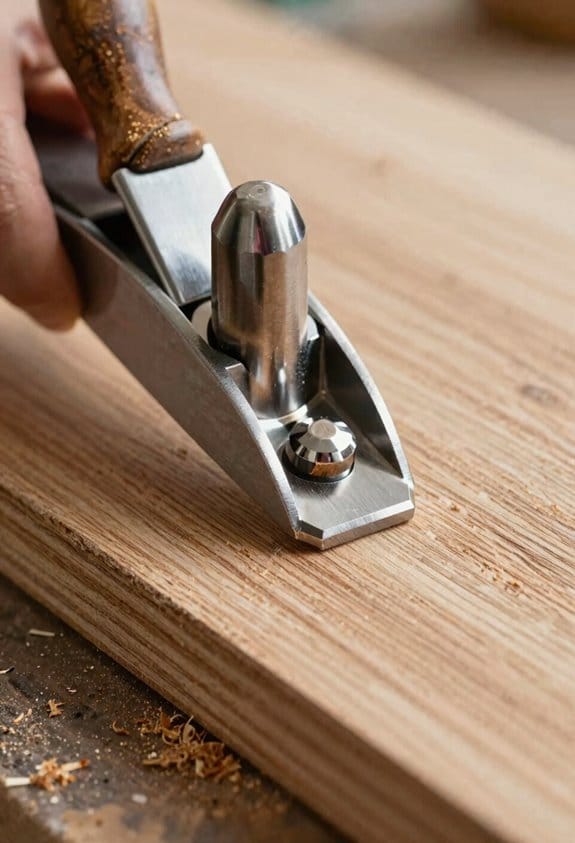
- Remove tiny highs with a low-angle plane or by a light sanding pass; correct bigger highs on the planer.
Why it matters: stable, repeatable thickness reduces seasonal movement mismatch so joints don’t cup or stress over time. Example: matching thickness of frame members for an exterior door helps the door stay square through humidity changes.
5) Keep stock stable before assembly: acclimate wood for 48–72 hours in your shop, then set your target thickness and batch-process similar boards together. Use bold-faced notes on cut lists to mark the target thickness so you, and anyone helping, hit the same number.
How a Thickness Planer Makes Parallel, Predictable Stock
If you’ve ever stared at a warped, rough board and wondered how to make it usable, this is why: a thickness planer takes one flat face and makes the opposite face parallel so your pieces all match.
Why this matters: when your boards are parallel and predictable, joinery fits better and glue-ups clamp true. Example: you plane five rough-sawn boards to 3/4″ and they all stack without gaps for a table top.
1) Set up the planer for shallow cuts.
- Why: shallow passes cut cleaner and reduce tear-out.
- How: set the cutterhead to remove 1/32″ to 1/16″ (0.8–1.6 mm) per pass; feed at about 8–12 feet per minute.
- Real-world: when I run a 6″ wide figured oak board at 1/16″ per pass and that speed, the surface needs only light sanding.
2) Make sure boards move steadily.
- Why: steady infeed and outfeed keep edges square and thickness consistent.
- How: adjust the infeed and outfeed rollers so they just contact the board without lifting it; set table extensions flush within 1/16″ of the bed.
- Real-world: I once had a 48″ maple that snipe-marked until I raised the outfeed by 1/32″ and the problem disappeared.
3) Keep knives sharp and set.
- Why: sharp, correctly set knives cut cleanly and preserve intended dimensions.
- How: replace or sharpen knives when you see dulling (blunt feel, tear-out); use a gauge to ensure each knife is within 0.001″ of the cutterhead diameter.
- Real-world: swapping in a fresh set of blades on a 12″ planer turned a fuzzy cedar slab into a glass-smooth board that measured dead-on at 1/2″.
4) Plane after jointing one face.
- Why: jointing one face gives a stable reference, and planing the opposite face makes the board parallel and to thickness.
- How: 1) Joint one face flat. 2) Lay that face against the planer bed. 3) Plane to your target thickness in 1/32″–1/16″ passes.
- Real-world: after jointing face A of a rough poplar board, planing face B to 3/4″ produced five boards that fitted a bookshelf panel without shimming.
Practical tips you can use now:
- If you hear chatter, slow the feed by 20% or make a shallower cut.
- For figured or resawn stock, take 1/32″ passes and sand with 120–150 grit only if needed.
- Measure thickness at three points (near each end and center) after each pass; expect less than 0.010″ variance on a well-tuned machine.
Follow those steps and your planer will give you parallel, predictable stock ready for joinery.
Recommended Products

1" thick granite table bed

Set includes #3, #4, #5 and #6 hand planes

13 in. 2-Speed Thickness Planer, & Dust Hose Adapter
Why Consistent Thickness Matters for Joinery and Glue‑Ups
If you’ve ever tried gluing up boards that look the same but don’t sit flat, this is why.
Why consistent thickness matters for glue-ups
Why it matters: if your boards are the same thickness, the glue spreads evenly and clamps pull faces together without gaps.
Example: when you glue a 6″ wide tabletop from three boards planed to 3/4″ each, the joints close uniformly and you can clamp with two 12″ bar clamps at 200–250 lb each.
How to do it:
- Set your planer or hand-plane to the final thickness you want (for example, 3/4″ or 18 mm).
- Run all boards through, measure with calipers or a reliable ruler at each end and middle.
- Adjust and re-run any board more than 0.005–0.010″ out of tolerance.
If your stock matches to within that range, you’ll get tight glue lines and less sanding.
How matching thickness affects joinery alignment
Why it matters: matching thickness makes mortises, tenons, dowels, and biscuits align without shimming or re-cutting.
Example: when you cut tenons for a frame from stock planed to 1/2″ exactly, the shoulders sit flush and corner gaps are under 0.5 mm, so you don’t have to pare shoulders later.
How to do it:
- Thickness-joint all your frame parts to the same measurement before cutting joinery.
- Mark and lay out joinery after thicknessing so your reference faces are consistent.
If you skip this, you’ll spend time fitting one joint at a time.
Why grain direction and thickness go together
Why it matters: matching grain orientation and equal thickness helps parts expand the same way, reducing visible mismatches and stress.
Example: when you glue edge-grain boards for a cutting board with all grain running the same direction and each board at 3/4″, seasonal cupping is minimal and the board stays flat across humidity cycles.
How to do it:
- Arrange boards so their growth rings curve the same way when possible.
- Plane thickness uniformly, then glue, so faces contact evenly along the grain.
This reduces differential movement and visible gaps.
How consistent thickness reduces seasonal stress in joints
Why it matters: when thickness is uniform, joints share stress during humidity changes instead of one member bearing all the movement.
Example: a set of chair legs planed to the same final diameter and thickness keeps mortise-and-tenon shoulders from cracking over winters and summers.
How to do it:
- Thickness all parts for the chair before cutting mortises and tenons.
- Leave a 0.5–1 mm glue-gap allowance only for non-structural joints if you expect large seasonal changes.
Uniform members make joints last through repeated cycles.
Practical checklist before you assemble
Why it matters: a quick checklist prevents common mistakes that wreck glue-ups.
Example: before clamping a bookshelf top, you run this checklist and avoid a multi-hour re-fit.
Steps:
- Measure thickness at three points on every board.
- Re-plane any board out by more than 0.005–0.010″.
- Confirm grain orientation where it matters.
- Dry-assemble and clamp lightly to check for gaps.
- Proceed to glue when all measurements are within tolerance.
One last tip: keep your measuring tools accurate (calipers zeroed, ruler not nicked) and you’ll spend far less time sanding and fitting.
Common Joint Failures Caused by Inconsistent Board Thickness
If you’ve ever clamped a panel and found a hidden gap later, this is why.
Why it matters: uneven board thickness makes glue joints fail under normal loads, so your project looks bad and falls apart sooner.
When boards aren’t the same thickness, surfaces sit out of plane and clamps pull the high board down while the low board barely touches, causing uneven clamping and stressed glue lines. For example, when gluing a 24″ wide table top made from 5 boards where one board is 0.020″ thinner, you can get a hairline gap that never bonded along a 6″ stretch. Check mating faces with a straightedge and shim or plane until they’re within 0.005” over the joint length.
Uneven pressure during cure creates gaps where glue never bonded because pressure was unequal. I once glued a cabinet door where a 1/32″ thickness mismatch left a 2″ hidden gap; the door stayed square but flexed under load. Before you glue, stack the boards, clamp lightly, and run a drum sander or plane across the joint faces until you see no daylight between boards along the full edge.
Edges can rock and cause misaligned corners and weakened mechanical engagement in dowels or biscuits. If a dowel joint uses a 3/4″ dowel and one mortise sits 0.040″ high, the dowel takes point contact and the faces don’t clamp. Use a router jig or a drill press with a fence and verify face alignment with a square; adjust stock thickness so both faces sit flush within 0.010″.
In tight-fitting joinery, a thin member leaves point contact instead of full-face contact, reducing glue area and yielding joints that loosen under load. For instance, a thin tenon shoulder 0.030″ low will transmit load through a corner only, which can split under torque. Measure tenon faces with calipers and test-fit with assembly glue at the bench; you want continuous contact across the shoulder before final glue-up.
How to fix it—practical steps:
- Measure: use calipers or a dial indicator to check thickness at three points along each board.
- Flatten: plane or run boards through a drum sander to get them within 0.005″–0.010″ of each other.
- Test-fit: clamp dry and inspect joints with a straightedge and light behind the seam.
- Final clamp: when gluing, use cauls and even-pressure clamps; tighten in small increments to keep pressure even.
A real example: I had a glue-up for a 36″ wide butcher block where two center strips were 0.012″ thinner; I ran them through a planer set to remove 0.015″ across both faces and then did a dry clamp—no gaps and the finished top stayed flat.
If you keep your board thickness consistent to the thousandths of an inch level for small joinery and within a few thousandths for larger panels, your joints will stay tight and strong.
Recommended Products

ULTIMATE STORAGE: This 72-inch tool chest with wheels comes with 15 drawers(3 large and 12 small), 3 upper cabinets, and a pegboard, which provides a decent amount of storage space to keep a variety of tools organized.

【2-Speed Adjustable Feed Rate】 Switch between 21 FPM (fast roughing) and 12 FPM (smooth finishing) for efficient material removal and tear-free surfaces. Perfect for hardwoods like oak, maple, and softwoods.

Compact with less weight for easy transporting to the jobsite
Jointer + Planer Workflow to Fix and Prevent Failed Joints
Here’s what actually happens when you prep faces for glue joints: if one face is flat and the opposite is parallel to it, your boards will mate fully and your glue joint will hold.
Why this matters: without flat, parallel faces you’ll get gaps at the glue line and joints that fail under stress. Example: two 8/4 oak boards glued to make a table top will split at the seam if one face cupped 0.5 mm over 1200 mm.
1) Flatten one face on the jointer.
- Set your jointer tables coplanar within 0.1 mm along the full bed—use a straightedge and feeler gauges or a digital indicator.
- Remove tabletop finish or thick glue lines first so the knives cut wood, not finish.
- Make light passes, 0.5–1.0 mm per pass, until a full-length straightedge sits flat with no rocking.
- Mark that face with a bright pencil X and label it “reference.”
Real-world example: I flattened a 6-foot walnut board by taking three 0.7 mm passes on the jointer; the straightedge showed no gap across 1800 mm afterward.
Before you plane, you need to know that the planer copies the reference face to the other side.
2) Plane the opposite face to thickness and parallelism.
- Measure target thickness with calipers at several points and set the planer table for a first cut of 1–2 mm.
- Feed with the jointed face down so the planer makes the opposite face parallel to your reference.
- Work in 0.5–1.0 mm incremental passes until every spot measures within 0.2 mm of target thickness.
- Check at the edges with a square; if the edge is out by more than 0.5 mm over the board length, skim the jointer again.
Example: For a 25 mm final thickness, I cut to 26.5 mm in three passes, then finaled at 25.0 mm; caliper checks at four points read 25.0, 25.1, 24.9, 25.0 mm.
3) Prevent cupping and failed joints with maintenance and checks.
- Clean chips and resin from the planer table and infeed/outfeed rollers after every session.
- Check knives: remove and inspect yearly or after every 40 hours; replace or sharpen if you see nicks larger than 0.1 mm.
- Verify the planer table is flat and parallel to the cutterhead using a straightedge and feeler gauge; adjust to within 0.15 mm clearance.
Real-world example: After cleaning resin build-up and replacing slightly nicked knives on my planer, a batch of kiln-dried maple boards that previously cupped now stayed flat and glued without gaps.
Follow these steps and you’ll remove much of the variability that causes failed joints: one flat reference face, a planed parallel face, and simple maintenance checks.
Recommended Products

MAXIMUM SUPPORT - Large, precision-ground cast iron table and extensions provide maximum workpiece support

54 four-sided carbide inserts provides smoother, quieter cutting and a superior finish

VARIABLE SPEED: Electronic infinitely-variable speed from 40 to 3200 RPM
Jigs for Consistent Thickness: Sleds, Fences, and Stop Blocks
If you’ve ever tried to feed thin or warped stock through a cutter and gotten wild thickness variation, this is why.
Why it matters: inconsistent thickness ruins fit and finish and wastes material.
1) Use a sled for flat support and consistent thickness
Why it matters: a sled keeps thin or bowed pieces supported so the cutter contacts them evenly.
Real-world example: when you run 1/8″ maple veneer through a router sled, the veneer doesn’t sag and you get an even pass instead of a scalloped edge.
Steps:
- Cut a sled base from 3/4″ plywood sized 1″ larger than your longest workpiece on each side.
- Attach a sacrificial fence at 90° using four 1″ screws, countersunk and plugged.
- Shim the workpiece with 0.005″ feeler gauges under any gaps until it sits flat against the sled.
- Lock the sled to the table with two toggle clamps, spaced about 12″ apart.
- Make one test pass at cutting depth, then measure thickness at three points with calipers; adjust shims if any point differs by more than 0.010″.
Tip: if the sled twists, add a 1/2″ stiffener strip across the bottom.
2) Set and check a fence so your long edges cut true
Why it matters: a square, straight fence prevents drift and keeps repeated passes identical.
Real-world example: ripping a 48″ bookshelf side against a misaligned fence gives you one bowed edge and a lot of sanding.
Steps:
- Use a known straight edge (a 48″ machined straight bar or a long steel ruler).
- Place the straight edge against the fence and sight for gaps; use a 0.002″ feeler gauge to find any high spots.
- Loosen the fence, tap it with a wooden mallet until the straight edge seats flat, then lock the fence.
- Make two test cuts on scrap at full length and measure width at both ends; if they differ by more than 0.015″, repeat adjustment.
Tip: for consistent reference, mark the fence with a permanent line at the centerline of the blade.
3) Use stop blocks to make identical parts without remeasuring
Why it matters: stop blocks let you repeat the same length or location dozens of times with minimal setup.
Real-world example: cutting ten dowel spacers for a jig—set the stop once, and every piece is the same length.
Steps:
- Clamp a stop block to the fence using a parallel clamp; position it 3/4″ from the blade for the first test cut.
- Cut one sacrificial piece and measure to the stop with a tape or calipers.
- Adjust the stop by the measured error; reclamp and cut a second sacrificial piece.
- When two consecutive pieces match within 0.010″, run the production pieces.
Tip: secure the stop with a 1/4″ steel pin through the fence for high-volume runs.
Final checklist before you run a batch
Why it matters: a quick checklist stops small errors from becoming big ones.
Real-world example: before a 20-piece run on a router table, this checklist cut rework by half.
Steps:
- Sled secured and shimmed.
- Fence checked with straight edge.
- Stop block clamped and verified with two sacrificial cuts.
- Measure first production piece with calipers.
If any item fails, stop and correct it.
Recommended Products

Versatile Slab Flattening Jig features 3.5 inch diameter carriage; designed for standard 3-1/2 inch routers such as 690/890, 610/618, 1617/1618, 1754X/28190/28084, HE041(57368), and RT1322-00 models

86" MAXIMUM CAPACITY: Surfaces slabs, live edge stock, butcher blocks, and wide panels up to 86" wide. Handles jobs that are impossible for a planer or belt sander.

SAVE TIME AND MONEY ON WOODWORKING – Use a Slab Jig to level your woodworking projects without the high cost of a CNC machine! Cut your wood slabs down to size while saving time and money!
Measuring Repeatability: Tools, Tolerances, and Quick Checks
Here’s what actually happens when you set up measuring tools for a run: if your tools aren’t consistent, your parts won’t be either. You want repeatable measurements so you don’t scrap parts or chase phantom errors.
Why this matters: inconsistent measurements waste material and time. Example: you plane 20 table legs and half are too short because the planer drifted by 0.015″.
1) Which tools to keep on the bench and why
Why this matters: knowing which tools do which job keeps you from measuring the wrong thing. Example: measuring tenon thickness with a rule instead of calipers led me to loose-fitting joints on a bookshelf.
Steps:
- Keep calipers (digital or dial) for feature widths and depths down to 0.001″.
- Use a dial indicator for repeatable setup checks on fences and stops; it shows runout to 0.001″-0.002″.
- Have a 12″ steel rule for rough layout and quick checks to ±0.02″.
- Use thickness gauges (feeler or sheet) for shims and gaps of 0.001″–0.010″.
2) How to calibrate quickly before a run
Why this matters: calibration removes bias so your first part is correct. Example: before cutting drawer fronts I zeroed calipers on a gauge block and avoided a batch of oversize parts.
Steps:
- Zero your calipers on a clean 1.000″ gauge block or use their built-in zero on closed jaws.
- Check the planer by running a 0.020″ shim under the outfeed; measure the removed amount after a pass.
- Run the dial indicator across a known flat surface and note any offset; record offsets on a sticky note.
3) How to set realistic tolerances
Why this matters: tolerances matched to fit prevent overprecision and reduce rework. Example: mating a drawer to a case, I set drawer gap tolerances to 0.010″ and avoided sanding every piece.
Steps:
- For tight joinery (dovetails, precision tenons) set tolerances to ±0.002″–0.005″.
- For general furniture parts use ±0.010″–0.020″.
- For rough stock prep accept ±0.020″–0.050″.
4) How to apply statistical sampling for batches
Why this matters: sampling saves time while still catching problems early. Example: on a run of 100 shelf blanks I measured 10 at start, 10 at middle, and 10 at end and caught a drift after the middle check.
Steps:
- Measure 10% of the batch or at least 10 pieces, whichever is larger.
- Take three checkpoints: start, middle, end.
- If variation exceeds your tolerance, stop and recalibrate immediately.
5) Quick start/mid/end checks you can do in under five minutes
Why this matters: fast checks prevent hours of rework. Example: a five-minute mid-run dial indicator check revealed a fence that had shifted 0.010″ after a heavy cut.
Steps:
- Start: zero calipers, verify one known dimension, and record it.
- Middle: measure three random parts and compare to the recorded value.
- End: measure one final part and log the result for traceability.
Practical habits to keep repeatability high
Why this matters: small routines prevent big mistakes. Example: after I began storing calipers in a foam slot and cleaning jaws before use, my repeatability improved and my rejects dropped by half.
- Wipe measuring surfaces clean before every use.
- Keep a note of tool offsets on the bench.
- Replace or service a tool if it shows drift beyond the tolerances you rely on.
Follow these steps and you’ll catch problems early, keep parts consistent, and save time and material.
Recommended Products

High Accuracy and Precision - Groove Calipers are excellent tools in providing accurate markings to maintain exact measurements and hardened stainless steel construction. One lithium battery for over one year of normal usage.

Heavy-Duty - The Starrett Micrometer are made to last with quality materials that ensure durability and better work performance. It comes with an adjusting wrench and a smooth friction thimble for uniform pressure.

Heavy-Duty - The Starrett Tubular Inside Micrometer has rigid and lightweight rods, quick reading figures and lock nut. Extension rods are made of steel tubing and each rod is marked with length.
How Consistent Thickness Boosts Glue Contact and Long‑Term Stability
Before you glue, understand why thickness matters: uneven parts concentrate stress and make joints open over time.
When both faces are parallel and each member matches thickness, the glue line bears load evenly and gives you more surface contact. For example, when I glued a bookshelf back panel, planing both rails to 3/4” exactly stopped the shelf from sagging after months of use. Check thickness with calipers or a planer set to a repeatable stop — I set mine to 19.05 mm (3/4″) and test three spots per piece. Do that.
How do you get consistent thickness?
Why it matters: consistent thickness keeps surfaces flat so glue can bond across the whole joint.
- Jointed face, then plane to thickness: run one face through a jointer, mark the face, then set your planer to the target thickness and pass the board until that reading shows on your calipers.
- Use repeatable stops: clamp a sacrificial fence or use a planer stop to cut to the same depth every time.
- Measure in three places: near each end and the middle; aim for ±0.2 mm (±0.008″).
Real-world example: when I made a table apron, I measured each apron piece at the ends and center, corrected high spots with the planer, and the tabletop stayed flat rather than cupping.
How do you remove high spots and equalize contact?
Why it matters: high spots reduce contact area and create gap paths for moisture.
- Identify high spots with a straightedge or winding sticks.
- Mark with pencil, then take light passes on the planer or sand with a block until the straightedge shows consistent contact.
- Re-check with calipers at three points.
Example: on a door stile that rocked, removing a 0.5 mm high spot cured the twist and gave a full glue line.
What glue and clamping approach should you use?
Why it matters: consistent glue and pressure preserve the bond while wood moves.
- Apply a uniform bead or use a 0.15–0.3 mm wet film thickness; run a spreader across the surface once you’ve pressed the parts together.
- Use clamps spaced every 6–8 inches (150–200 mm) for boards under 3″ wide; wider panels need closer clamps.
- Tighten clamps until you see a thin, even squeeze-out — about a 0.25–0.5 mm line — then leave for the glue’s open time plus recommended clamp time.
Example: gluing a cutting board, I used 8 clamps at 100 mm spacing and 0.3 mm squeeze-out; the board stayed flat through seasonal humidity changes.
What about wood type and long-term stability?
Why it matters: species and grain orientation control movement after glue-up.
- Prefer quartersawn or stable species for panels you need to stay flat.
- Match thickness across mating parts and use the same species when possible.
- Let parts acclimate to your shop for 48–72 hours before final gluing.
Example: I rebuilt a window sill using quartersawn oak for the ledge and matching oak for supports; over two winters it barely moved.
Quick checklist before you clamp:
- Faces jointed and parallel.
- Thickness set to target within ±0.2 mm.
- High spots removed and verified with straightedge.
- Glue spread to 0.15–0.3 mm wet film.
- Clamps every 150–200 mm with even pressure.
- Parts acclimated 48–72 hours.
Follow these steps and your glue joints will have more contact and last longer.
Frequently Asked Questions
Can Inconsistent Thickness Hide Internal Moisture-Related Warping?
Yes — I’ll say inconsistent thickness can mask moisture migration effects, hiding dimensional stability issues; kiln drying effects may seem fine initially, but seasonal movement later reveals internal warping that uneven boards can conceal.
How Does Planer Tear-Out Affect Glue Surface Quality?
Planer tear-out roughens and crushes fibers, reducing glue contact and risking surface contamination; I always inspect and sand or re-planer light passes to restore a clean, smooth surface for reliable glue joints.
Can Planing Change Wood Grain Direction and Strength?
Yes — I’ll note planing can cause end grain reversal and subtle grain deviation, which can alter strength and glue absorption; I’ll avoid tear-out and reverse cuts, and plane carefully to maintain structural integrity.
What Maintenance Keeps a Planer Producing Repeatable Cuts?
I keep my planer repeatable by regular blade sharpening, adjusting feed rate, performing roller cleaning, and confirming depth calibration; I also check fences, lubricate moving parts, and tighten fasteners so cuts stay consistent and reliable.
Do Adhesives Behave Differently on Planed Vs Sanded Surfaces?
I once glued maple panels after planing and sanded oak elsewhere; adhesives behaved differently. I’ve found planed faces raise surface energy, boosting bond strength; sanded faces may need more prep for equally reliable glue joints.


