You’ve stood by a noisy workstation watching dust drift out from under a hood and wondered why the collector never seems to stop the cloud.
Maybe you’ve measured after-shift dust and still can’t explain why exposure limits are missed.
Most people assume simply adding a bigger fan or higher static pressure will fix the problem.
This piece shows exactly how placing hoods, arms, or capture guns inches from the source changes exposure, reduces cleanup, and cuts energy use.
You’ll get clear steps to size fans from face velocity and hood area and practical tips to simplify fire control and compliance.
It’s simpler than it looks.
Key Takeaways
If you’ve ever stood next to a grinding bench and felt the dust, this is why source capture matters: it stops contaminants before they spread, so your coworkers and equipment stay cleaner and you spend less time and money on cleanup.
- Regulators and occupational health studies pushed controls to the emission point so exposures drop reliably and long‑term illnesses go down; you get measurable reductions at the worker’s breathing zone when the capture hood is at the source. Example: a metal shop that added a small hood over a bench reduced respirable dust by 70% within weeks.
- Source capture prevents contaminated air from dispersing, lowering cleanup costs and protecting adjacent equipment and occupants; you avoid moving dust across the room when you trap it at the tool. Example: a paint prep area that used a fume gun cut floor wipe costs in half.
- Engineering practice shows hood proximity and proper capture velocity are efficient, often needing only 300–600 CFM for typical bench tasks, so you don’t have to oversize fans. Example: a lab using an articulated arm at 400 CFM captured solder smoke right at the board.
- Modular arms, fume guns, and backdraft tables let you capture diverse processes without moving workpieces, so you keep production flowing and still control emissions. Example: a fabricator swapped a modular arm between welders and saws to control smoke across three stations.
- Use this simple sizing rule: CFM = face velocity × hood area. First measure the hood face area in square feet, then pick a face velocity (for bench work, 100–300 fpm is common), and multiply to get CFM. Example: a 1.5 ft² hood at 200 fpm needs 300 CFM.
What Source Capture Is : And When to Use It
Think of source capture like putting a vacuum right where dust or fumes are made so they don’t spread through your workspace. It grabs particulates at the point of creation using hoods, arms, or extraction guns, which reduces worker exposure and protects your equipment.
Why it matters: capturing contaminants at the source prevents them from ever circulating in the room, so you lower exposure and clean-up costs. Example: when you sand a wooden tabletop with a 5-inch palm sander, a 4–6 inch hood placed 1–3 inches from the sanding surface and pulling 300–500 CFM will capture most of the dust before it drifts.
When should you use source capture?
Why it matters: using it at the right time saves money and health risks. Use it for tasks that create concentrated dust or fumes—welding, grinding, sanding, soldering, spray finishing. Example: for a bench welding job, mount a 6–8 inch flexible arm within 6 inches of the weld and run 400–600 CFM to catch welding smoke.
How to set up and operate source capture
Why it matters: correct setup and use determine how much contaminant you actually remove. Example: in a small fabrication shop, operators position a hood 2–4 inches from the cutting point, not touching the workpiece, and angle it to intercept the plume.
Steps:
- Choose the right nozzle size and arm length for your task (e.g., 4–8 inch hood for small hand tools, 8–12 inch for larger operations).
- Position the hood 1–6 inches from the source depending on tool power and plume size.
- Set fan speed to the required flow (check manufacturer or aim for 300–600 CFM for typical bench tasks).
- Turn the system on before starting the task and keep it running for 15–30 seconds after stopping to clear residuals.
- Train operators to hold the hood steady and watch for reduced capture when they move too far away.
Maintenance and checks you must schedule
Why it matters: a poorly maintained system loses capture power and puts everyone at risk. Example: in a busy shop, replace main filters every 3 months or sooner if you notice sparks, odors, or a 20% drop in airflow.
Steps:
- Inspect flexible arms and hoods weekly for cracks or loose fittings.
- Measure airflow monthly with a simple vane anemometer; record readings.
- Replace filters per manufacturer guidance or when pressure drop increases by 20–30%.
- Clean pre-filters and collection trays weekly in dusty operations.
Training your crew
Why it matters: even the best system fails if people don’t use it right. Example: show a new hire how capture drops when the hood moves from 2 inches to 8 inches—use a visible smoke source or incense stick.
Steps:
- Demonstrate correct hood placement and let each operator practice.
- Teach them to check airflow gauge before work and report changes.
- Run a quick refresher every 3 months and after equipment repairs.
When to combine source capture with other controls
Why it matters: some tasks still produce fugitive contaminants that need room-level help. Example: in a spray booth, use source capture plus a general ventilation system that provides 6–12 air changes per hour.
Practical takeaway: use source capture whenever you have a concentrated contaminant source, position hoods within a few inches, run 300–600 CFM for typical bench jobs, keep filters and arms maintained, and train operators with hands-on demos.
Recommended Products

Sandsmart control continuously monitors the load on the drum motor and automatically regulates the speed

INCLUDES: 9 Gallon portable dust extractor, poly filter bag (3M 95981), conductive hose (3M 95291), push handle (3M 96804), 2 x HEPA filter cartridges class H (3M 95259)
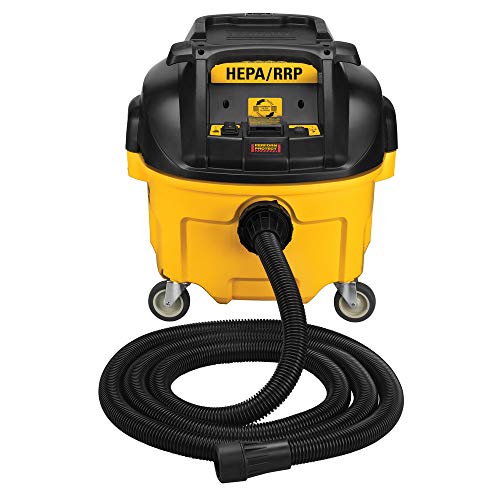
8 GALLON BASIC FEATURED DUST EXTRACTOR
Why Engineers Choose Source Capture: Risks, Energy, and Cost Benefits
If you’ve ever worked near grinding, sanding, or welding, this is why engineers pick source capture so often.
You want to keep workers healthy, and source capture does that by grabbing dust and fumes right where they’re made, before the particles drift into breathing zones. For example, a sheet-metal shop fitting a small hood over a grinder can cut airborne metal dust by more than 90% within the first few seconds, reducing respiratory exposure levels below occupational limits.
Why that matters: fewer exposures mean fewer long‑term illnesses and less time off work. One factory I visited saw employee sick days drop from 12 to 4 per year after installing local capture at three stations.
The system also reduces fire and explosion risks because it prevents dust from accumulating on surfaces and in vents. If you run a woodshop, think of a table saw with a close‑fitting shroud and a 2,000 CFM dust collector running directly to it — that setup removes sawdust before it settles and cut the chance of a flash fire. Inspect accumulations monthly and empty collectors when they reach 50% capacity to stay safe.
Before you install anything, know the energy tradeoffs and savings in specific numbers. Source capture usually needs 70–90% less airflow than whole‑room ventilation for the same emission control, so your fan power drops dramatically. For example, replacing a general exhaust that pulled 10,000 CFM with three local hoods drawing 1,500 CFM each cuts total flow from 10,000 to 4,500 CFM and can shrink your fan energy bill by roughly 50%.
How that saves money for you:
- Lower utility bills from reduced airflow.
- Less frequent maintenance because machines stay cleaner.
- Fewer repairs and less material waste from contaminated products.
- Easier regulatory compliance, which reduces fines and paperwork time.
A practical maintenance example: a bakery added local capture at its mixing stations and cleaned filter cartridges quarterly instead of monthly, saving two labor hours per week and $1,200 annually in replacement filters.
If you want to implement source capture, follow these steps so you don’t overspend or undersize equipment:
- Identify the emission point and measure plume size and velocity (use a handheld anemometer or hire a consultant).
- Select a hood that fits within 2–4 inches of the source for small operations, or a capture arm for larger moving sources.
- Size the fan so it provides the required capture velocity at the hood — aim for the manufacturer’s recommended 100–200 fpm across the hood face for dusts and 200–500 fpm for gases or fumes.
- Add a suitable dust collector or filter and set a maintenance schedule (inspect filters monthly at first, then adjust).
- Verify performance with a smoke test and periodic exposure sampling.
A real example to visualize: a small fabrication shop added three capture arms over welding benches, sized fans to 3,000 CFM total, and swapped filters every six months; after installation they cut weld fume complaint calls to zero and reduced energy use by about 40%.
You’ll get the best results when you keep hoods close to the source, match fan power to need, and maintain filters on schedule.
Recommended Products

EXPANSIVE FIELD OF VIEW: Capture vast landscapes, tight interiors, and dramatic perspectives with an ultra-wide 14mm focal length designed for full-frame mount cameras. Perfect for travel, cityscapes, and real estate shots.

STUNNING PORTRAIT PERFORMANCE: Capture beautifully isolated subjects with creamy bokeh and shallow depth of field. Perfect for portraits, weddings, street photography, and lifestyle shots with a natural 75mm perspective.

ULTRA-WIDE FULL FRAME COVERAGE: Capture an expansive 115.7° angle of view with edge-to-edge clarity. Ideal for landscapes, architecture, interiors, and astrophotography on Canon EOS R full-frame mirrorless bodies.
Key Source-Capture Components and Design Principles (Hoods, Arms, Backdraft Tables, Fume Guns)

If you’ve ever worked next to cutting or sanding and smelled dust or fumes, this is why.
I’ll start by telling you why source capture matters: it keeps contaminants out of your breathing zone so you and your team stay healthier and cleanup is easier. Hoods, modular arms, backdraft tables, and fume guns are the main tools you’ll see.
How hoods work and when to use them
Why it matters: a hood shapes airflow so the suction actually reaches the tool or workpiece instead of wasting energy.
Example: a small sheet-metal shop uses a 12″ by 18″ hood over a bench grinder and notices half the dust used to settle on nearby shelves; after adding a properly placed hood the shelves stayed cleaner.
1) Position the hood inlet within 6–12 inches of the source for hand work; 18–24 inches for larger stationary pieces.
2) Match hood size to the task: use a hood roughly the same width as the workpiece or slightly larger.
3) Aim for capture velocities of 100–200 feet per minute at the hood face for dusts, and 200–400 fpm for light fumes.
Good hoods are shaped to guide airflow and have adjustable openings so you can tighten capture on small parts. Keep the inlet unobstructed and check seals monthly.
Why modular arms matter and how to set them
Why it matters: arms let you bring the inlet to the exact spot you need, so you don’t have to move the workpiece.
Example: a CNC shop mounts an articulated arm over a router table; the operator swings the arm to each cut and captures chips before they spread across the floor.
Steps to use them:
1) Mount the arm as close to the work zone as practical — ideally within the same work envelope.
2) Keep the arm inlet 6–12 inches from the source; lock the joints once positioned.
3) Size ducting and fan to avoid excessive pressure drop — keep runs under 20 feet and use smooth bends.
Modular arms should be easy to reposition and have a quick-lock. Inspect the seals and swivel bearings every 3 months.
How backdraft tables capture contaminants
Why it matters: backdraft tables pull dust and particles down through the surface so they don’t become airborne across the shop.
Example: a woodshop installs a 4′ x 8′ backdraft table with 1/8″ perforations spaced every 1/2“; operators sand on the table and sawdust drops straight into the collection system.
Steps to set one up:
1) Choose a perforation pattern that gives you 6–12% open area for sanding and 12–18% for heavy dust-producing cutting.
2) Set fan suction to create 150–250 fpm through the perforated surface during sanding.
3) Use a pre-separator or cyclone before the filter to reduce filter loading.
Backdraft tables work best when you keep the workpiece centered and avoid blocking large portions of the table surface.
Why fume guns are useful and how to use them
Why it matters: fume guns capture emissions right at the operator’s hands, reducing exposure during tasks like soldering or gluing.
Example: an electronics bench fits a fume gun with a 3″ nozzle; techs hold it 2–4 inches from the circuit while soldering, and solder smoke no longer fills the bench area.
How to use:
1) Keep the nozzle 2–6 inches from the source, depending on the gun size.
2) Use flow settings: low for light fumes, medium-high for rosin or solvent-based work.
3) Mount the gun on a swing arm or stand so you can position it quickly and store it out of the way.
Fume guns need regular filter checks; replace filters when you see a pressure drop of 4–6 inches of water.
Design principles that tie everything together
Why it matters: following simple design rules means you use less fan power and capture more contaminants.
Example: a finishing shop rearranged three capture points so each inlet sat within 12 inches of its source and reduced overall fan speed by 30% while improving capture.
Rules to follow:
1) Keep capture points close — within 6–24 inches depending on task.
2) Minimize duct length and bends; each 90° bend equals about 5–10 feet of added equivalent duct length.
3) Aim for the right face velocity for the contaminant you’re controlling (see hood section for numbers).
4) Make adjustments easy: quick-locks, articulated arms, and accessible controls.
Good design cuts operating costs. Check performance with a smoke stick or simple velocity meter after installation and quarterly thereafter.
Recommended Products

PERFECT FOR BROADCAST: Designed as the perfect studio camera for ATEM switchers, this model has a 6K sensor up to 25,600 ISO, EF lens mount, HDMI out, SDI connections, 7" HDR LCD with sunshade, built-in color correction, built-in microphones, built-in hardware live streaming, and recording to USB disks.

EXTRACT-ALL WELDING FUME EXTRACTION ARM: The Extract-All Welding Fume Extraction Arm helps in directing hazardous smoke, dust, mist, and fumes away from industrial applications like welding, powder mixing, and more. It is prepared to match the industrial strength and durability. It is easy to move and has external supports and self-locking joints which helps it in being sturdy and easy to use.

PERFECT FOR BROADCAST: The perfect mini studio camera features a cinematic 4K sensor up to 25,600 ISO, Active MFT lens mount, 12G-SDI and HDMI, 3.5mm talkback, 7" LCD with sunshade, color corrector and recording to USB disks
Implementing Source Capture: Sizing, Placement, and Airflow Checklist

Before you plan a source-capture installation, you need to know why it matters: if you get sizing, placement, or airflow wrong, the system will just move contaminants around instead of removing them.
1) How do you confirm capture velocity and size the ducting?
Why it matters: capture velocity sets the fan and duct size that actually pulls contaminants into the hood.
Steps:
1. Determine required capture velocity at the hood lip — for general dust use 100–200 feet per minute (fpm); for light fumes use 100–150 fpm; for heavier mists or heat use 200–300 fpm.
2. Measure hood opening area in square feet, then calculate required volumetric flow (CFM = velocity (fpm) × area (ft²)).
Example: a 2 ft × 3 ft hood (6 ft²) at 150 fpm needs 900 CFM.
3. Size ducts to keep velocity between 3,000–4,000 fpm in straight runs to avoid settling, and calculate fan static using pressure drop for each bend (use ~0.5–1 inch wc per standard 90° elbow) and filter.
Example: three 90° elbows plus a 2″ filter ≈ 3.5 inches water column total static.
2) Where should you place hoods and arms?
Why it matters: distance and angle decide whether contaminants get captured before they spread.
Steps:
1. Position the hood lip within the recommended capture distance: 6–12 inches for high-velocity sources (e.g., soldering iron, 6 in), 12–24 inches for lower-energy sources (e.g., sanding bench, 18 in).
Example: when brazing on a workbench, mount a flexible arm so the hood lip is 8 inches from the joint, angled to face the plume.
2. Place arms so they don’t block workers: use articulated arms with quick-locks and set stops to prevent overreach.
3. Orient hood intake to face the main plume direction rather than toward open walkways.
3) How do you balance and tune airflow across zones?
Why it matters: uneven airflow makes some hoods underperform and others overdraw air, causing re-entrainment.
Steps:
- Divide the system into zones and measure CFM at each hood using a balometer or pitot tube.
- Install manual or motorized dampers in each branch for tuning and label their set positions.
- Tune so no hood exceeds its target by more than ±10%. Avoid branch velocities >5,000 fpm to reduce noise and re-entrainment.
Example: a three-hood line with targets 500, 900, 600 CFM — adjust dampers until each reads within ±10% under normal operation.
4) What maintenance and monitoring access do you need?
Why it matters: without access you’ll get performance drift and unexpected failures.
Steps:
- Provide access panels at filters and fan inlets sized at least 18×18 inches.
- Install static pressure taps before and after filters and record a baseline pressure drop (e.g., 0.5–2.0 inches wc depending on filter).
- Label ducts and runs with flow direction and zone ID.
Example: a paint booth system with a 1.2 inches wc baseline before the filter and filter change scheduled at 2.0 inches wc.
5) How do you test under real process loads?
Why it matters: lab numbers lie if real work changes the plume shape or debris load.
Steps:
- Run the full process with operators performing typical tasks while you measure hood capture using smoke or visible tracer and CFM at the hood.
- Adjust hood position, damper settings, or fan speed until capture meets the required velocity at the hood lip and CFM targets across zones.
- Document final settings and capture distances, and repeat verification quarterly or when processes change.
Example: during a grinding operation, you might need to move a hood from 18 inches to 12 inches and increase that branch CFM from 600 to 800 to stop visible dust escape.
Follow these concrete steps, record numbers, and you’ll have a system that actually removes contaminants instead of just shuffling them around.
Recommended Products

ENGINEERED — NOT A SHOP HACK: Custom brackets, secure latches, sealed fittings, and extensive testing create a refined, commercial-grade system. Includes Dustopper's X-Static, our static electricity elimination solution kit.

High Quality Construction: Crafted from premium pure aluminum material, this laminar flow hood boasts exceptional durability and corrosion resistance, ensuring a long-lasting performance in demanding industrial and laboratory settings.

FFU Industrial Filter Fan – Equipped with an aluminum blade fan rated at 706cfm, featuring a 3-gear switch for adjustable airflow. The fan operates with extremely low power consumption, effectively reducing costs and ensuring efficient performance
Source Capture for Compliance and Fire/Explosion Control

If you’ve ever watched dust settle on a workbench, this is why.
Why it matters: removing dust and fumes at the source stops them from spreading and forming combustible layers that can lead to explosions.
1) What is source capture and when to use it
Why it matters: dealing with contaminants before they leave the work area keeps you compliant and reduces ignition risk.
- Source capture means you put a hood, hooded arm, or backdraft table within 6–12 inches of the emission point so airflow pulls contaminants into a collection system before they disperse.
- Example: on a bench grinder, mount a small hood 8 inches from the wheel and run 500–800 CFM to capture metal dust as it’s created.
Takeaway: position capture devices close to the source and provide appropriate airflow.
2) Why point capture (hooded arms and backdraft tables) helps you meet regulations
Why it matters: regulators expect you to control emissions at the point of generation and to document controls.
Steps:
- Pick the right device: use an articulated hooded arm for moving work or a backdraft table for sheet cutting.
- Set distance: keep intakes 6–12 inches from the source for hooded arms; mount backdraft grills across the table surface.
- Target airflow: aim for 400–1,000 CFM per hood depending on source strength; measure with an anemometer.
Example: a laser cutter operator used a 10-inch hooded arm at 10 inches and 600 CFM to stop soot from settling on nearby conveyors.
Takeaway: choose the right capture style and record the intake distance and CFM.
3) How to size hoods and balance airflow
Why it matters: undersized hoods won’t capture, oversized fans waste energy and create turbulence that defeats capture.
Steps:
- Measure the emission area in square inches.
- Calculate face velocity: for particulate capture aim for 100–200 fpm at the hood face, for fumes 200–400 fpm.
- Compute CFM = face area (ft²) × face velocity (fpm).
Example: a 1 ft × 2 ft hood (2 ft²) aimed at 150 fpm needs 300 CFM; the shop installed a 350 CFM fan to allow for filter resistance.
Takeaway: use face velocity targets and add 10–20% for filter pressure drop.
4) Spark mitigation and locating traps/arrestors
Why it matters: catching sparks at the collection point prevents them from traveling into ductwork where they can ignite accumulations.
Steps:
- Install spark traps or arrestors immediately upstream of the filter or collector.
- Use rotary valves or drop boxes to avoid feeding sparks into fans.
- Ground ducts and equipment with continuous grounding straps every 20–30 feet.
Example: a woodworking shop added a mesh spark arrestor at the hood inlet and eliminated 95% of glowing ember events in the duct.
Takeaway: put spark mitigation where material first enters the system and ground continuously.
5) Testing capture efficiency and recordkeeping
Why it matters: tests prove your system works and supply regulators with the documentation they expect.
Steps:
- Perform a smoke test or use a particle counter at the breathing zone and at the hood face.
- Log intake distances, CFM readings, filter changes, and test dates in one binder or digital file.
- Retest after any hood repositioning, process change, or annually at minimum.
Example: a metal shop saved a compliance audit by showing a smoke test video and CFM log from the last 12 months.
Takeaway: test, log numbers, and keep evidence.
6) Integrating suppression and grounding
Why it matters: suppression and bonding reduce the chance an ignition will grow into an explosion.
Steps:
- Where required, connect automatic suppression to the collector and test quarterly.
- Bond and ground portable tools, hoods, fans, and ducting; measure resistance and record it.
- Use explosion vents on collectors sized by the vendor to match your maximum dust loading.
Example: a grain-handling facility added suppression to a collector and reduced incident damage in a small ignition event.
Takeaway: mix suppression, grounding, and vents based on hazard analysis.
Final practical checklist (use every time you set up capture)
- Place hood 6–12 inches from source.
- Target face velocity: 100–200 fpm for dust, 200–400 fpm for fumes.
- Size CFM = area × velocity and add 10–20% for pressure drop.
- Install spark traps at collection points and ground every 20–30 feet.
- Test capture with smoke or particle counters and log results.
- Add suppression/vents where hazard analysis or code requires.
If you follow these steps, you’ll reduce explosion and fire risk while staying aligned with regulatory expectations.
Frequently Asked Questions
How Often Should Source-Capture Filters Be Replaced?
About 70%-90% capture efficiency, and I’d replace source-capture filters every 3–12 months depending on usage; I watch filter lifespan and replacement indicators like pressure drop, visible loading, odors, or reduced airflow, then swap promptly.
Can Source Capture Handle Nanoparticles and Ultrafine Dust?
Yes — I can capture nanoparticles and ultrafine dust, but I often rely on HEPA filtration and encourage particle agglomeration pre‑collection so filters efficiently trap ultrafines; design and maintenance still determine real-world effectiveness.
What Are Typical Installation Costs per Workstation?
Costs vary: roughly $2,000–$8,000 per workstation for basic setups, $10,000+ for advanced systems. I factor equipment depreciation, installation logistics, and maintenance when estimating, and I adjust by industry and airflow needs.
How Does Source Capture Integrate With Existing HVAC Controls?
I integrate source capture with existing HVAC controls via building automation, coordinating duct fans and exhaust schedules; I monitor and adjust pressure balancing to maintain room airflow, preventing drafts while ensuring capture hood performance and system efficiency.
Are There Tax Credits or Incentives for Installing Source-Capture Systems?
Yes — I’ve found tax creditability overview varies by jurisdiction; incentive eligibility often depends on energy efficiency, emissions reductions, and safety codes. I’d check federal, state, and utility programs and document performance to qualify.